


| Availability | In Stock |
|---|---|
| Condition | Brand New |
TC426 WiFi to DMX time controller with the programmable time controller of the host computer, the load output can be changed with the change of time. Customers can customize the schedule mode they want through the PC host computer client or mobile APP client. Then download the required schedule to the controller through the USB port or wifi. In addition to the function of editing the schedule, the PC host computer and mobile APP client can also set the time for the controller, which is the synchronous clock function of the host computer. If users want to see the effect of the edited schedule, they can use the fast broadcast function of the host computer. The host computer is also equipped with a delete function. Once the delete function is executed, the mode name display area becomes blank. A programmable time controller with a host computer can control up to five loads of LED changes. The adjustment of the lighting change effect can be applied to plant lights, lightbox advertisements, stage setting, home decoration, etc.
Product Features
Customers can customize the schedule mode through the PC client or mobile APP client and can set the mode effect for a certain period of time. They can edit multiple modes and delete redundant modes. The edited modes can be previewed directly.
Technical Parameters
Working temperature: -20 to 60 ℃
Power supply voltage: DC 5 to 24V
Static power consumption: <1W
Net weight: 220g
Gross weight: 360g
Dimensions: 150MM * 78.5MM * 26MM
Packing size: 185MM * 180MM * 54.8MM
Output: standard DMX512 signal
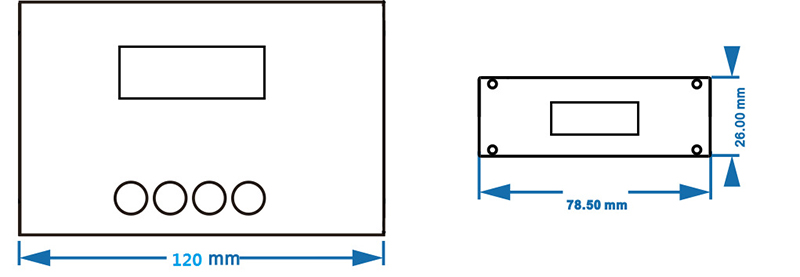
Interface description
Input interface:
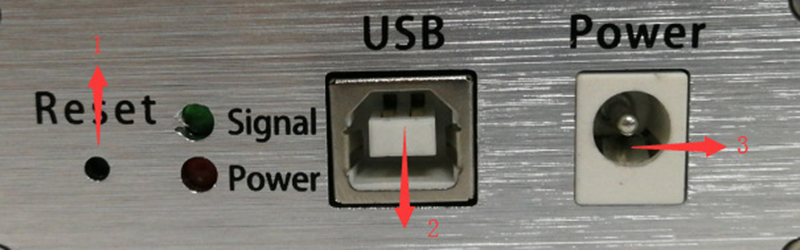
'1' It is a reset button. When the controller crashes, you can touch this button to reset, only for chip reset, not initialization reset.
'2' It is a USB signal access port. When the mode of the host computer is edited, it can be downloaded to the controller through the USB cable.
'3' DC plug, when the load power is small, you can choose this interface to the input voltage.
Output interface:
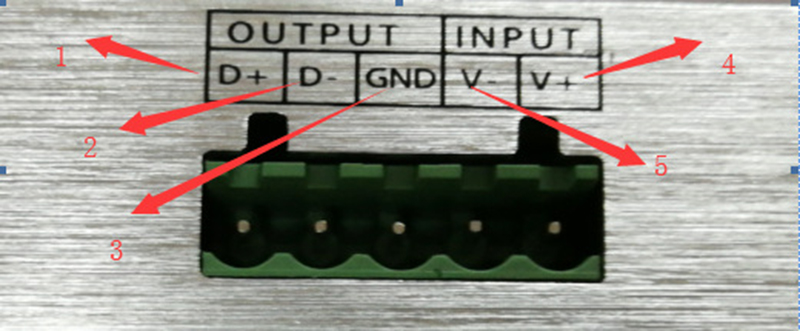
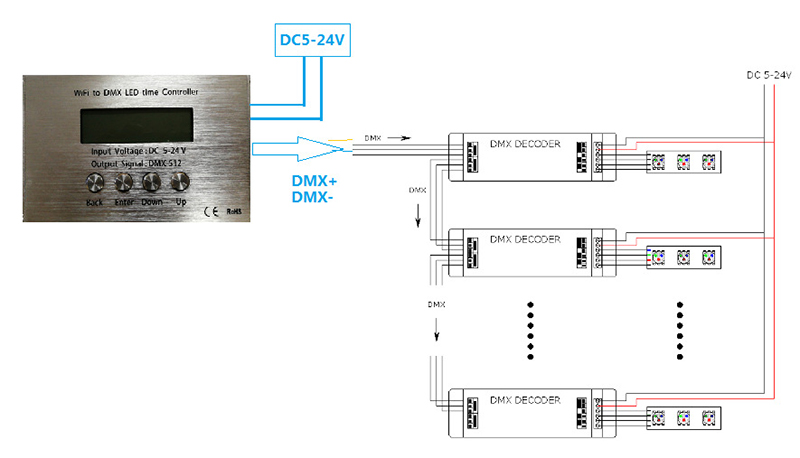
'1' Output positive pole for DMX
'2' Negative output for DMX
'3' DMX ground wire
'4' Power input positive
'5' Power input negative
Functional operation instructions
The controller has two modes of power-saving mode and settable mode and has four buttons of "Back", "Back", "Down" and "Up".
1.Wifi settings
Wifi has two modes:
AP mode: The mobile phone is directly connected to the controller for control. The wifi name of the timing controller is (SmartTime426 XXXX); long press the Back button to set the Wifi mode to AP mode. The display shows "Set: softAP... ", After setting, it will enter the normal display mode;
STA mode: connect the mobile phone to the router, and then control the timing controller through the router. You need to set up and join the network through the mobile phone APP; when you turn on the timing controller, the wifi will be initialized, and the display shows "Init: Wifi..." After completion, it will enter the normal display mode, wifi mode is the state of the last setting (AP or STA mode);
Mobile phone software instructions (support Android)
The APK file in the download CD is installed on the mobile phone. After installation, the mobile phone software operates as follows:
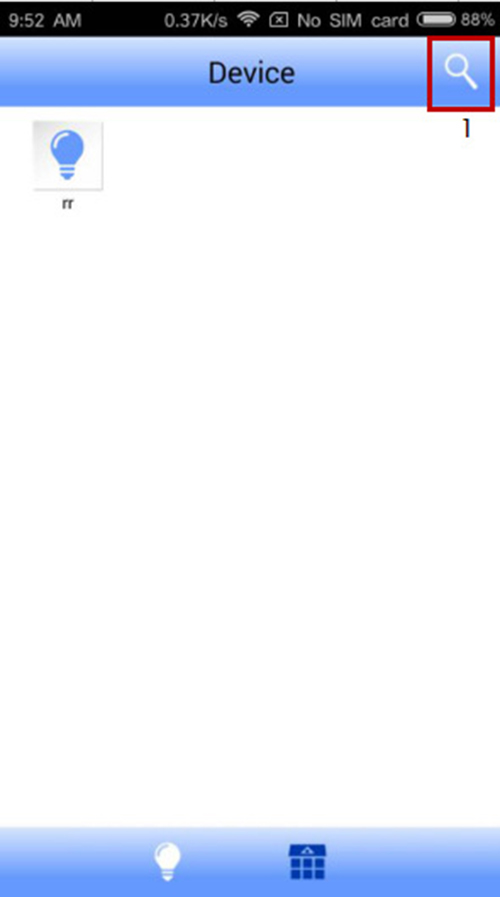
1) After the mobile phone is connected to the TC426 network, entering the software will automatically refresh the TC426 device. You can also search for TC426 devices through the "1" device search button.
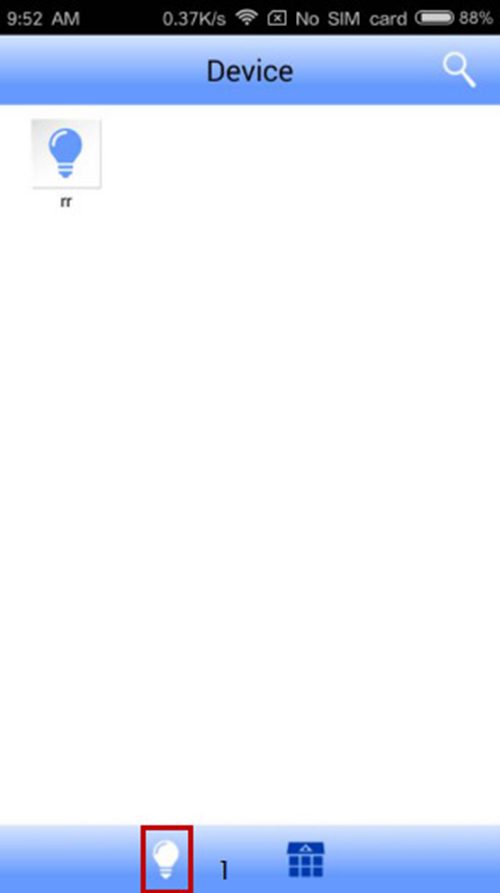
2) After the device is searched, click the "1" device edit button to set the device
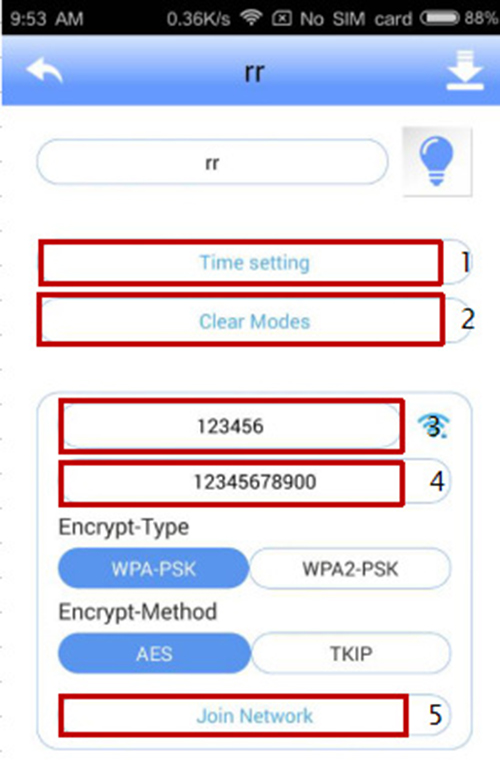
3) After entering the device editing interface, you can click "1" to synchronize the time, and click "2" to clear all modes in the device. To add a router, enter the name of the router in "3", enter the password of the router in "4", and click "5" to join the router. (You can also directly control the TC426 device without adding a router). After successfully joining the router, exit the software and wait for a few seconds. At this time, the wireless signal from the TC426 device should not be found in the WIFI list added to the phone. Select the router set when editing TC426, and then enter the software. The software will automatically refresh the TC426 device, or you can search for the TC426 device through the search button.
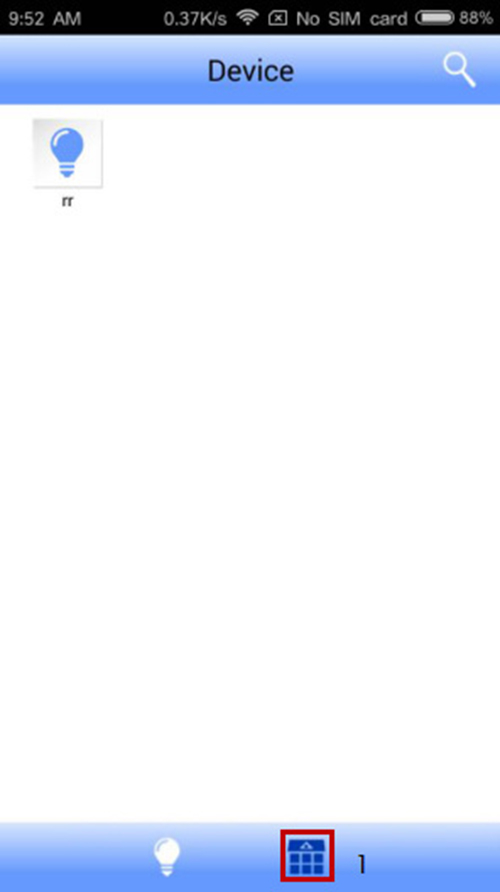
4) After the device is connected to the router and the device is searched, click the "1" mode editing button to edit the mode.
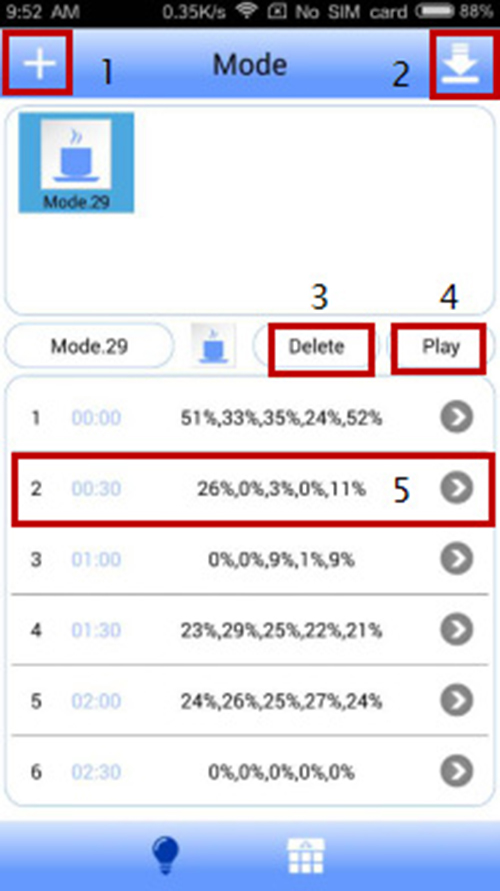
5) Click "1" to create a new mode, click "5" to set the colour of the mode, after setting the mode, click "4" to preview the set mode, if you want to delete the new mode, click the "3" delete button To delete the mode, click on it after the mode is built: 2 to download the mode to the TC426 device (the mode with the same name will overwrite the existing mode on the controller).
Power saving mode
When no button is pressed within 30 seconds in the settable mode, the display backlight turns off. If no key is pressed within 30 seconds, the controller will enter the power-saving mode. When pressing any key, the controller will return to the original display interface.
Settable mode
① Press the "Back" button in the main menu to enter the time display interface.
The current time or date and mode are displayed on the first line of the time display interface, and will automatically switch every two seconds. The second line displays " [Menu] ", press the "Back" key to enter the main menu interface;
②When you press the "Back" key in the time display interface or press the "Menu" key in the submenu of the main menu, you will enter the main menu. In the main menu, the first line of the display shows " [Menu] ", indicating the location. The second line of the display shows "1.Mode", "2.Setup" or "3, Run", which can be switched by the "Down" and "Up" keys. Press the "Back" button to enter the corresponding settings; press the "Menu" button to return to the time display interface;
The main menu displays as shown in Figure:

③ In the main menu, select "1. Mode" and press the "Back" button to enter the mode selection;
"Mode" is displayed on the first line of the mode selection display, indicating the location.

④ Select "2.Setup" in the main menu and press the "Back" key, you will enter the setup menu;
In the setup menu, the first line of the display shows " [Setup] ", indicating the location.
The second line shows "1. Time", "2.Date" or "3.Sound", you can select the set object through "Down" or "Up".
Press the "Back" button to enter the corresponding settings, press the "Menu" button to return to the main menu;
The setting menu is shown in Figure:

I. Select "1.Time" under the setting menu and press the "Back" key, it will enter the time setting;
" [Time] " is displayed on the first line of the time setting display, indicating the location.
The second line of the display shows the set time "hour: minute: second", for example, "11:16:56".
Press the "Back" key to select the set number (hour/minute/second), the selected area will flash, this flashing indicates that it is in the editing state.
Press the "Up" key corresponding to the number plus 1, when it reaches the maximum value will return to the minimum value;
Press the "Down" key corresponding to the number minus 1, when it reaches the minimum value will return to the maximum value;
Press "Back" to save and return to the setup menu
The setting mode is shown in Figure:

II. Select “2.Date” under the setting menu and press the “Back” key, it will enter the date setting;
"Date" is displayed on the first line of the date setting mode display, indicating the location.
The second line of the display shows the set date "Year Up Month Up Day", for example, "13Up01Up01".
Press the "Back" button to select the set number (year/month/day), the selected area will flash, this flashing indicates that it is in the editing state.
Press the "Up" key corresponding to the number plus 1, and save the current value, when it reaches the maximum value will return to the minimum value;
Press the "Down" key corresponding to the number minus 1, and save the current value, when it reaches the minimum value will return to the maximum value;
Press "Back" to save and return to the setting menu;
The setting mode is shown in Figure:

III. Select "3.Sound" under the setting menu and press the "Back" button to enter the sound setting;
In the sound setting mode, the first line of the display shows "[Sound]", indicating the location.
The second line of the display shows "OPEN" or "CLOSE" to indicate the sound setting
Press "Down" key or "Up" key to switch the sound off or on;
Press “Back” to return to the setting menu;
The sound settings are shown in Figure:

⑤ Select "3.Run" in the main menu and press the "Back" key to enter the run menu;
In the run menu, the first line of the display shows " [Run] ", indicating the location.
The second line displays "Start" or "Stop", indicating that the controller is turned on or off.
Press "Down" or "Up" to select startup or shutdown.
Press the "Back" button to execute the user-selected option; press the "Menu" button to return to the main menu;
The running menu is shown in Figure:

Typical application
Precautions
1. The power supply voltage of this product is DC12V to 24V, can not be connected to other high-voltage power supply;
2. When downloading the pattern, power on the timing controller first, and then connect the USB cable;
3. The power cords must not be short-circuited with each other, causing a short circuit;