| Availability | In Stock |
|---|---|
| Condition | Brand New |
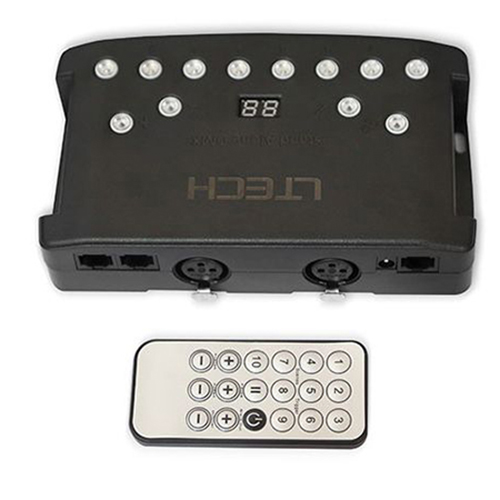
Ltech LTSA1024 is a dmx lighting controller with 1024 DMX output channels that offers precise control over color, intensity, and various lighting effects.
LTSA1024 usb dmx 512 master controller supports both DMX and Art-Net protocols, providing flexibility in integration with other lighting systems. It also offers multiple playback options, including a built-in microSD card slot for storing and playing back custom lighting scenes.
Specification
Input:USB 2.0
Input connector:Mini USB -Mini USB cable included
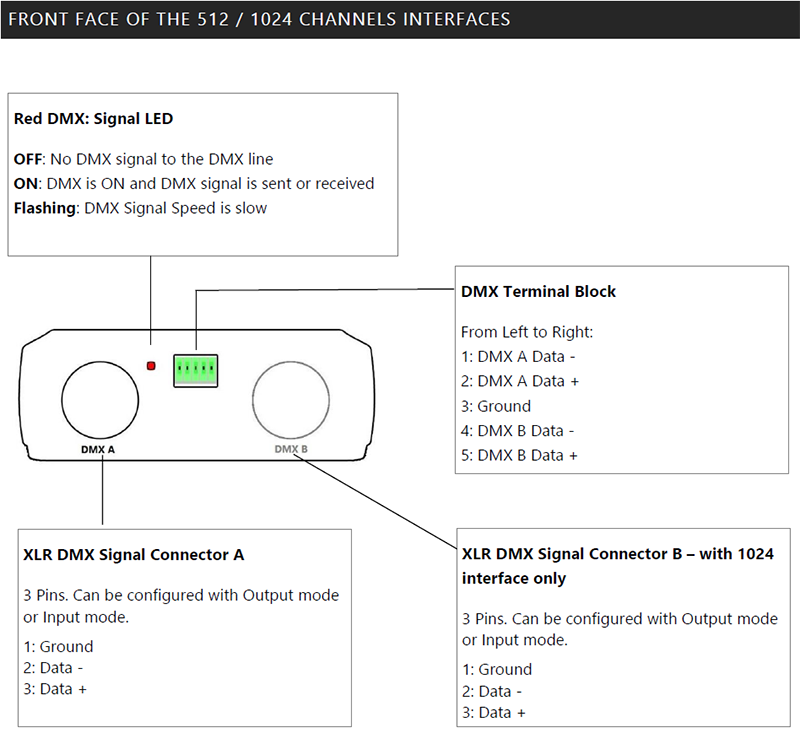
Output connector:XLR 3 (XLR 5 is optional) 1:Ground, 2:Data+, 3:Data
Number of DMX Input/Output:512 or 1024 (PC + Stand Alone)
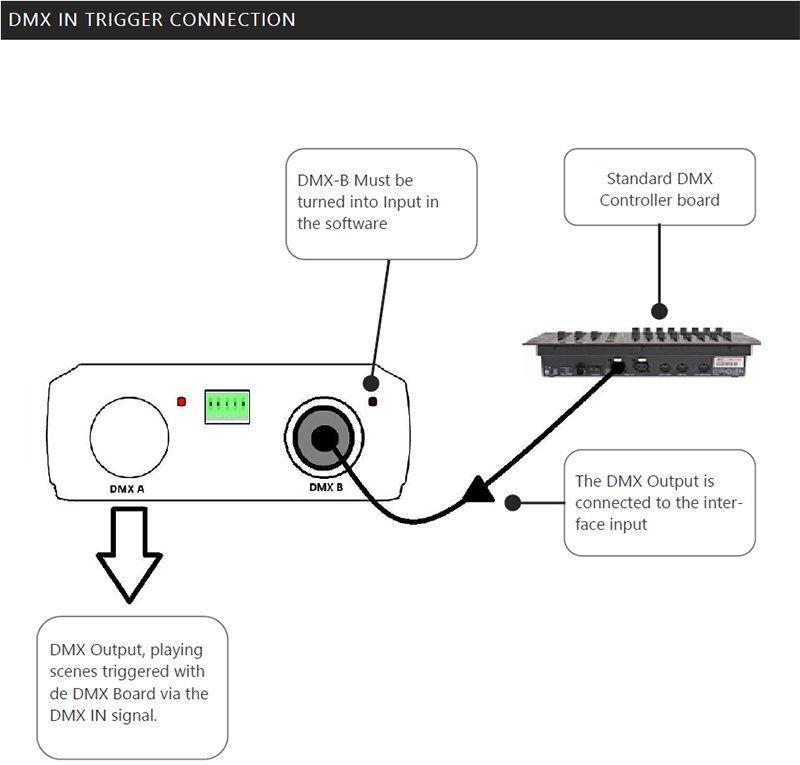
PC DMX IN triggers:Yes
StandaloneDMX IN triggers:Only with 1024 interfaces
External triggers:x4 contacts (5V.) multiplexed to 15 contacts max(20m max cable length)
Master/Slave connection:Yes, 3 wires for 16 connected interfaces max(20m max cable length)
Infra-redconnection:Yes via an external IR module (PCB) and 3 connection wires(max15m away)
Infra-redremote:Optional
DMX Speed:1 to 45 Hz, MaB, Bk
Stand Alone mode:Yes, 512 or 1024 channels per interface
Internal Clock (RTC):Yes
Internal calendar:Yes
Backups of the internal clock:Yes, 3 weeks without power
Internal memory:Yes (4 MB)
Memory Capacity:4000 steps with 512 channels, 100 000 steps with 16 channels
Input power voltage:5 V. via USB(USB power supply included)
Input current:80 to 200 mA
Power:2W
Display of signal states:DMX LED + USB LED
CPU technology:32 bitInternal memory:Yes
Data display:7 segments LED display
External triggers:x4 dry contacts for up to 15 multiplexed contactsContact
Input Voltage:5 V
Dimensions:H: 40 mm (1,57 in) / W: 110 mm(4,33 in) / D: 120 mm (4.72 in)
Color:Black / Red
Operating Temperature:-25 to +70 C°
Certifications:CE, RoHS
IP rating:IP20
Place of use:Indoor
Storage:Keep in a dry place
Warranty:24 months
DMX Compatibility:8 and 16 bit
DMX fixtures
System Compatibility:Windows XP, Vista, 7, 8, 8.1, 10, MAC OS X (10.6 and +), Linux
LTSA1024
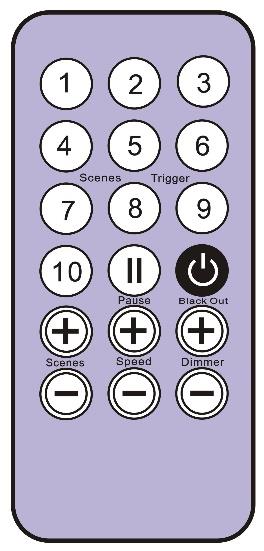
Button 1 to 10 must be assigned to a scene via the software.
Each button can trigger a different scene. With the remote control, a scene cannot be stop directly with the assigned button. To stop it you must press the Stop/Black Out button or trigger another scene.
Pause button to freeze the current scene to its actual state.
Stop/Black Out button to stop the current scene and play the empty scene number 00. All DMX channels are set down to 00 levels.
+/- for scene trigger. Select the next or previous scene automatically. You don't need to hold the button to validate and play a scene. The next or previous scene will play directly after selected.
+/- for Scene speed. Increase or decrease the speed of the current scene. A different speed can be chosen separately for each scene.
+/- for General dimmer. Increase or decrease the RGB, CMY and dimmer channels of the fixtures. The CMY, RGB, Dimmer channels are defined in the Profile of the fixture.
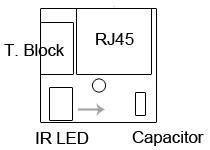
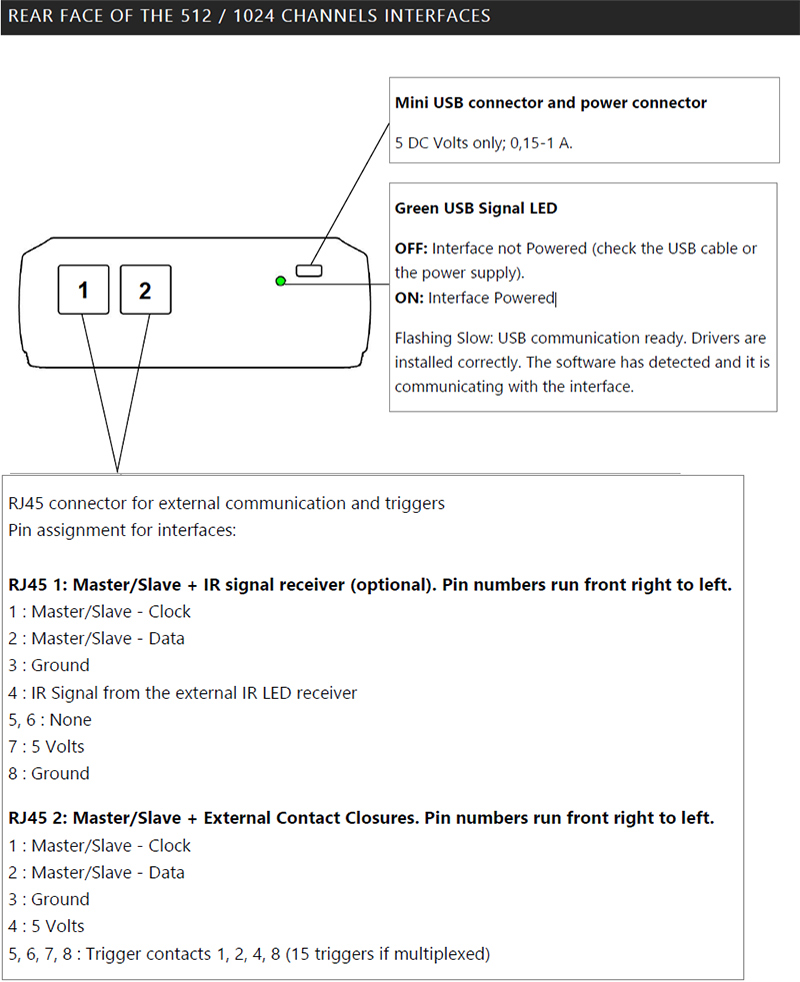
To use the IR remote control, an external PCB with an IR receiver LED must be connected before to the RJ45 #1 of the Stand Alone interface. The stand-ard RJ45 cable distance is about 20 meters maximum.
IR PCB Pin assignment: -With RJ45 use pins #3 = Ground; #4 = IR Data ; #7 = 5V DC. -With T. Block use pins: O = IR Data; V = 5V DC; G = Ground.
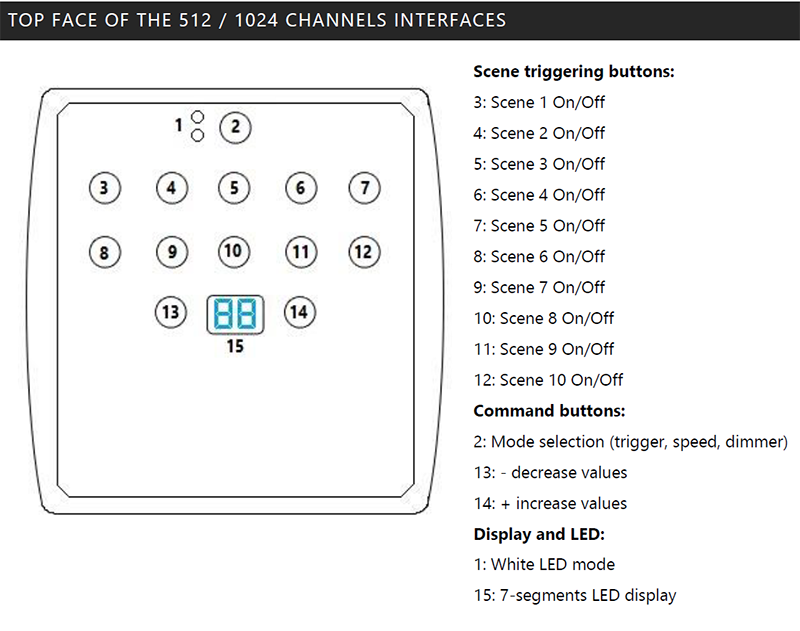
LED 7-SEGMENTS DISPLAY OPERATION:
Display the number of the playing scene and the mode (speed/dimmer) value.
00: Stand Alone mode running. No scene is playing. All DMX channels are set to 0. PC: The interface is connected to the computer and software controlled.
In trigger mode, the 7 segment display gives the current scene number. The 00 value indicates that no scene is playing and the DMX interface send nulls (0x00) on all output DMX channels. In speed mode, the display indicates the speed of the current scene, values are between -9 and 9. In dimmer mode, the display indicates the general intensity, values are between -9 and 9.
WHITE LED MODE
All OFF: Scenes buttons are operating on trigger mode 1st LED ON: Scene Speed mode activated. Press + or – to adjust the speed of the current playing scenes 2nd LED ON: General Dimmer mode activated. Press + or – to adjust the dimmer
MODE SELECTION BUTTON
Press the Buttons to select the Speed, Dimmer or the default Trigger mode. NEXT/PREVIOUS, +/-SCENE PUSHBUTTONS
Trigger Mode: Select the Next or Previous Scene number. Go to the scene number you wish to start and Hold the button for 2 seconds to confirm and play the new scene from 01 to 99. Speed Mode: Increase or decrease the Speed of the current scene. Values from -9 to +9.
Dimmer Mode: Increase or decrease the general intensity (dimmer + RGB). Values from -9 to +9. Default is 00.
BLUE LED TRIGGER PUSH BUTTONS:Push a button to trigger scenes loaded in memory. Push again to stop scenes.

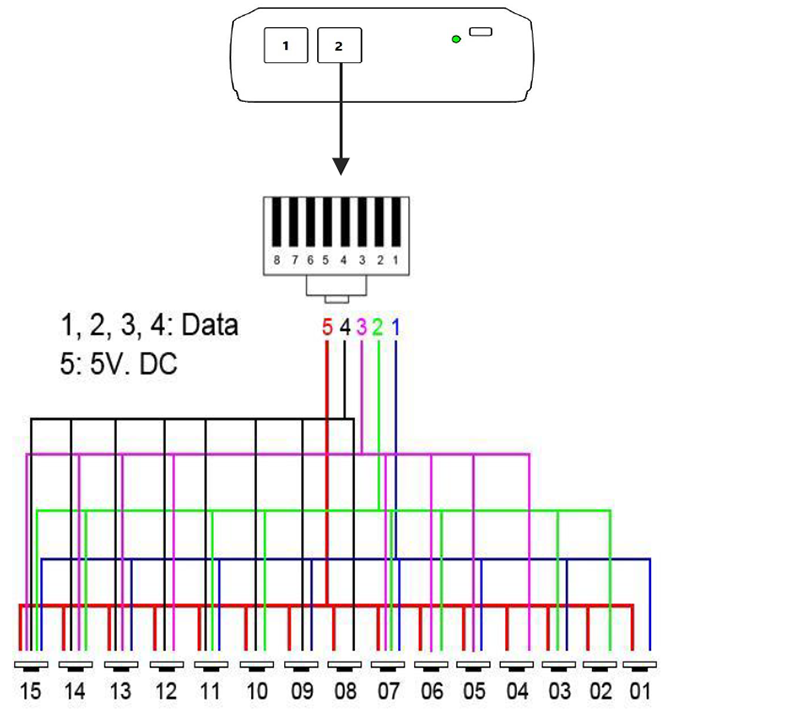
15 CONTACTS WIRING AND CONNECTIONS WITH RJ45 PINS
The 4 externals contacts are located on the Ethernet socket number 2. You can use the 4 contacts to basically trigger 4 scenes. To have more triggers you must use a multiplexed system to get a maximum of 15 contacts as following: