

| Availability | In Stock |
|---|---|
| Condition | Brand New |
Product summarization
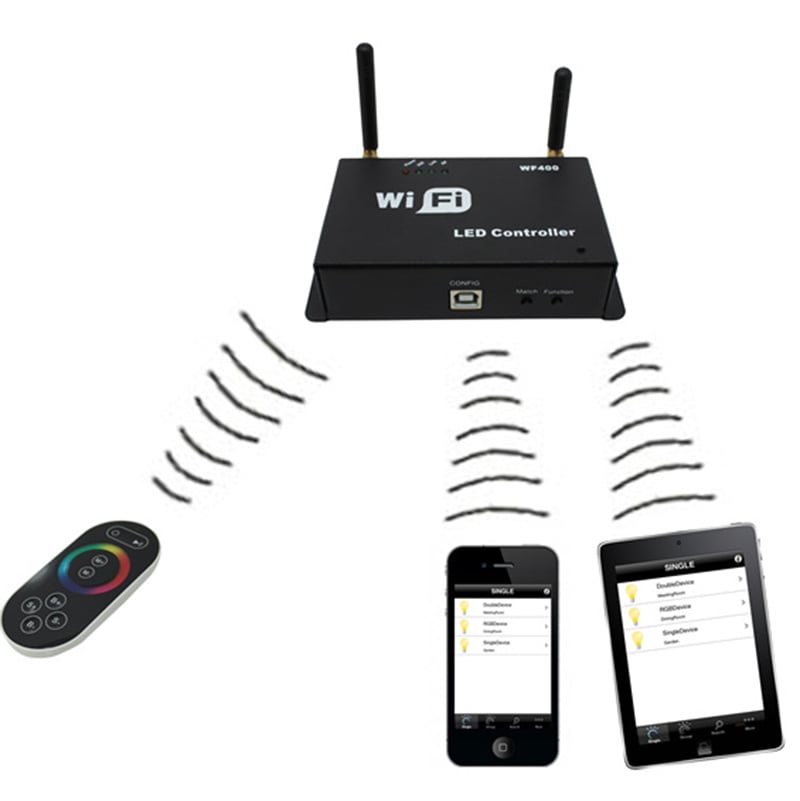
WF400 is another wifi controller independently developed by our company, following our WF100, compared with WF100, WF400 is more powerful, and more flexible to use, when using, you do not need to switch wireless networks, it is more convenient to be on internet. You can choose encrypt network, can also open network. It’s more convenient for you to choose wireless network with WiFiManager network management software, WF400 network configuration. Combined our independently developed mobile software Touchhome+ with controller, this makes the function of WF400 more better than WF100. Supporting the use of software with WF400, it can achieve single point control and group control, in addition, it includes some features, such as re-name of controller, set the location, timing control and other function. This makes the function of WF400 more powerful.
Trough the use of WIFI technology, it provides more comfortable, safer and more convenient intelligent lighting control than traditional lighting control, optimizes the lighting control methods, which brings a new, comfortable lighting environment to users.
Product composition

Standards and Certifications


Technical Parameters
Software technical parameters
controlling software:
Name: Touch Home+
Operating Platform: ios system (iphone, ipad), Andriod (pad) device must have WiFi function
Language: English, Chinese (automatically recognized according to system language)
Category: Communication
Configuration software:
Name: WifiManager
Operating Platform: Win 7/Windows Vista/Win2003/WinXP/Win2000
Language: English
Type: Communication (usb)
Controller technical parameters
Working Voltage: DC5~24V
Working Temperature: -20-60℃
Working Power Consumption: about 1.6W
Output: 3-channel common anode, maximum 4A per channel, with over-current protection function
Packing Size: L215*W165*H55mm
Dimensions: L107*W65*H30mm
Controller Weight: 340g
Remote Control Weight: 85g
Gross Weight: 550g
Receiving Sensitivity: 802.11b/g DSSS (-5dBm), 802.11b CCK (-10dBm), 802.11g OFDM (-15dBm)
Specifications Download 
Instructions for use
The correct use of the controller mainly includes the following steps:
Step 1: Controller interface setting
Understand the function of each interface of the controller, and its basic usage and wiring. Refer to the controller interface description.
Step 2: Configure the controller
Method 1: Configure various parameters of the controller through WiFiManager, including parameters such as name, location, network, time, output type, etc., to facilitate user setting and control. Refer to the instructions of WiFiManager.
Method 2: Manual configuration via TouchHome+ configuration tool.
Step 3: Install the controller
Understand the specific wiring method and installation requirements of the controller. Refer to the controller hardware installation instructions.
Step 4: Remote control
It introduces the specific use method of touch remote control. Refer to the instructions of the remote control.
Step 5: Mobile phone control
The mobile phone control method is briefly described. Refer to the instructions of TouchHome+.


5. ANT
ANT: WIFI antenna
RF: Touch the remote control antenna
Remote control instructions

Key Description
There are 64 touch buttons (points) on the touch remote control panel. The functions of each button are as follows:
1. Switching key, in any state, the controller output can be turned on or off;
2. Pause key, in dynamic mode, can stop the controller in the current state;
3. This key has two functions:
① Mode plus selection key, that is, when the current control mode is the pulley mode (color), if you need to realize the mode (color) in the controller, you can press this key;
② Mode switching key, that is, when the current control is M key mode, the mode (color) specified in the M+ key mode table can be switched.
4. This key has two functions:
① Mode minus selection key, that is, when the current control mode is pulley mode (color), if you need to realize the mode (color) in the controller, you can press this key;
② Mode switching key, that is, when the current control is M key mode, the mode (color) specified in the M-key mode table can be switched.
5. Color wheel touch keys, static mode selection keys, up to 55 touch points.
This key has two functions:
①The static color selection key of the pulley, that is, when the current control mode is the M key mode (color), if you need to achieve the static color on the pulley, you can press this key;
②Pulley color switching key: it can be switched from 55 static colors (the color shown by the pulley).
6. Output brightness control key, each time you press the brightness level plus 1, a total of 25 levels;
7. Output brightness control key, each time the brightness level is decremented by 1, there are 25 levels in total;
8. Output speed control key, each time you press the speed level plus 1, a total of 100 levels;
9. Output speed control key, each time the speed level is decremented by 1, the total is 100 levels.
Power management
Stop using the remote control for about 15-20s, the remote control will automatically enter the standby state to extend battery life. At this time, the color ring cannot be used. You must press the button to wake up the remote control and enter the working state.
Note: All functions of this remote controller are applicable to the WF400A type (factory default), namely RGB mode. In WF400B, M+, M-, B+, B-, effective, when WF400C, only M+, M- are effective.
Controller mode description
When different modes are selected, the controller output mode is different, and the working mode should be configured according to the type of light bar. When the user uses the RGB light bar, the working mode is WF400A, when the user uses the color temperature light bar, WF400B is selected, and if it is a monochromatic light bar, WF400C is selected. The specific mode table is as follows:
1. WF400A mode:
WF400A mode: users use RGB light bar, should choose this mode. It can control all four-wire three-loop (common Yang) LED full-color lighting products, and extensively control all current-limiting LED lighting products such as RGB full-color LED modules, LED light strips, SMD flexible light bars and so on. In this mode, the controller can achieve dynamic changes such as overall jump, gradual change, strobe. With the mobile phone control software, user-defined color changes can be achieved. The brightness and speed can be adjusted in the jump and strobe mode, the gradient mode can only adjust the speed, and the static mode can only adjust the brightness. The controller built-in mode table is as follows:


2.RGB lamps connection diagram
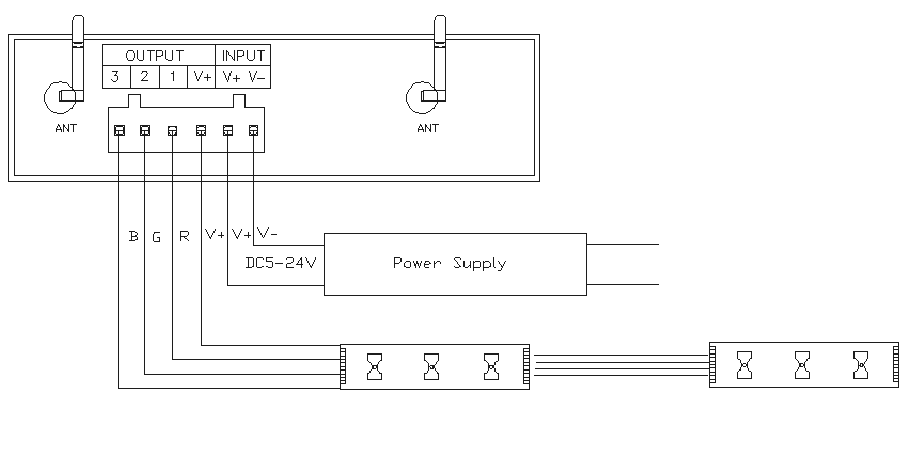
When the user's lamp is RGB type, the controller type should be set to WF400A through the host computer software. At this time, the output type is RGB, and the lamp can be used according to the above figure. The built-in mode of the controller can be selected by the Function key of the controller or the M+ and M- keys of the remote control, and the static color can be selected by the color wheel of the remote control. The remote control also has the function of adjusting the speed and brightness in a specific mode. Or control via mobile phone software.
Color temperature lamp connection diagram

When the user's lamp is a monochrome type, the controller type should be set to WF400C through the host computer software. At this time, the output type is dimming mode, and the lamp can be used according to the above figure. The built-in brightness level of the controller can be selected through the function key of the controller or the remote M+ and M- keys, or stepless dimming through the mobile phone software.
System application diagram
When there are multiple controllers in the user's wireless network, the system structure is shown in Figure 8.1. The user can control the controller individually or in groups. Up to 250 controllers can be accommodated in a control system. For the control method, please refer to the "TouchHome" soft description.

Precautions
1. Please do not install the controller in a closed, high magnetic field or high voltage area;
2. In order to reduce the risk of fire and device damage caused by short circuits, please ensure correct connections;
3. Make sure to install in a ventilated area to ensure the proper temperature;
4. The controller should be installed as close to the router as possible to ensure normal control;
5. Check whether the voltage and power supply match this controller;
6. Before energizing, please check whether the line is connected correctly, and use the instrument to test whether there is a short circuit;
7. When there is a problem, please do not open the shell of the controller at will.
8. This manual is only applicable to this type of controller, and it will be updated without notice.
