- Why This Guide Exists
- Step 1: Define Your Backlit Application
- Step 2: Measure the Backlit Area
- Step 3: Choose the Right LED Sheet Size & Type
- Step 4: Calculate How Many LED Sheets You Need
- Step 5: Power Supply & Control Basics
- Step 6: Installation & Mounting Tips
- Real-World Configuration Examples
- Common Mistakes to Avoid
- Final Thoughts
Why This Guide Exists
Designing a custom LED backlight sheet system can feel intimidating at first. How many LED sheets do you need? Which size works best? How do you power and control everything without running into flickering or uneven brightness?
The good news is: you don’t need to be a lighting engineer to get it right.
Whether your project involves a kitchen island, reception desk, backlit wall, display cabinet, or a commercial feature panel, the same step-by-step system design approach applies.
This guide walks you through the entire process — from defining your application to installation — so you can confidently build a custom LED backlighting sheet system from scratch, even if this is your first time working with LED light sheets.
Step 1: Define Your Backlit Application
Before choosing LED flexible backlight sheets, power supplies, or controllers, start with one simple question:
Where will this backlighting be used?
LED backlight sheets systems are extremely versatile. No matter where your creativity leads—a modern kitchen island, a sleek store reception desk, a glowing museum display, or even a custom headboard—installing your backlighting follows the same reliable, streamlined process.
What You Should Have Now:
- A clear understanding of where the backlighting will be used
- Confirmation that the same system design process applies regardless of application
- A defined project goal (functional lighting, decorative effect, or both)
Step 2: Measure the Backlit Area
Accurate measurement is the foundation of a successful LED light sheet backlighting system.
1. Measure the overall installation area
Record the total width and height of the surface you want to backlight. This defines the maximum coverage area for your LED sheets.
2. Check the cavity depth
Measure the distance between the LED sheets and the diffuser material (acrylic, stone, glass, or panel). This spacing directly affects light uniformity.
3. Evaluate the shape and surface condition
Ask yourself: Is the backlit area clean, flat, and rectangular? Or does it include irregular edges, cutouts, or fine contours?
Why this matters:
If your design requires precise contour coverage or detailed shapes, modular or highly cuttable LED sheets are ideal.
If the project only involves gentle bends or a simple rectangular surface, you don’t need to overthink flexibility — larger sheets or long-roll LED sheets work perfectly.
Taking a few extra minutes at this stage can save hours of rework later.
What You Should Have Now:
- Total width and height of the backlit area
- The available cavity depth behind the surface
- A clear decision on whether the layout requires high flexibility or a simple, regular arrangement
Step 3: Choose the Right LED Sheet Size & Type
Now that you know your installation dimensions, it’s time to select the right light sheet specification.
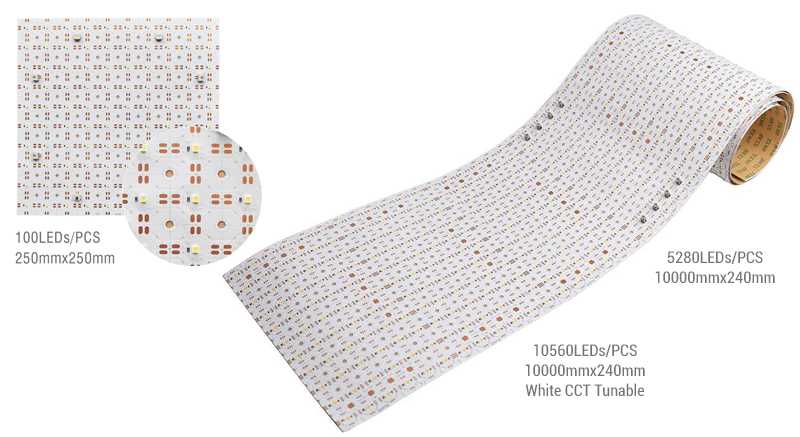
SuperLightingLED offers sheet lights LED solutions in a wide range of sizes and colors, from compact 250mm*250mm (9.84in*9.84in) to super large 10m*240mm (393.7in*9.45in) panel size in single-color white (various color temperatures), tunable white (adjustable warm to cool), RGB or RGBW or RGBCCT (color-changing and white tuning), and addressable RGB dynamic effects.
If your measured area is flat, open, and highly regular, long-roll LED sheet lighting can significantly simplify installation.
If parts of the area are fragmented or irregular, even larger LED sheets can be cut into smaller sections. These sections can then be arranged to follow the shape of the surface and electrically connected via soldering or connectors.
What You Should Have Now:
- A selected LED sheet format (modular or long-format)
- A clear lighting type choice (white, tunable white, RGB, or addressable)
- Confidence that the selected sheet size matches the measured layout
Step 4: Calculate How Many LED Sheets You Need
This is the step most users worry about — but it’s easier than it sounds.
To make this process easier, let’s walk through a real-world example using one of the most common LED sheet light backlighting applications.
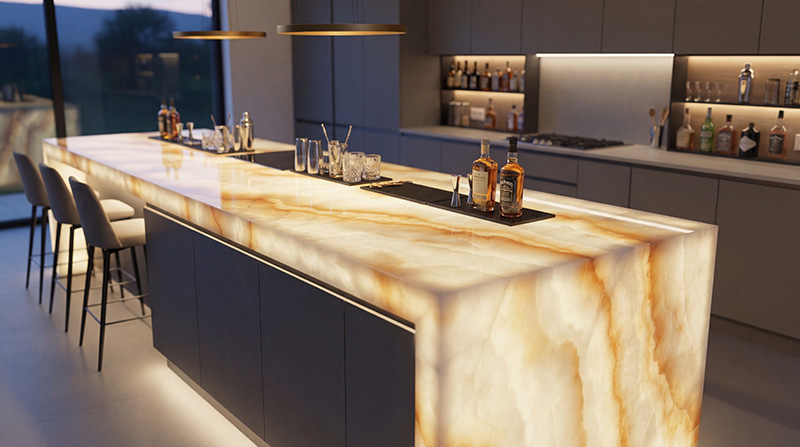
Example Project: backlit kitchen island panel
Application: kitchen island backlighting
Backlit Surface Size: length 72 inches (6 ft / ~1830 mm), width 36 inches (3 ft / ~915 mm)
Option A: Using Standard Modular LED Sheets (480 x 240 mm)
Assume we select a popular modular LED sheet size of 480 × 240 mm (approximately 18.9 × 9.4 inches).
1: Calculate how many sheets across the width
72 inches ÷ 18.9 inches ≈ 3.8
Round up → 4 sheets
2: Calculate how many sheets across the height
36 inches ÷ 9.4 inches ≈ 3.8
Round up → 4 sheets
3: Total number of LED sheets
4 × 4 = 16 LED sheets
This layout provides full, even coverage across the entire backlit surface.
If slight trimming is needed at the edges, the LED sheets can be cut along marked cut lines and adjusted accordingly.
Option B: Using Long LED Sheet Rolls
Now let’s consider the same project using long-roll LED sheets, which are ideal for large, regular surfaces.
LED sheet roll width: 240 mm (9.4 inches)
Maximum continuous length per roll: 10 meters (≈32.8 ft)
1: Determine how many horizontal runs are needed
36 inches ÷ 9.4 inches ≈ 3.8
Round up → 4 horizontal runs
2: Determine length per run
Each run needs to cover 72 inches (6 ft / 1.83m)
This fits well within the 10-meter maximum length
3: Total LED sheet requirement
4 runs × 6 ft = 24 ft total LED sheet length
When purchasing, you can choose between four 2-meter-long sheet light rolls or one 10-meter-long sheet light reel.
This approach reduces the number of electrical connections and works best when the backlit area is flat and uninterrupted.
Which Option Should You Choose?
Both approaches can achieve excellent, uniform backlighting. Evaluate the price and potential control and operating costs associated with each light sheeting solution based on your specific needs.
What You Should Have Now:
- The total number of LED sheets required
- A confirmed layout approach (modular grid or long runs)
- An estimated total illuminated area with proper coverage margins
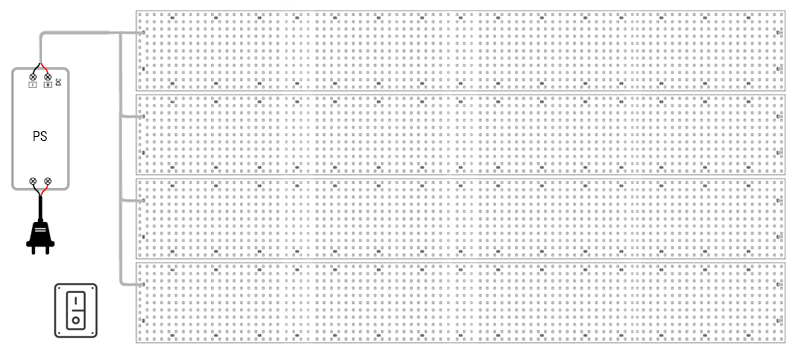
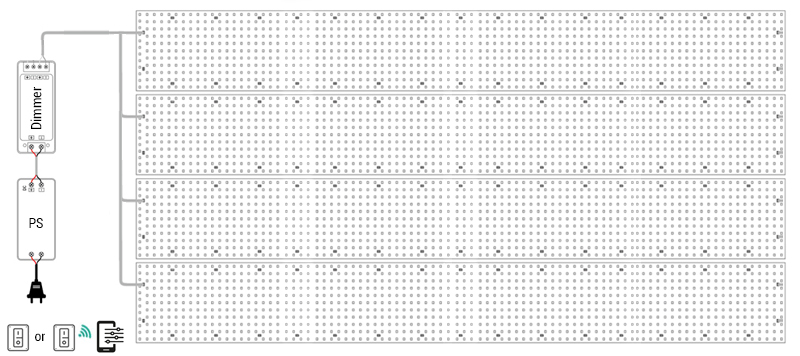
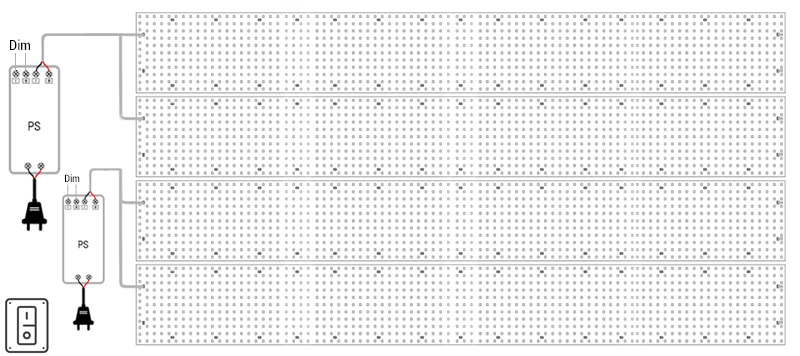
Step 5: Power Supply & Control Basics
Continuing the Same Kitchen Island Example. At this stage, we already know the physical layout. Now we’ll determine how to power and control the system correctly.
Option A: Modular LED Sheets (16 pcs, 480 x 240 mm)
What we have
- LED sheet size: 480 × 240 mm
- Total quantity: 16 sheets
- Each LED sheet consumes 45 W
Power calculation
- 16 × 45 W = 720 W total load
- Add 20–30% safety margin
- Recommended power supply: 864 W or higher
Control requirement
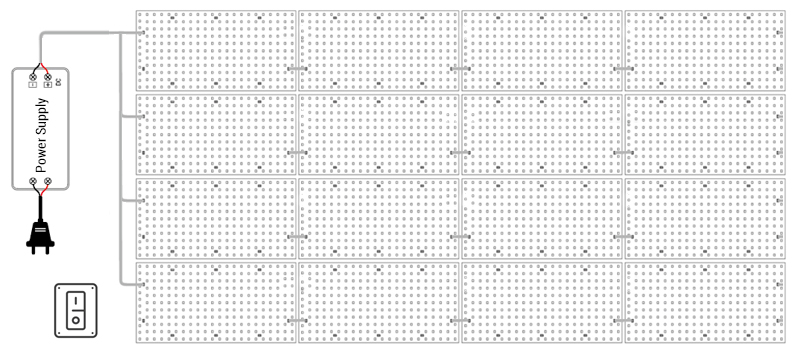
If no dimming or color control is needed:
- No controller is required
- Connect the power supply directly to a wall switch or switched circuit
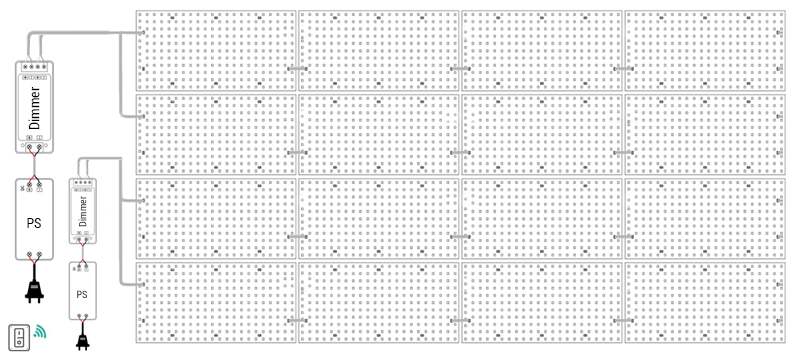
If dimming or color control is required:
- A controller must be added
- Ensure the controller’s rated output can handle the connected load
- Large systems may require multiple controllers, even if controlled together
Option B: Long-Reel LED Sheets (4 pcs x 2 m)
Now let’s look at a simpler, very popular configuration for clean and regular layouts.
What we have
- LED sheet format: long-reel
- Length per sheet: 2 meters (≈6.6 ft)
- Quantity: 4 sheets
- Total illuminated length: 8 meters
- Each 2 m LED sheet consumes 96 W.
Power calculation
- 4 × 96 W = 384 W total load
- Add 20–30% safety margin
- Recommended power supply: 460–600 W
Control requirement
Because this layout uses fewer, longer sheets, a single controller is usually sufficient.
Wireless control (RF / WiFi / Bluetooth) allows all four sheets to be adjusted together using one remote or app.
What You Should Have Now:
- Total system wattage
- Correct power supply size
- Clear decision on whether a controller is required
Step 6: Installation & Mounting Tips
At this stage, all system decisions have been made. This step focuses on how to physically install and connect the LED sheets correctly, ensuring long-term stability and uniform backlighting.
Both Option A (modular LED sheets) and Option B (long LED sheets) follow the same basic mounting principles:
- LED sheets feature high-adhesion backing for quick and accurate placement
- For permanent or commercial installations, screw mounting is available in addition to adhesive
- A clean, flat mounting surface is essential for consistent brightness and long-term reliability
These shared steps ensure the LED sheets remain secure and properly aligned over time.
Option A: Modular LED Sheets (Multiple Small Sheets)
Option A offers greater layout flexibility and supports two power connection methods:
- Quick connectors for fast, tool-free installation
- Hardwired solder connections for fully custom layouts
Only the hardwired (soldered) version requires manual soldering when connecting multiple sheets or cut sections. Quick-connector versions do not require soldering for simple connection.
https://www.youtube.com/watch?v=Tu5oDXuvHOE
Series connection guideline
- Recommended maximum: up to 5 LED sheets per series connection
- Exceeding this limit may result in voltage drop or uneven brightness
- For larger layouts, use parallel connections or multiple power outputs from the power supply.
Option B: Long LED Sheets (4 x 2 m Example)
Option B is designed for clean, regular layouts and uses a screw-lock wiring method:
- Power cables are mechanically secured using screw terminals
- No soldering is required for standard installations
This method provides strong strain relief and is well-suited for longer continuous runs.
https://www.youtube.com/watch?v=NU4fVS4f-Kw
Series connection guideline
- Maximum continuous run length: up to 10 meters (≈33 ft)
- Ideal for long, uninterrupted backlit surfaces
- Because fewer connection points are used, voltage stability is easier to maintain.
What You Should Have Now:
- A clear wiring layout for your LED sheets
- Proper load distribution
- A stable, easy-to-maintain installation
Real-World Configuration Examples
To help you visualize how everything comes together, here are two complete configuration examples based on the same kitchen island sheet lights project — using Option A and Option B respectively.
Option A Example: Modular LED Sheet Solution
1. Uses standard power supply, no dimming required, controlled by wall switch
Items used:
- 16pcs 480mm*240mm 24V 45W 3000K warm white LED light panel sheet (4 × 4 grid layout)
- 1pcs UHP-1000-24 power supply
- 1pcs wired wall switch
- 4pcs sheet light power cable
- 12pcs sheet light daisy-chain cable
- Some extension cords
- Some wire splices
2. Uses standard power supply, dimming required, controlled by smart wireless system
Items used:
- 16pcs 480mm*240mm 24V 45W 3000K warm white LED light panel sheet (4 × 4 grid layout)
- 2pcs 24V 20A (250Hz / 500Hz / 2KHz) V1-B RF LED dimmer
- 2pcs LRS-450-24 or UHP-500-24 power supply
- 1pcs EF-T wireless mini touch control
- 4pcs sheet light power cable
- 12pcs sheet light daisy-chain cable
- Some extension cords
- Some wire splices
Option B Example: Long-Roll LED Sheet Solution
1. Uses standard power supply, no dimming required, controlled by wall switch
Items used:
- 4pcs 2m*240mm 24V 96W 3000K warm white LED sheet lights (4 × 1 layout)
- 1pcs UHP-500-24 or LRS-600-24 power supply
- 1pcs wired wall switch
- 4pcs sheet light power cable (2-pin power wires)
2. Uses standard power supply, dimming required, controlled by smart wireless system
Items used:
- 4pcs 2m*240mm 24V 96W 3000K warm white LED sheet lights (4 × 1 layout)
- 1pcs 24V 20A HW2 WiFi+RF LED controller
- 1pcs UHP-500-24 or LRS-600-24 power supply
- 1pcs wired wall switch or K3S wireless remote
- 4pcs sheet light power cable (2-pin power wires)
3. Uses dimmable driver, controlled by 0-10V / Triac / PWM system
Items used:
- 4pcs 2m*240mm 24V 96W 3000K warm white LED sheet lights (4 × 1 layout)
- 2pcs YSD-300WUGP-24TL or YSV300W24V-IP67 24V 300W dimming driver
- 1pcs wired 0-10V / Triac / PWM dimmer switch
- 4pcs sheet light power cable
- Some extension cords
- Some wire splices
Common Mistakes to Avoid
The points below highlight the most common issues to watch out for.
Installing LED Sheet Lighting Too Close to Thin Diffuser Materials
When backlighting thin translucent materials (such as marble or stone panels only a few millimeters thick), placing LED light sheet panels too close to the surface can create visible hotspots. In this case, a minimum spacing of approximately 50mm (2 inches) is recommended to achieve uniform backlighting.
Using Thick or Low-Transmittance Diffusion Materials
Not all backlit materials transmit light effectively. Thick stone slabs may block light almost entirely. Dark or highly opaque materials reduce brightness dramatically. Always verify material translucency before finalizing the LED panel sheet layout.
Spacing LED Lighting Sheets Too Far Apart
Sheet LED lights should be installed adjacent or evenly spaced. Large gaps between sheets reduce light overlap and diffusion.
Exceeding Series Connection Limits
Connecting too many sheet of LED lights in a single series run can lead to voltage drop and inconsistent brightness.
The connectors on LED sheet panel have limited current capacity, typically 5-6A, while long-roll light sheet supports 10A. Exceeding these limits often causes dim sections toward the end of the run.
Overloading Power Supplies or Controllers
Power-related issues are among the most common causes of flickering and instability of custom LED sheet lighting projects.
Undersized power supplies may cause flickering, reduced brightness, shortened component lifespan. Always include adequate power headroom.
LED controllers also have output limits. A single controller may not handle all flexible LED sheets in larger backlighting systems. Multiple controllers may be required, even for unified lighting effects.
Mixing Wiring Methods Incorrectly
Ignoring cable polarity and color coding during LED back lighting sheet wiring may result in inverted color temperature control, incorrect colors, limited or unstable dimming performance. Always match wiring channels precisely to the controller’s output terminals.
Not all LED sheet types can share the same controller. Each flexible LED sheet lighting system must be matched with its appropriate control protocol. Do not mix addressable LED sheets with standard color-changing LED sheets.
Skipping Maintenance Access
Flexible LED light sheet is reliable, but no system is entirely maintenance-free. Avoid fully sealing LED lighting sheet panels without access points. Ensure controllers and power supplies remain accessible. Proper access simplifies troubleshooting and long-term service.
Final Thoughts
A custom LED sheet backlighting system doesn’t have to be complicated. By following a clear, step-by-step approach — defining the application, measuring accurately, choosing the right LED sheet format, and planning power and control properly — even first-time users can achieve professional results.