LED strip lights are suitable for a variety of application scenarios, and can be used as auxiliary lighting, decorative lighting, main lighting, plant growth lights, and special wavelength lights. There are outdoor waterproof led strip lights, indoor room led strip lights, etc. The safety, softness, and cuttable characteristics of the led rope light bring us great convenience in use, allowing us to better enjoy the led light strips.
Single color led strip lights are the most basic of all led rope lights. Before starting the wiring of the single color led strip, please prepare the materials to be used: single color led strip lights, LED dimmer, LED driver, LED solderless connectors or soldering tools, screwdriver, 2-pin bare wire, wire stripper, scissors, tape measure, and other single color led light strip accessories.
1. How to install single color led light strips?
There are two situations for how to install single color led strip light, the led light controller is not installed and the led controller is installed. The wiring is simple without installing the led controller. And it is not difficult to install the led controller. Next, let us learn more about how to install a led light strip.
►1.1 No LED light controller installed
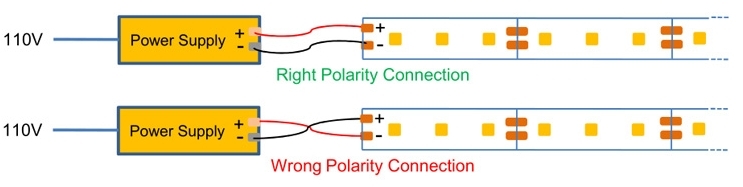
There are two bare wires at the end of the single color led strip light, one red and one black. Red represents the positive pole, and black represents the negative pole. Some people wonder, can the red wire be connected to the black wire? The answer is of course no. The functions of the red line and the black line are different, which is like connecting a single color led light strip with an RGB color changing led strip light.
As the 5V led strip lights have a voltage drop of 5 meters, it needs to be powered at both ends when it is connected to the led power supply to solve the color and brightness attenuation caused by the voltage drop. The 12V led strip lights and 24V led strips have no voltage drop at 5 meters, so they can be powered at one end.
| 5V single color led strip lights ⇒ Power supply at both ends of 5 meters 12V single color led strip lights ⇒ Power supply at both ends of 10 meters, power supply at one end of 5 meters 24V single color led strip lights ⇒ Power supply at both ends of 15 meters, power supply at one end of 10 meters |
For more knowledge about the led strip connect to the power supply, click here.
1.1.1 How to connect multiple led strips to one power supply?
Pay special attention to the voltage drop when connecting multiple single color led light strips. Voltage drop is also a common topic in the process of installing led tape lights.
Because the led strip uses low voltage to work, the voltage is consumed, and the end voltage is less than the start voltage, resulting in differences in the color and brightness of the tape light. Therefore, it is not recommended to connect multiple single color led strips in series.
However, the maximum connection length of the 24V led strip is 10 meters, so two 24V single color led rope lights can be connected and can be powered at one end. The solution to the voltage drop is to bring enough power to the LED lights.
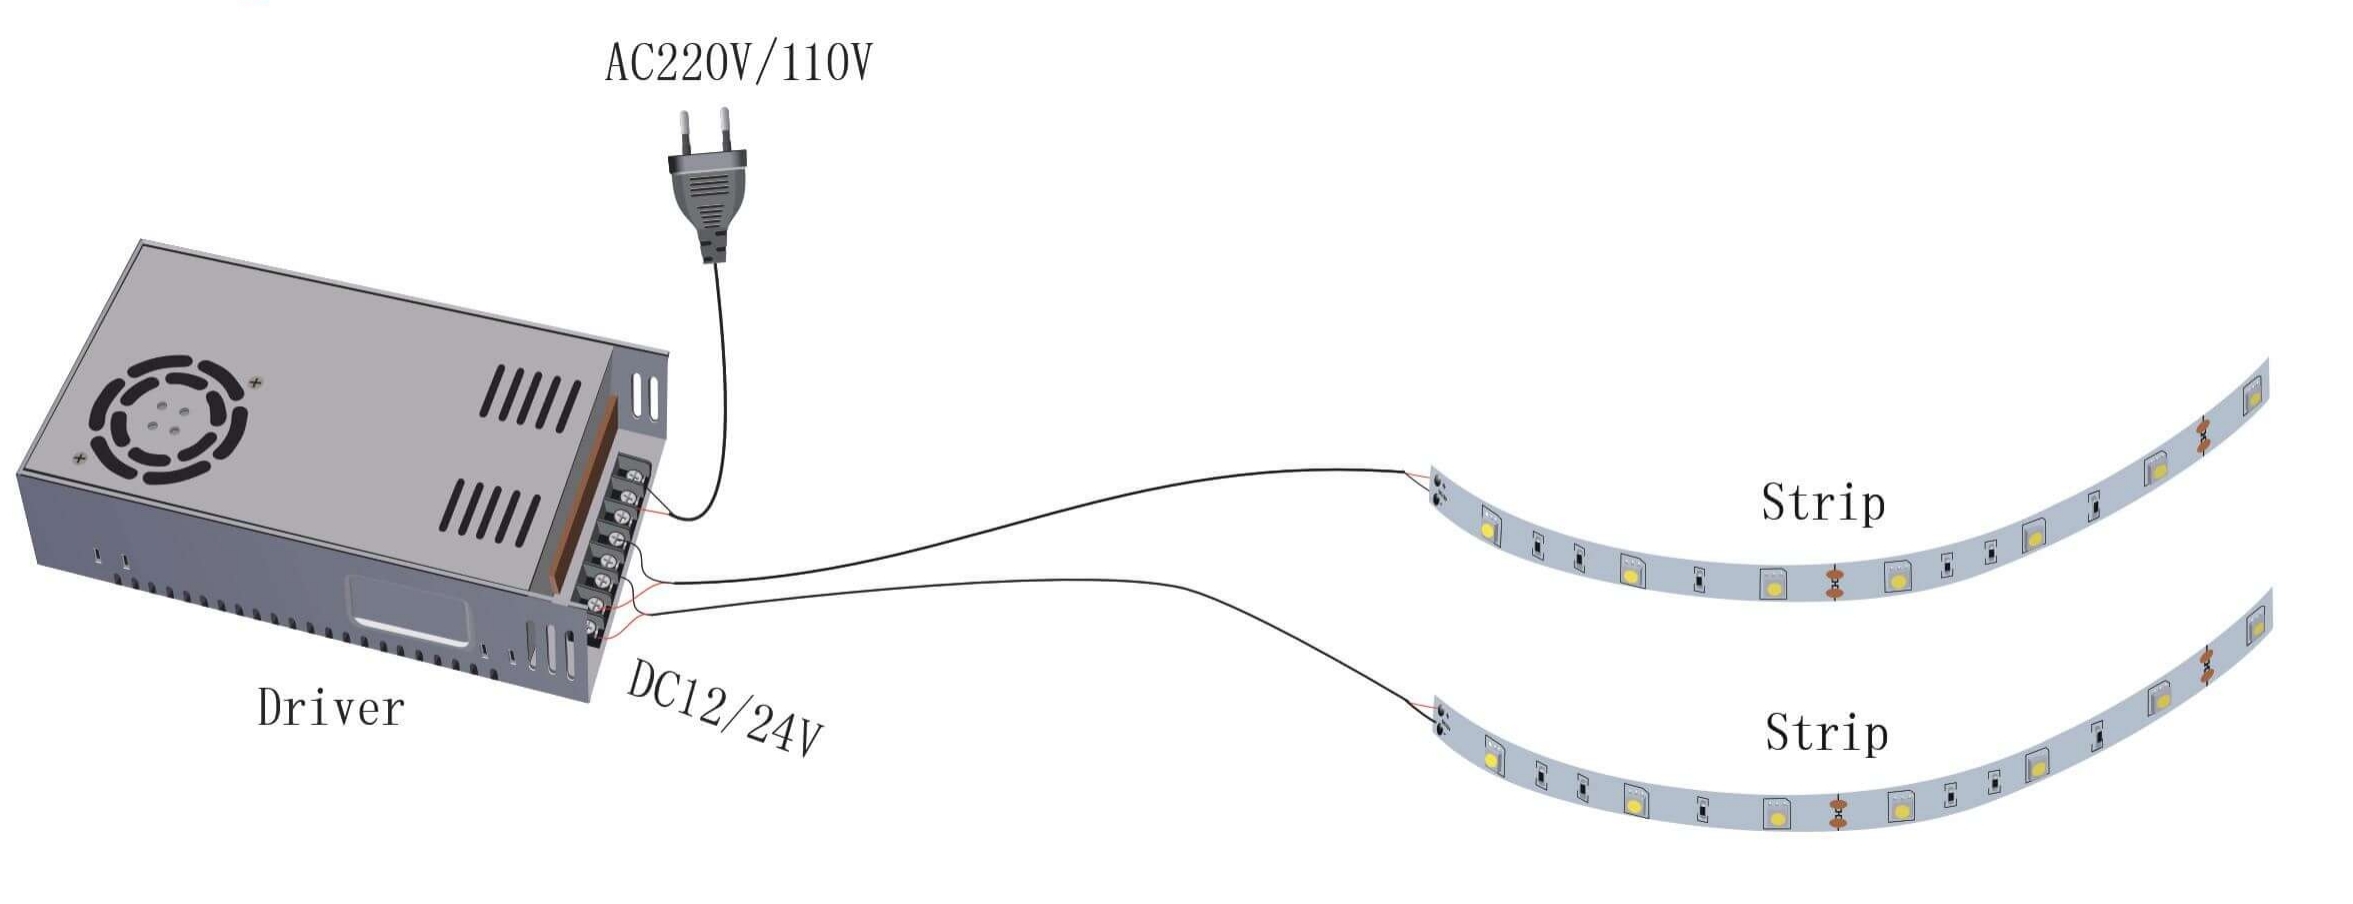
Multiple single color led strip lights can be connected to the same led driver, as long as the power supply can carry enough power required by the multiple led strips.
An SMD5050 led strip with 120 LED lights per meter requires 96 watts, and two that 5050 rope lights require 192 watts. Then it needs at least 230 watts of power to carry two such led strip lights because of the power calculation rule 80%. After the led driver consumes the required power of the led strips, there should be 20% of the space left to extend the service life.
2. Need to install the LED light controller
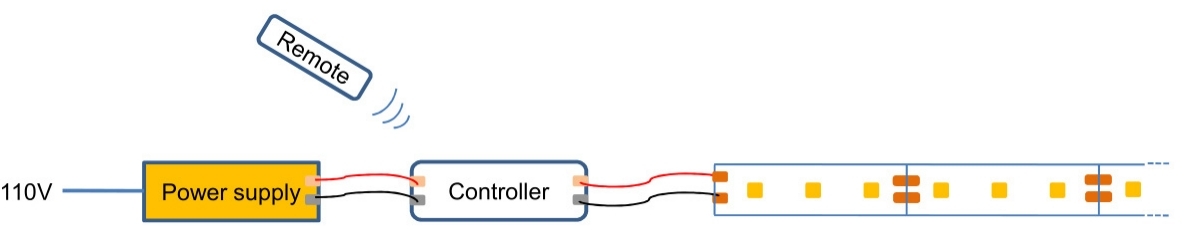
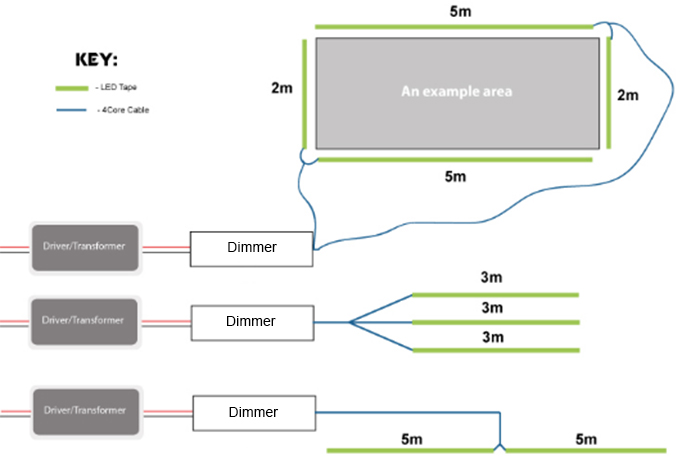
The LED dimmer controls the brightness of the single color led strip, and the led driver provides energy for the led controller and the led strip. Therefore, the connection sequence is the led strip to the led dimmer and the dimmer to the led power supply.
Can one dimmer control multiple single color led strips? Of course, an led dimmer can control two single color led lights like the below wiring diagram. It is worth noting that the power of the led light controller should be the same as the power of the led driver.
2. How to wire your large LED strip project?
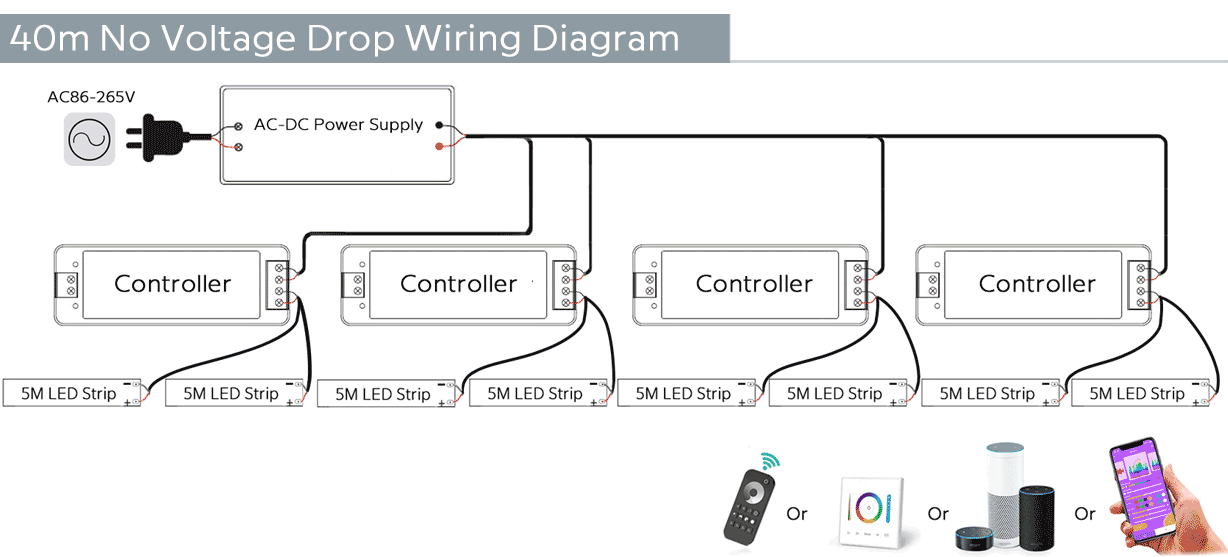
When there are long led light strips, how to install the light strip? There are two options. One is to choose an ultra-long constant current led strip, which can achieve ultra-long distance without voltage drop and solve wiring troubles. You can operate the constant current led strip light according to the above method without installing the led controller and installing the led light controller. The second is to hardwire multiple led strips, but complex wiring is required.
Choose which method to use according to your preferences and the actual situation. Now let’s talk about the wiring of multiple led strips in detail.
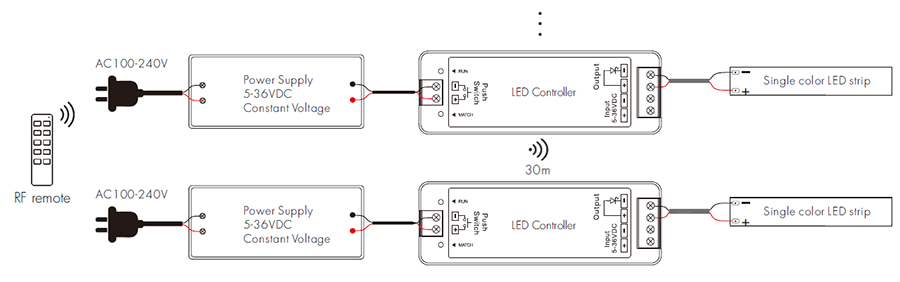
►2.1 Use the RF LED dim controller
Connect a single-color led strip to an RF led controller, and how many such sets are connected depends on your project needs. Then provide power to these RF wireless controllers. These led dim controllers can share a power source or use power sources separately, depending on if there is a voltage drop. To prevent the voltage drop, it is recommended to use the power supply separately.
The RF dim controller can realize automatic synchronization within 30 meters. The led light remote sends out a control signal, and the first led controller that receives the signal will automatically synchronize to the next led light controller and then the next controller is within the effective distance, which is less wiring cost between the led controllers.
Although there is an automatic synchronization distance of 30 meters, this distance will be attenuated due to the influence of other strong signal sources like the WIFI router and the microwave at home. The distance between the two RF led dim controllers should be no further apart than 15 meters.
2.1.1 How to set up the RF LED dim controller?
The RF controller supports a variety of control methods, mobile phones, remote control, panel control, Bluetooth, WIFI, and voice assistant. Multiple RF controllers can be controlled together or separately. There is a matching button on each led controller to match the remote control. An RF led controller can be paired in different zones of the same remote control to realize a flexible grouping function.
How to pair the RF LED light controller?
Step 1. Turn on the RF led controller and the led light remote.
Step 2. Press the matching button of the first RF led controller, and the controller indicator will flash.
Step 3. Press the “1” of the RF remote within 10 seconds.It means “1” can control the led strip controlled by the first RF led dim controller.
Step 4. Pair the other RF led controllers in the same way.
If you want to control the RF led light controllers at the same time, pair all the led controllers to the “1” of the remote, and of course, it can be “2”, “3”, or “4”.
For individual control, match the first RF controller to “1”, the second led controller to “2”, the third to “3”, and the fourth to “4”. In this way, you can control each led light strip individually to get the result you want. It is generally used in multiple zones, which solves the problem of connection between zones.
How to reset the RF led dim controller? Keep pressing the matching button until the indicator light flashes, which means reset successfully.
For controlling the RF led light controllers in the same area together, in fact, there is another simple way to install the led tape light, that is, to use an ultra-long constant current led strip, which saves the cost of using multiple led controllers.
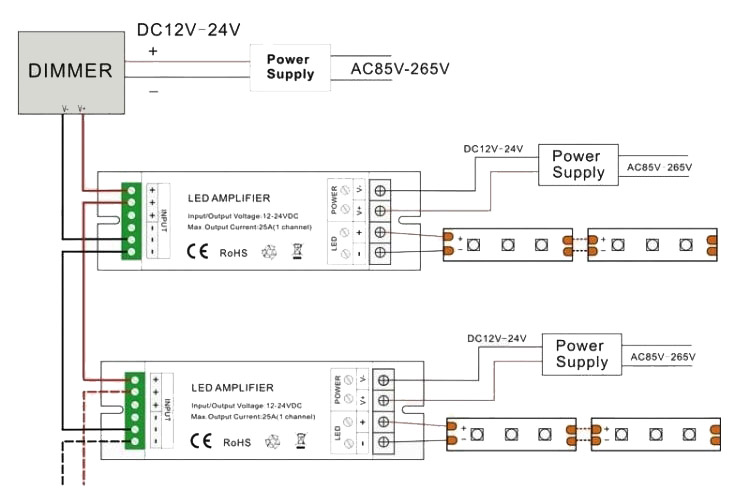
►2.2 Use the LED signal amplifier
1) What is an led signal amplifier?
The led signal amplifier is to enhance the weakened signal in the circuit to keep the color and brightness of the subsequently led strip consistent with the previous light strip. With the signal amplifier, you can connect the led light strips in series or in parallel.
• LED amplifier series wiring diagram
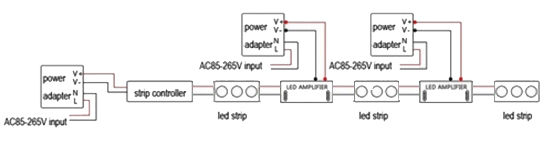
• LED amplifier parallel wiring diagram
2) When to use the led amplifier?
For simple led strip projects, no amplifier is needed. When it comes to multiple led strip wiring or you find that your led light is dimmed due to the signal attenuation, the amplifier will work at this time.
When the dimmer is overloaded, the power of all the light strips is greater than the power of the dimmer. At this time, an amplifier can be used to divide the light strip into two sections, with an amplifier in the middle.
3) How to use the led amplifier?
The led amplifier is installed behind the led light controller. And the led amplifier amplifies the attenuated signal flowing through the led strip, it is inevitable to connect the led light strip. However, without power, the amplifier will not work at all, so it is necessary to connect the led amplifier to the power supply. Simply put, the led amplifier needs to be connected to the led light controller, the led strip, and the led power supply.
The led amplifier power is related to the power of the led strip connected to the amplifier. If the led tape light connected to the led amplifier is 36 watts, the amplifier power must be at least 36 watts.
| LED amplifier power = Current x Voltage |
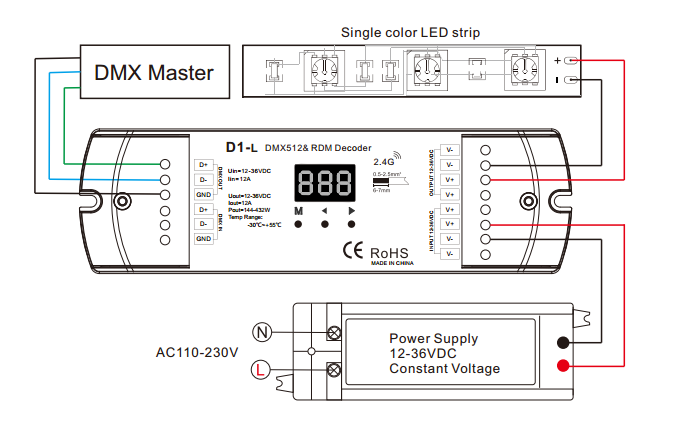
►3. Use DMX decoder
The DMX decoder is compatible with international standard protocols such as DMX512, with a constant voltage power supply and PWM constant voltage output, which can be used to control single-color LED lights. One DMX decoder can control multiple single color led strips to solve the complicated problem of led light strip wiring. Generally used for commercial lighting.
The wiring principle of one DMX console to control multiple DMX decoders:
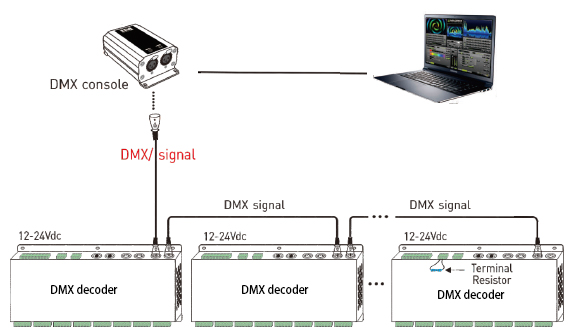

How to wire a single DMX decoder?