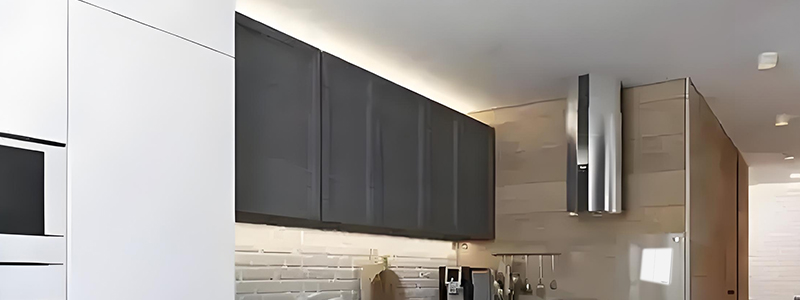
Ever walked into your kitchen at night, flipped on the overhead lights, and still found your island shrouded in shadows? The solution isn’t a brighter ceiling fixture—it’s above-cabinet lighting using LED tape lights. This subtle yet powerful design ‘borrows’ the ceiling as a reflector, bathing your space in glare-free, even illumination while visually lifting the room’s height. Today, we’re breaking down how this permanent uplighting solution can transform your kitchen lighting—no bulky fixtures required.
Strip Lights for Over the Cabinet Lighting
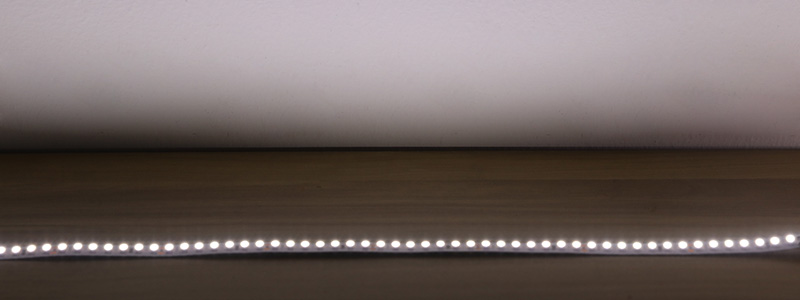
When it comes to permanent above-cabinet lighting installations, LED strip lights offer unparalleled advantages that make them the ideal choice. Their slim, flexible design allows for seamless integration along cabinet tops, creating a clean, modern look without the bulkiness of traditional lighting fixtures. This form factor is particularly beneficial for illuminating the often narrow and hard-to-reach spaces above cabinetry, where other lighting solutions might prove impractical or visually intrusive.
LED strip lights above cabinets typically serve as ambient lighting. For kitchen applications, we recommend 200-300 lumens per foot (656-984 lumens per meter) – this provides sufficient illumination to minimize shadows while creating a warm, inviting atmosphere. It’s important to avoid excessive brightness, as too much light can cause glare and strong reflections on the ceiling. The ideal lumen output should balance functionality with aesthetics. In spaces where above-cabinet lighting serves as the primary light source (particularly in compact areas), carefully calibrated LED strips can deliver perfect illumination without overwhelming the space.

Optimal Placement for Above Cabinet LED Strip Lighting
The positioning of LED strip lights above cabinets significantly impacts both the lighting effect and overall ambiance of the kitchen space. When deciding between direct wall corner mounting or leaving a gap, there are important visual and practical considerations to account for.

Mounting the strips directly against the wall creates a concentrated uplight effect, where light beams vertically toward the ceiling in a narrow column. This approach works well when aiming to create dramatic ceiling washes or when dealing with limited depth on the cabinet tops. However, it can sometimes produce harsh light cutoffs or visible “hot spots” where the light intensity is strongest near the wall.

Leaving a deliberate gap of 2-4 inches between the strip and the wall produces a markedly different lighting effect. This placement allows the light to diffuse more naturally as it travels upward, creating a softer gradient transition from cabinet top to ceiling. The slight setback helps minimize visible light sources from normal viewing angles while promoting more even illumination across the ceiling surface. This technique is particularly effective in spaces with higher ceilings where a gradual light fade is desired, as it prevents the “laser beam” effect that can occur with direct wall contact installations.
Most professional installers recommend positioning the LED strips toward the front edge of the cabinet’s top surface, typically 3-6 inches from the front lip. This placement offers several advantages: it conceals the light source from direct view when standing in the room, prevents dust accumulation in hard-to-clean areas near the wall, and provides optimal light distribution for both functional and decorative purposes. The exact positioning may vary depending on cabinet depth, with deeper cabinets (over 12 inches) sometimes benefiting from multiple parallel runs of lighting for complete coverage.
The required beam angle of the LED strips becomes an important factor in above-cabinet applications. Standard 120-degree diffusion strips work well for most installations, but situations requiring more precise light control may benefit from LED strips with narrower 60-degree or 90-degree beam angles. These focused options help direct light exactly where needed while minimizing spill into unwanted areas. For cabinets with particularly deep tops or unusual architectural features, consider strips with side-firing LED configurations that can illuminate both upward and outward simultaneously, creating dimension and visual interest in the space. Proper placement combined with appropriate beam angles ensures the lighting enhances the room’s architecture rather than drawing attention to the fixtures themselves.
Protection and Maintenance for Long-Lasting Cabinet Lighting
The longevity and performance of your above-cabinet LED strip lighting largely depend on proper protection and maintenance considerations. When selecting between different protection methods, the environment where the lighting will be installed should be your primary guide. In standard indoor kitchen environments where exposure to moisture is minimal, IP20-rated strips without additional housing are often sufficient and provide the most streamlined installation. However, these bare strips do require more frequent cleaning as they are prone to dust accumulation between the LEDs, which can gradually diminish light output over time.

For areas where occasional moisture exposure or grease accumulation is expected – particularly in kitchens near cooking surfaces or in bathroom applications – IP65-rated waterproof strips offer valuable protection. These silicone-coated strips resist moisture penetration while still allowing for relatively easy cleaning. The sealed construction prevents oil and steam from damaging the circuitry. When installing waterproof LED strips, special attention should be paid to the end caps and connection points, as these remain vulnerable areas where moisture could potentially penetrate.

Aluminum channels represent the premium protection solution, offering both physical shielding and enhanced heat dissipation. These extruded profiles not only protect the delicate LED strips from impacts and environmental contaminants but also significantly extend their lifespan by drawing heat away from the diodes. Channels with frosted diffuser covers provide the added benefit of eliminating the “dotting” effect seen with bare LED strips, creating perfectly even illumination that’s particularly desirable in visible applications.
Installation methods vary significantly between these protection approaches. IP20 and IP65 led strips typically use adhesive backing for direct mounting, though this can fail over time in warmer environments above cabinets. Supplementing with additional mounting clips or high-temperature adhesive is recommended for permanent installations. Aluminum channels offer the most robust mounting options, either screwed directly into cabinetry or secured with heavy-duty industrial adhesives.
Maintenance routines should be tailored to your chosen protection method. Unprotected IP20 strips benefit from quarterly cleaning with a dry microfiber cloth to remove dust, while IP65 strips can withstand occasional damp wiping. Aluminum channel installations are the easiest to maintain long-term, requiring only annual dusting of the diffuser surface.
Wiring Planning For Over Cabinet Kitchen Lights
Proper wiring implementation forms the backbone of any successful above-cabinet LED installation, where both functionality and aesthetics demand careful consideration. The art of hidden wiring begins with identifying natural concealment opportunities within your kitchen’s architecture – the void space above upper cabinets often serves as perfect routing channels for discreet wire runs. For particularly visible sections, paintable wire tracks or slim cord covers can maintain clean lines while blending with your wall color. The true challenge emerges when bridging multiple cabinet segments; here, strategic drilling through cabinet sides or utilizing the existing gap between wall and cabinetry allows for nearly invisible inter-cabinet connections that maintain electrical continuity without visual disruption.
Power supply positioning requires thoughtful planning to balance accessibility with concealment. The ideal location typically resides inside an adjacent cabinet or in the corner cabinet’s top compartment, places that offer both protection and relative ease of access for maintenance while keeping transformers out of sight. When dealing with extensive runs, consider dividing the installation into logical zones powered by separate drivers rather than stretching a single power source beyond its capacity – this approach not only prevents voltage drop but also allows for independent control of different lighting sections. A common oversight involves failing to account for the power supply’s heat dissipation needs; even quality drivers require adequate ventilation space to prevent premature failure.
The question of series versus parallel wiring depends largely on your specific LED strips’ capabilities and the overall run length. While series connections offer simpler wiring with fewer connection points, they’re only viable for shorter runs due to cumulative voltage drop across the strip. This is where long-run LED strip solutions show their value – these specialized strips allow for longer continuous runs without significant voltage loss.
Smart Controls & Lighting Customization: Personalized Over Cabinet Light
The true potential of above-cabinet LED strip lighting reveals itself in customizable control options and smart home integration. When planning your installation, consider whether to incorporate traditional wall switches or rely solely on smart controls. While smart systems offer convenience, installing a dedicated physical switch provides a reliable manual override – particularly useful during network outages or for guests unfamiliar with your smart home setup. For dimming capabilities, ensure your LED driver and control system support PWM (Pulse Width Modulation) or constant current reduction for smooth, flicker-free brightness adjustment.
Color temperature selection of LED over cabinet lighting should align with the space’s function—kitchens typically benefit from 3000K-4000K neutral white light, ensuring natural food presentation without an overly clinical feel, while living rooms or bedrooms may opt for 2700K warm white for a cozy ambiance or RGB strips for dynamic mood lighting. Modern tunable white strips take this further, allowing users to adjust lighting based on circadian rhythms or occasions, transitioning from crisp morning light to soft amber tones at night for truly adaptive illumination. When selecting light strips over cabinet, verify if they support 0-10V or DALI protocols if you plan professional-grade dimming integration.
Power supply selection, often overlooked, is critical for system stability. For dimmable installations, choose drivers specifically labeled as “dimmable” and compatible with your chosen control method (TRIAC, ELV, or smart protocols). For kitchen environments, select a transformer rated at least 20% higher than the actual power requirement to handle potential current fluctuations during dimming operations.
Smart home integration elevates cabinet lighting to new heights. Via Wi-Fi or Zigbee controllers, strips can seamlessly connect to platforms like HomeKit, Google Home, or Xiaomi’s ecosystem, enabling voice commands, automation, and scene synchronization. More advanced setups incorporate motion sensors to automatically activate task and accent lighting upon entering the kitchen with adjustable sensitivity and timeout settings to fine-tune responsiveness.
When seamlessly integrated with proper dimming capabilities and control options, above-cabinet lighting transforms from a basic utility into an intelligent, responsive system – blending functionality with sophistication and elevating everyday experiences through technology while always maintaining user-friendly operation.