
How to Connect LED Strip Lights?
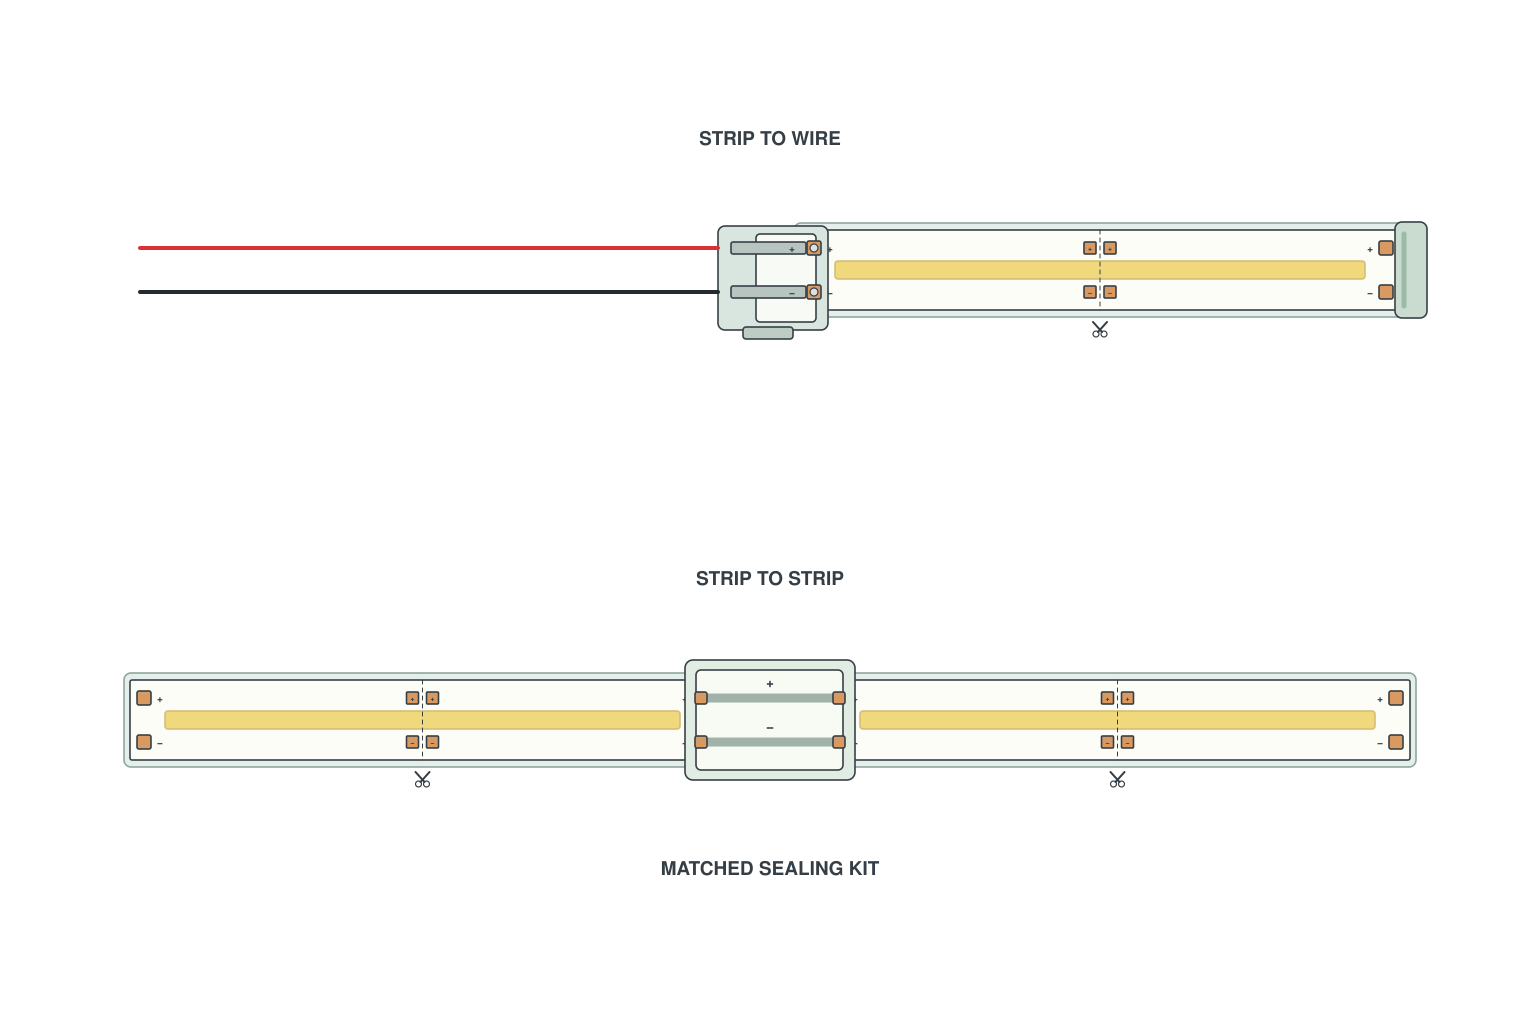
Cut both LED strips at a cut mark, then join them in one of three ways:
- Solderless connector: slide both strip ends into a strip-to-strip clip connector made for your strip width and pad count, and close it.
- Soldering: tin the pads and the wires, touch the iron for about a second per pad, and cover the joint with heat-shrink; the most stable joint.
- Extension cable: when the two strips are apart, put a strip-to-wire connector on each end and run an extension cable between them.
Connecting more than two? do not run them all end to end from one feed. Feed each 5 m section (12V) or 10 m section (24V) with its own pair of wires, and size the power supply 20% above the total (the 80% rule).
Correctly connecting LED strip lights is a fundamental part in the use of strip lights. When you tend to decorate your room with DIY LED strip lights, but you do not know how to connect LED strip lights. Here you will learn the LED strip light connection method.
Before installing LED strip lights:
1. First you have to measure the length of your preferred installation place.
2. Second, mark the cut location according to the length. Ensure that you can’t cut a wrong position.
3. Third, cut the LED strip light with a sharp scissor along the cutting line. Do not cut to other locations, otherwise, it will cause a section of the LED strip light not to light up.
More knowledge :
Can you cut led strip lights? What happens if you cut an led strip?
What you need to know about led strip installation:
How to connect two light strips together?
How to wire single color led strip lights?
How to wire tunable white/CCT led strip lights?
How to wire RGB color changing led strip lights?
At SuperLightingLED we cut and join LED strips every day, and most strips that come back to us for warranty failed at a joint, not in the middle of the reel. So start here: the three ways to join two strips, what each needs, and where each one goes wrong.
3 ways to connect two LED strips together
Soldering and connectors are the two basic ways; the third is the connector method with a length of cable in the middle, for strips that do not meet. Whichever you use, join only strips of the same type and voltage, and match + to +.
| Method | Tools | Best for | Watch out |
|---|---|---|---|
| 1. Solderless connector | Scissors and a strip-to-strip clip connector made for your strip width (8, 10 or 12 mm) and pad count | Quick DIY joins; simple and convenient, easy to install and remove | If the strip power is too high it will burn the connector, and a clip can work loose or make poor contact. On waterproof strips peel the last 5 mm of cover first. |
| 2. Soldering | A 30–40 W soldering iron with a fine tip, solder, a wet sponge, gloves, heat-shrink or silicone | Permanent joints, tight spaces, narrow strips; the most stable and reliable connection | Needs soldering skill. Keep the iron under 3 seconds per pad so you do not overheat the strip; solder contains lead, so wear gloves. |
| 3. Extension cable | A strip-to-wire connector (or soldered leads) on each strip end and an extension cable between them | Two strips that are apart: across a gap or around an obstacle | Thin cable drops volts before the next strip even starts; when in doubt go one gauge heavier. Match the pin count at both ends. |
Going round a corner? Use an L connector (two clips at 90 degrees) instead of folding the strip; a T connector when a run branches, a + connector for four ways (keep the total current within the connector rating). Corner connectors are for the same strip type only; do not mix voltages.
Diagrams drawn by the SuperLightingLED engineering team or taken from our wiring guides; click one for the full notes in our LED strip wiring diagrams library.
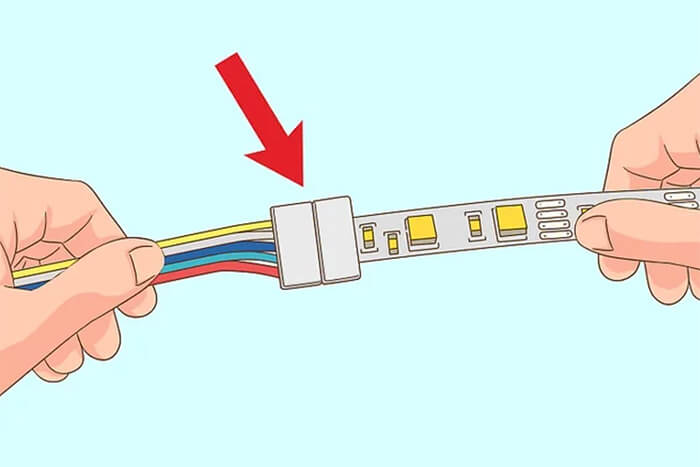
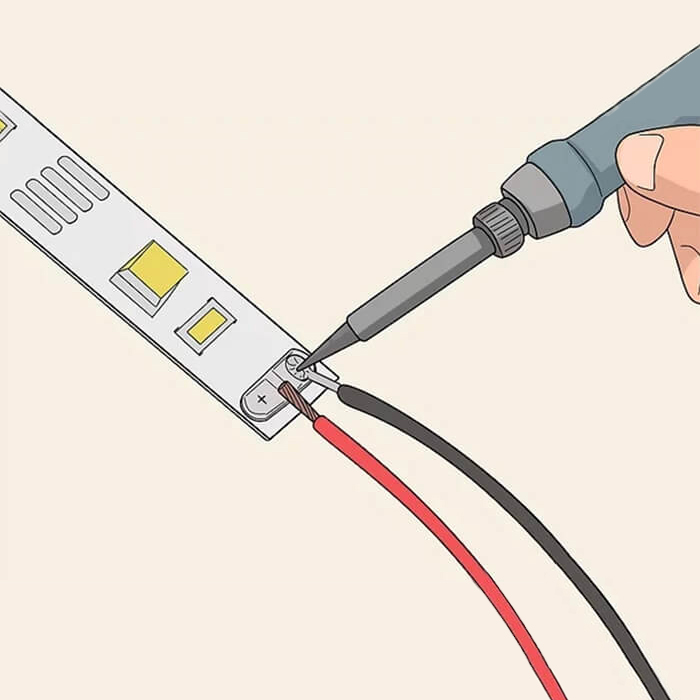
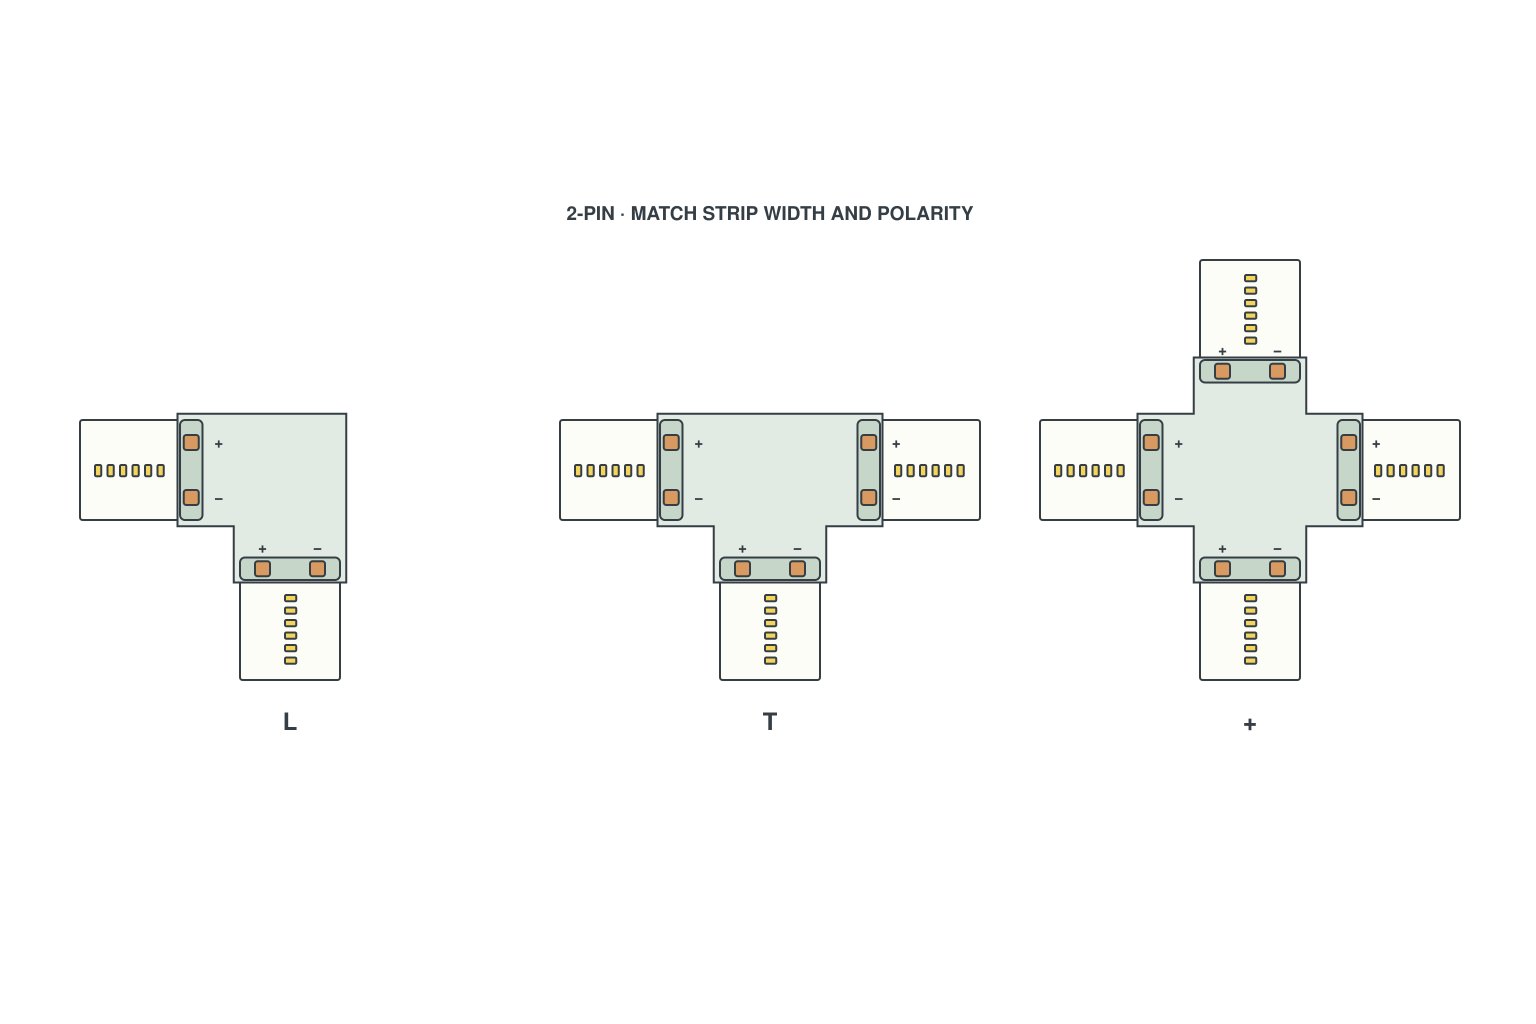
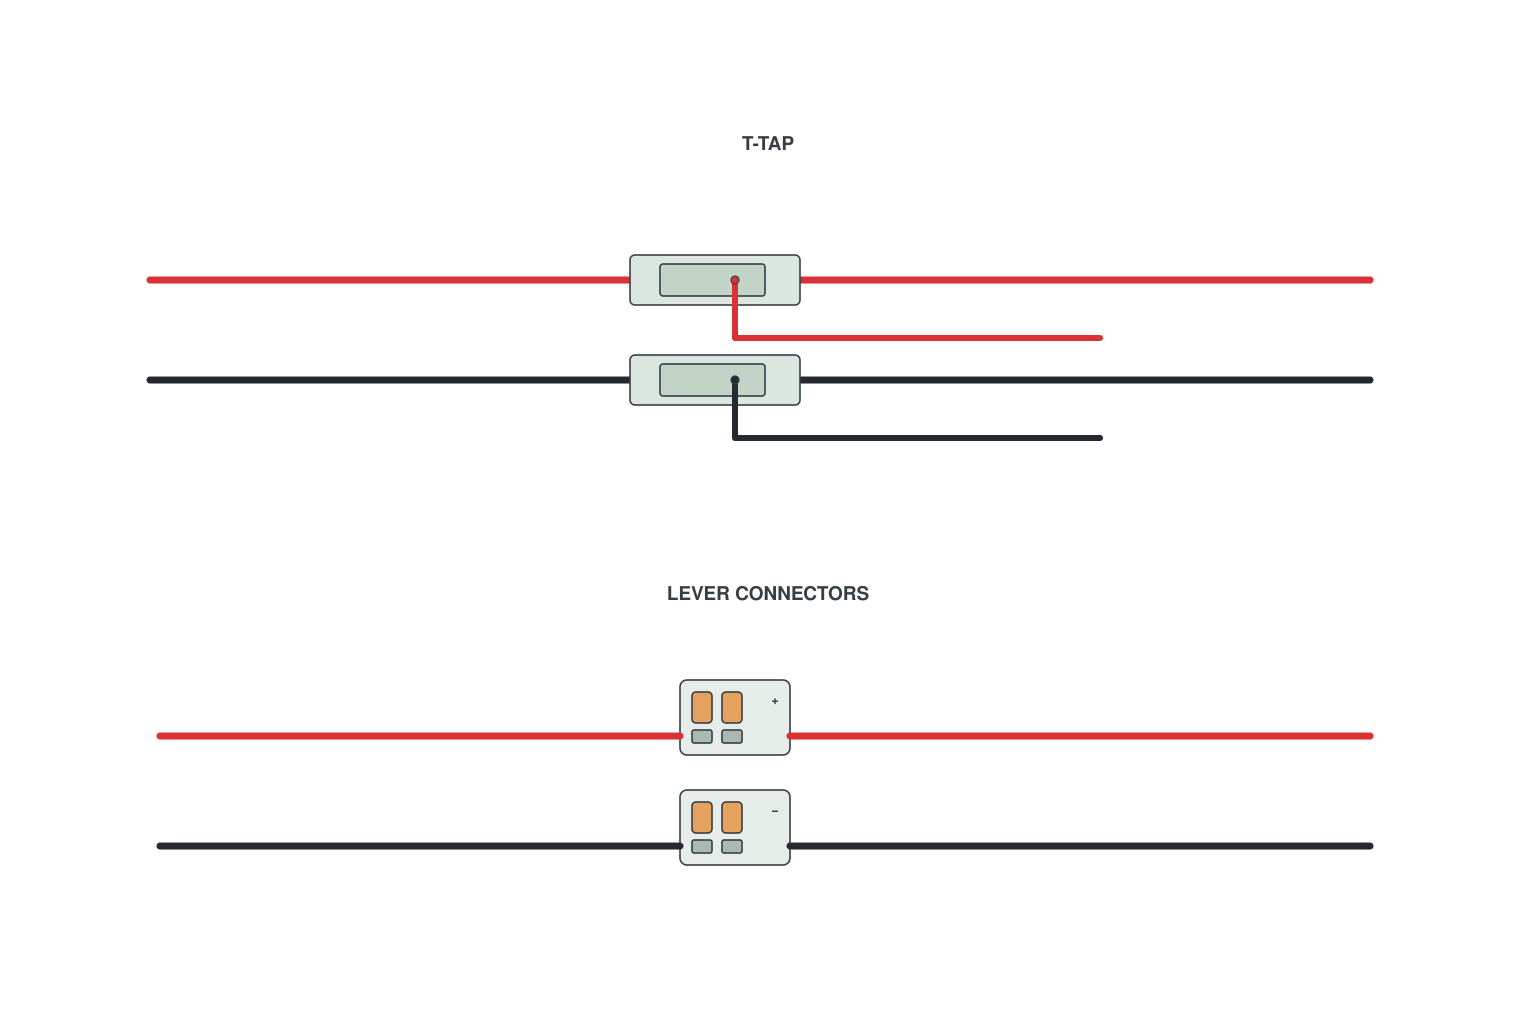
Step-by-step detail follows below: soldering, connectors and which one is better. Need the connector for your strip? See how to choose LED strip light connectors. Connecting the first strip to the supply? See how to connect an LED strip to the power supply.
Connecting waterproof and COB LED strips
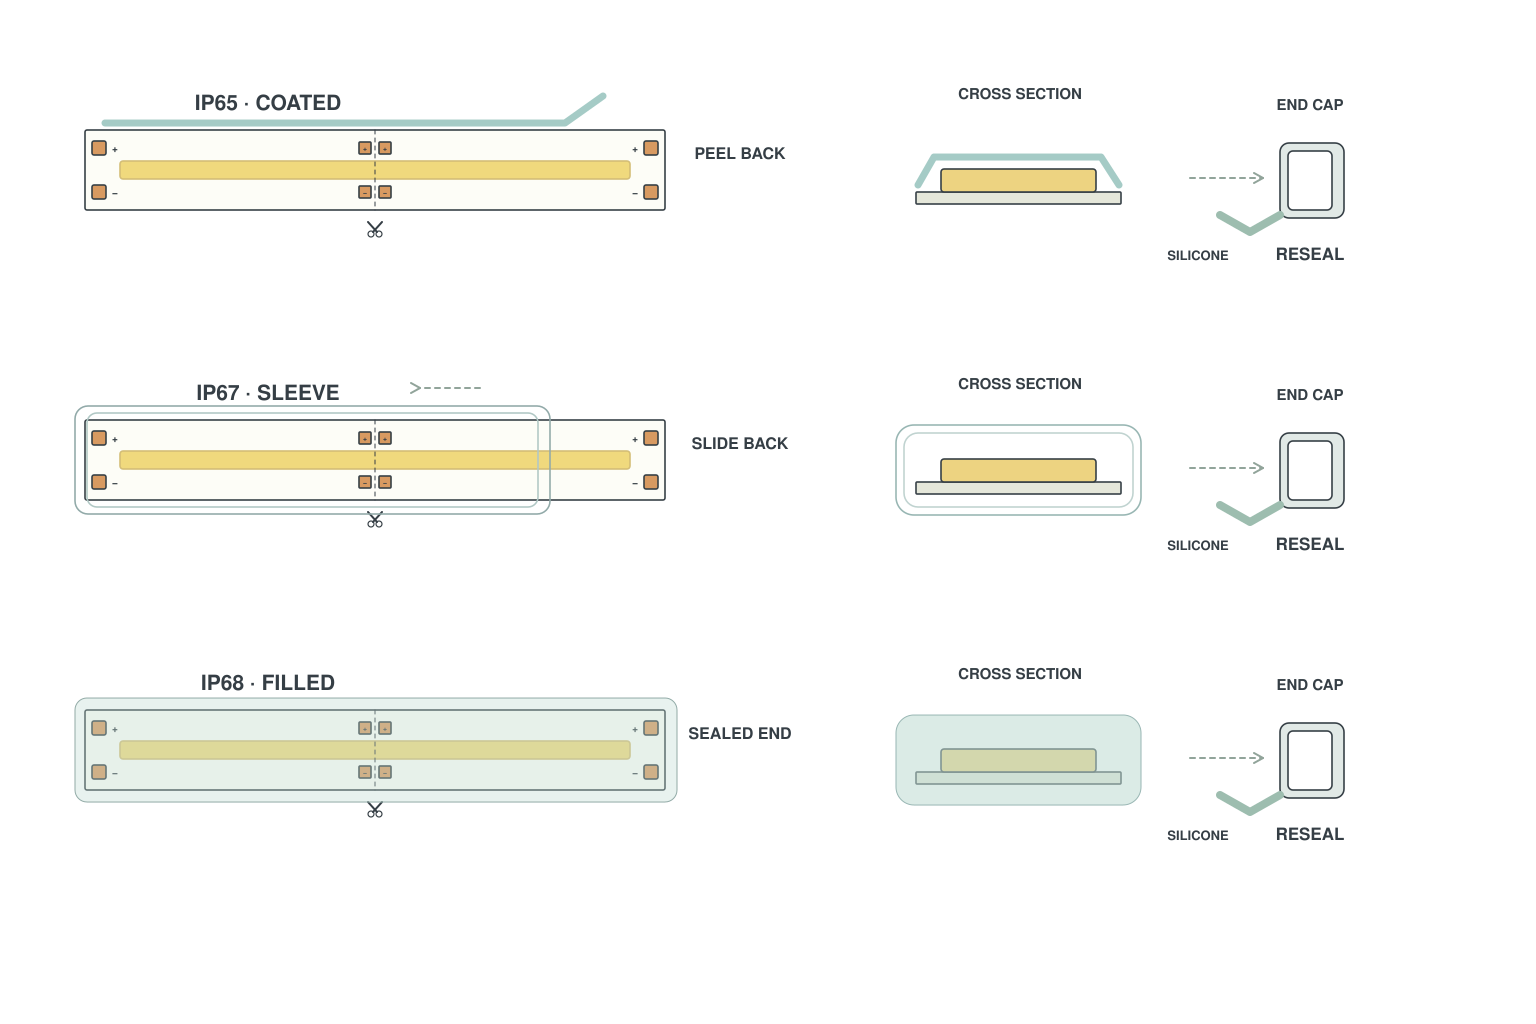
Waterproof and COB strips join the same ways, with one extra rule for each: every cut on a waterproof LED strip is a new joint that has to be sealed, and a COB strip takes a COB connector.
- IP65 (silicone coat): cut at the mark with scissors, peel the coating off the last pad.
- IP67 (silicone sleeve): cut, slide the sleeve back to expose the pads. Strip-to-wire: push the pads into the IP67 clip and close it. Strip-to-strip: both strip ends into the double clip. Seal the clip with the supplied silicone cap or heat-shrink, and match the pin count and the 10 mm / 12 mm width.
- IP68 (filled tube): cut, then re-seal the new end with the end cap and silicone.
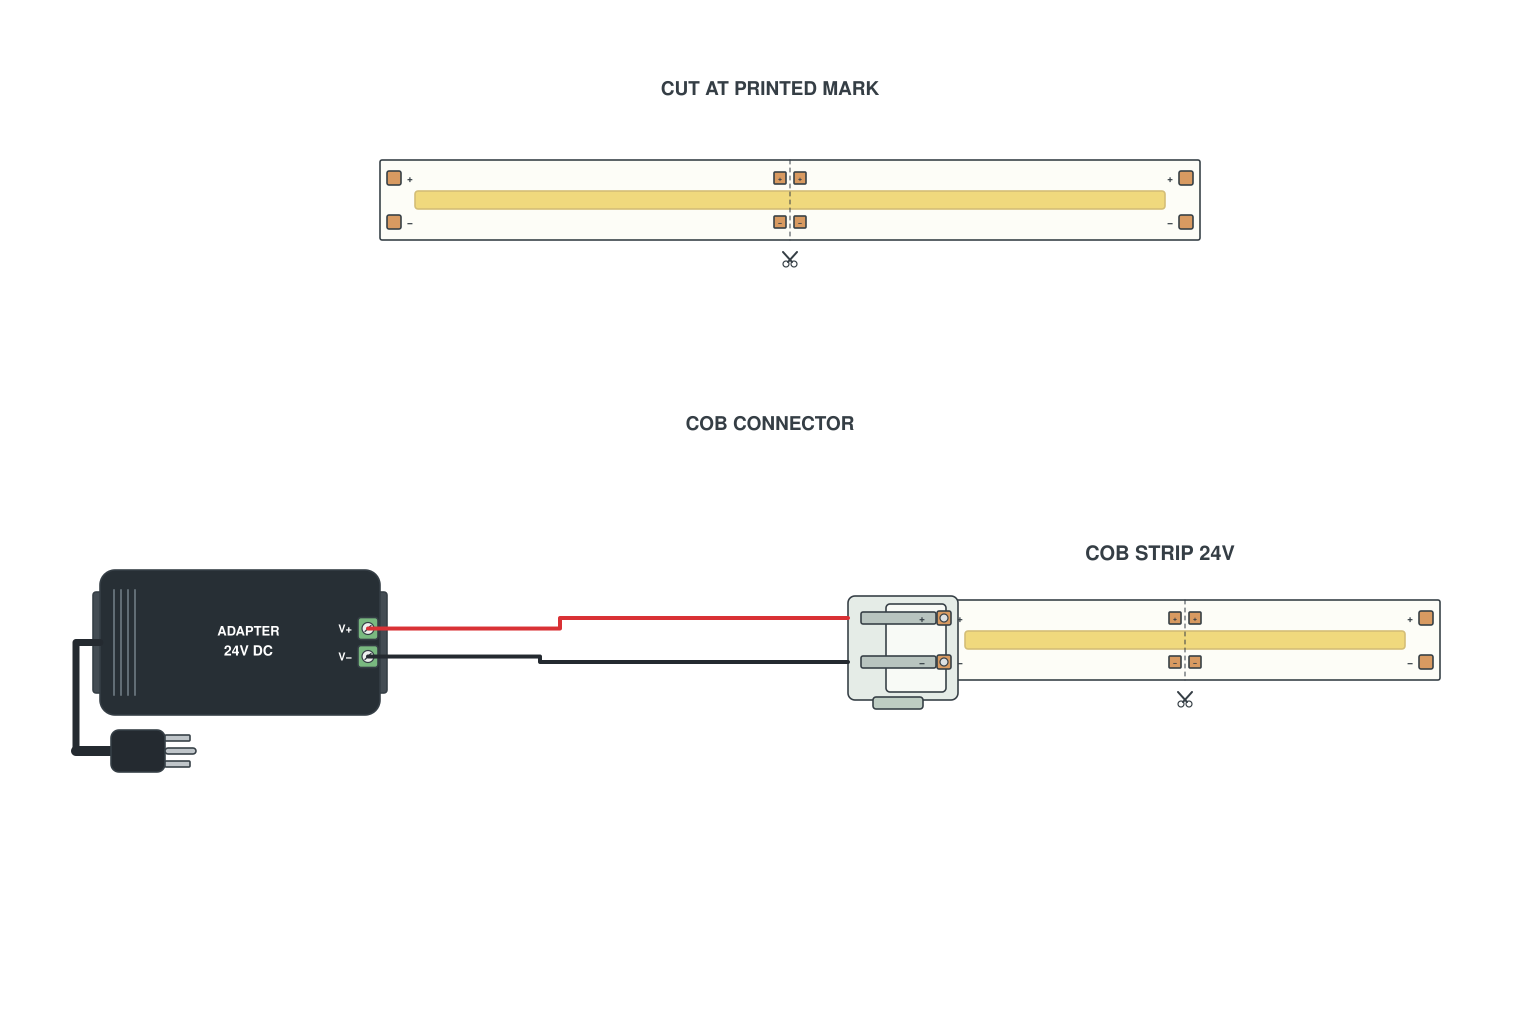
- COB LED strips: cut only at the printed mark (every 25–50 mm). Clip the COB connector onto the bare end, or tin the pads and solder wires with a fine tip and a short contact time; the pads are small. Then connect it to the supply or dimmer as with any single colour LED strip.
- Outdoor joints: use IP67/IP68 connectors, male-female plugs with the O-ring seated; hand-tighten the nut and leave a drip loop so water runs away from the connector.
How to connect LED strip lights together?
There are two ways to connect LED strip lights together, soldering or using LED strip light connectors. Which one is more suitable for you? You can accord to their advantages and disadvantages to choose.
How to connect led strip lights without connectors?
Soldering is a more stable way than using connectors. Performance is almost the same before and after soldering and it almost has no influence to LED strip lights. But it requires you have soldering tools. And the operation is required you to have certain soldering skills.
How to solder wires to led strips?
5 steps to soldering led strip lights:
►Step 1. Keep the tip of the soldering iron clean. Rub a few times on the sponge that is full of water. It is not only to temporarily cool down the temperature, but also to rub off the excess tin on the tip of the soldering iron. Be careful not to burn your hands. ►Step 2. Hold the wire in your left hand and the soldering iron in your right hand. During soldering, remember to wear gloves. Don’t breathe in the smell which is harmful to health. ►Step 3. Lightly touch the tinned part of the wire to the solder joint of the LED. Tap lightly with the soldering iron, and pay attention to the tip of the soldering iron touching the two objects at the same time. ►Step 4. Stay for a few seconds and leave at an angle of 45°. ►Step 5. After sticking firmly, connect the power supply to see if the strip light can light up. |
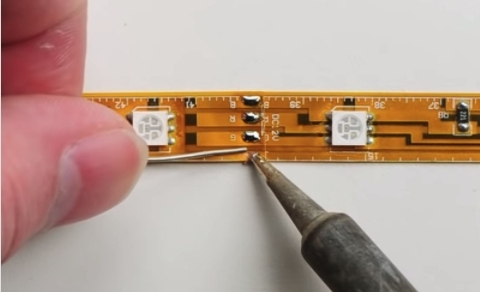
Precautions for soldering:
1. The solder wire contains a certain amount of heavy metal lead, which is harmful. Wear gloves during operation or wash hands after the operation.
2. Do not touch the tip of the soldering iron with wires and other sundries to avoid burns or leakage.
3. Be careful not to solder on a metal pad, as the temperature of the soldering will not rise due to the better heat dissipation effect.
How to connect led strips without soldering?
Using LED strip light connectors is very easy. Slide the open end of LED strip light into the connector and close it to lock it in. Although the operation is convenient, there are still areas to be aware of. If the power of LED strip light is too high, it will burn the connectors. And sometimes it has poor contact.
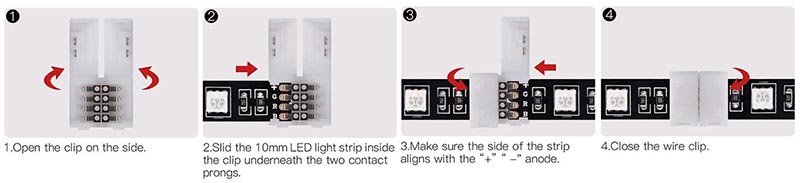
L shape LED strip light connectors are suitable for corners, where need to change direction. - shape connectors are suitable for straight direction or over obstacles. And there are T shape and + shape connectors, meeting different demands.
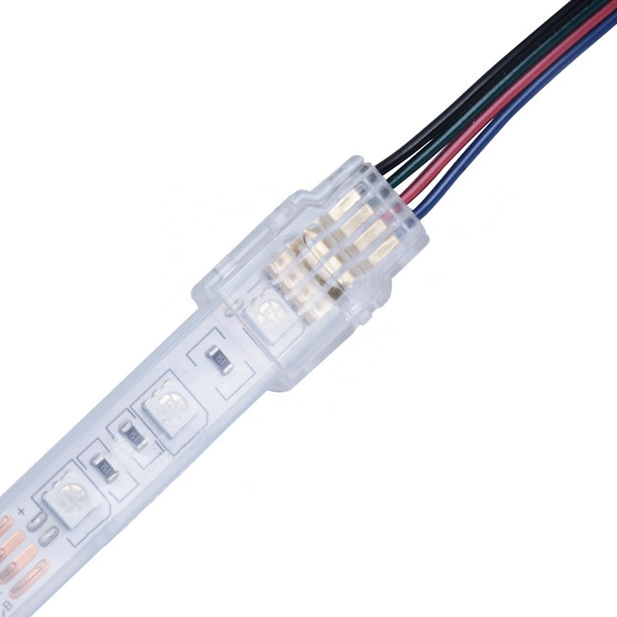
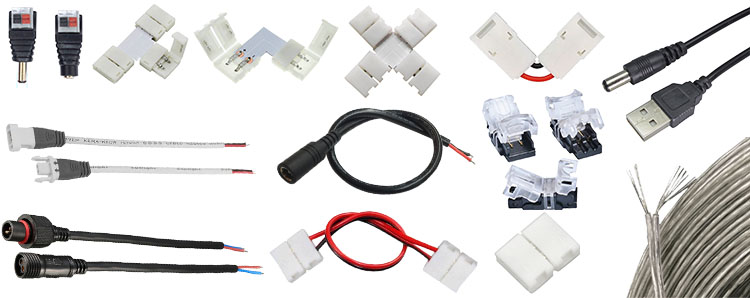
In addition to the strip-strip connector, there are also strip-wire connector used to connect strip lights to other wire interfaces, and wire-wire connector which connects wires and wires.
Choose the perfect LED strip light connectors for your project.
Which one is better between soldering and led connectors?
| Soldering | LED connectors |
• Require soldering technology and knowledge • Need soldering equipment • The connection is more stable and reliable • Not easy to loosen and fall off • Long duration |
• Simple and convenient operation • Easy to install and remove • Affected by the power of led strip light • May be loose or poor contact |
Considerations to connect multiple LED strip lights
Connect an LED strip light to an LED power supply is easy. But what if there are multiple LED strip lights? First to consider this two questions below.
Is there a voltage drop?
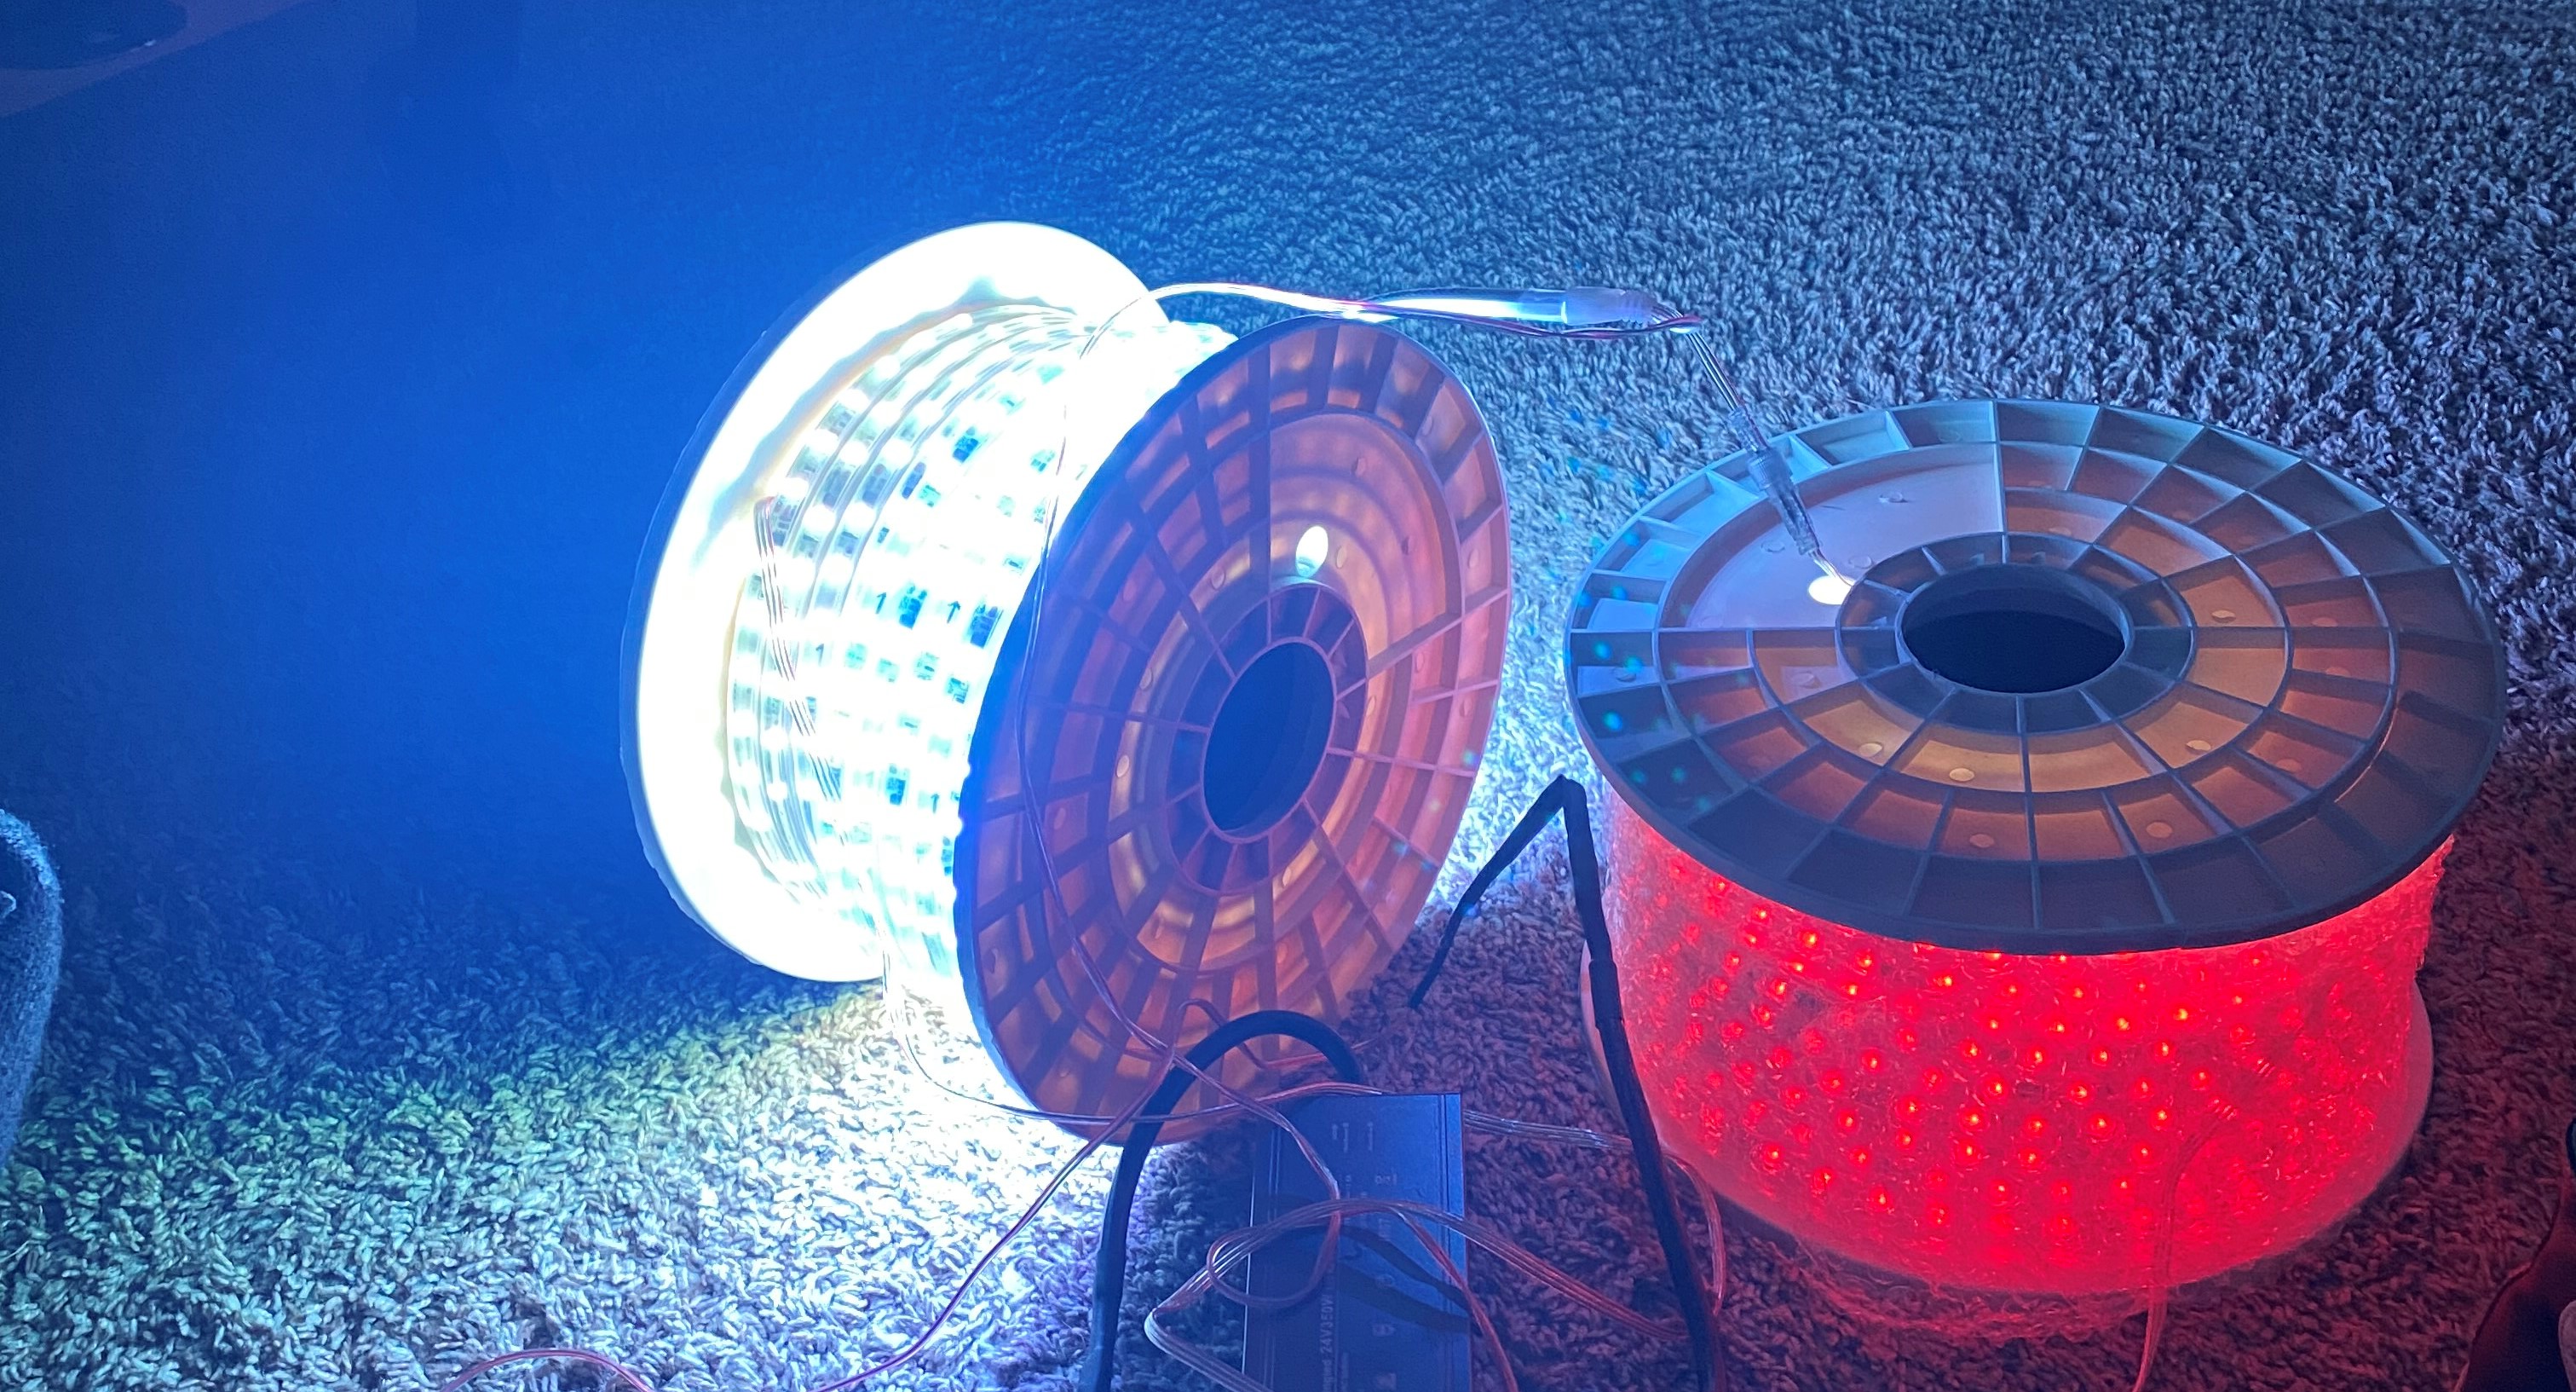
When you connect LED strip lights in series, you will find that the brightness and color get darker as the length of LED strip lights becomes longer with one power supply. Because LED strip lights have voltage drop. To make sure the brightness of LED strip light is the same, you can add another power supply in the end or connect an amplifier. An amplifier is placed between two LED strip lights, and it should be connected to the power supply.
Do I need an LED signal amplifier?
The color of the color changing LED strip lights can be changed after the controller is equipped. But the controller has a certain power, and it cannot bring unlimited LED strip lights. It needs an amplifier to amplify the signal of the controller, and then give the strip lights signal, so that a whole color changing LED strip light can work normally. If you don’t add an amplifier, the color changing strip light in the end will be very dim until it doesn’t light up.
How to connect multiple LED strip lights?
If you want to connect a 20-meter RGB color changing LED strip lights, typically an LED strip light is 5 meters a roll, and it means that you have to connect 4 LED strip lights. If total power of four LED strip lights is 200W, the power of the power supply and the controller need to be 250W.
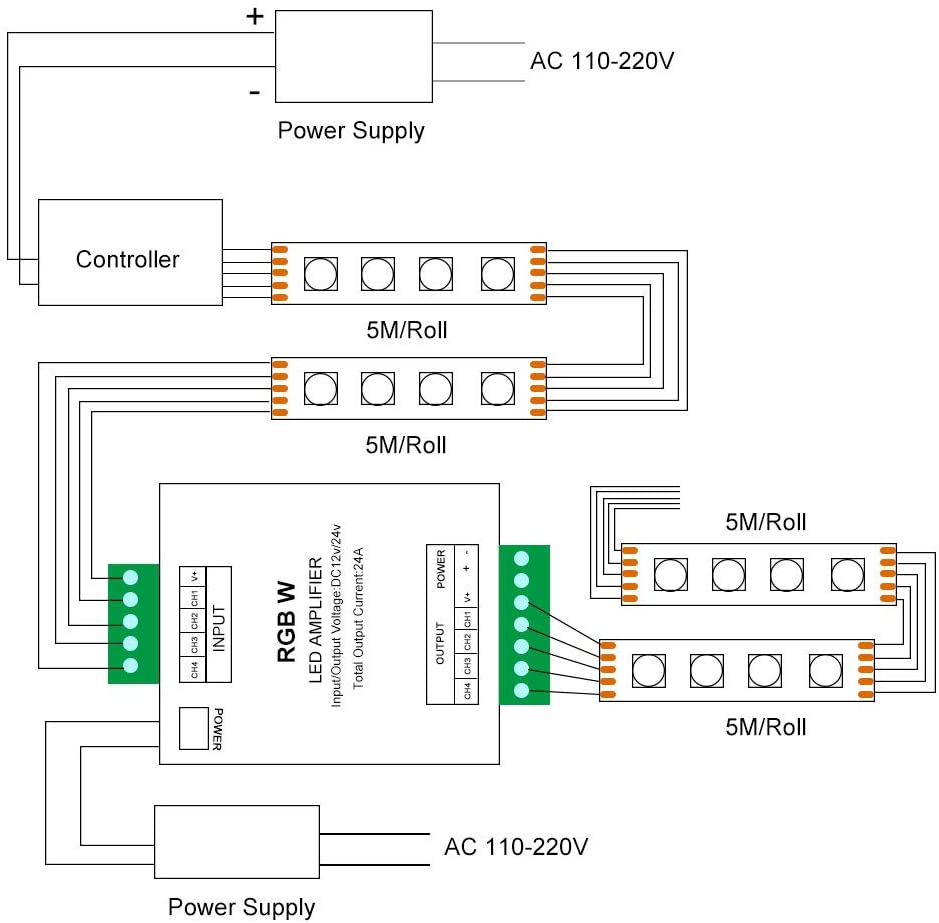
1. Traditional wiring method - Use Signal Amplifier
One connection method is that, power supply connects to controller, and the controller connects to 4 LED strip lights in parallel.
Second connection method, use an amplifier. The function of the amplifier is to amplify the signal that is weakened due to a long distance, so that the brightness and color of all the strip lights look the same. Power supply is connected to controller, and controller is connected to LED strip lights, and the amplifier is connected between every two strip lights.
The amplifiers need to be powered separately. You can also share a power supply with the controller, but pay attention to the power problem. Because in this way, the total power used by the power supply becomes larger, because you need to power the amplifiers, then you need a more powerful power supply to run.
But the use of amplifiers has a disadvantage, that is, it is not suitable for super long projects like 100 meters or 200 meters. If the distance is too long, the signal transmission will be delayed. You may have to wait a few seconds to light up the strip lights at the end.
2. Emerging wiring method - RF Wireless Control
Use the radio frequency controller to connect the RGB color changing LED strip lights. Power supply connects controller, and controller connects a strip light. And connect four groups strip lights in this way. Each group can be controlled individually.
The advantages of radio frequency control are that, the wiring is simple and not so complicated, and multiple controllers realize automatic synchronization, which can be controlled by mobile phone APP, RF remote control, touch wall panel, and intelligent voice control.
Note that the maximum distance between each RF controller is only 30 meters. Be careful not to exceed the maximum distance when connecting.

Overall, when you are connecting multiple LED strip lights, you have to ensure that it can normal work. Notice the voltage drop problem and the power can support the work. There is no doubt that the LED strip lights must be charged for normal use. Please pay special attention to this during the use of the LED strip lights.
Series or parallel: how to wire multiple LED strips
Joining strips end to end (in series) keeps the light continuous, but the current for the last strip then passes through every strip before it, which is why the far end gets darker. Keep the physical joint, and bring the power in parallel:
| Your layout | Wire it like this | Watch out |
|---|---|---|
| Two 5 m single colour reels | A separate pair of wires from the power supply terminals to the start of each reel (parallel); a splitter cable does this neatly when both reels start near the supply | Do not join the second reel to the end of the first: 10 m end to end at 12V is dim at the far end. Size the supply for both reels: 2 x 72 W x 1.25 = 180 W. |
| 20 m or more | Split the run into 5 m (12V) or 10 m (24V) sections, each with its own feed pair; join the sections with a connector so the light is continuous, but keep the feeds separate | One 24V 300–350 W supply with four feed pairs, or two 150 W supplies each feeding two sections. Above about 300 W use two supplies. |
| Two supplies, two sections | Supply 1 to section 1 only, supply 2 to section 2 only, cut at a cut mark where the first supply reaches its limit | Do not join the two V+ lines or the two V- lines. (Addressable strips are different: the GNDs must be common.) |
| Several short strips on one adapter | A 1-to-2, 1-to-4 or 1-to-8 DC splitter into the adapter, each strip on its own branch | Total watts within the adapter rating. A splitter shares power, not control: all strips switch and dim together. |
| Two RGB reels on one controller | Both reels to the controller output in parallel: a 4-wire splitter cable, or two cables to the same terminals | Check the controller rating: 2 x 5 m of 14.4 W/m at 24V is 6 A total, 2 A per channel; most controllers are 6 A per channel. At 12V keep each branch at 5 m, at 24V each branch can be 10 m. |
These layouts are drawn by the SuperLightingLED engineering team; click one for the full notes.
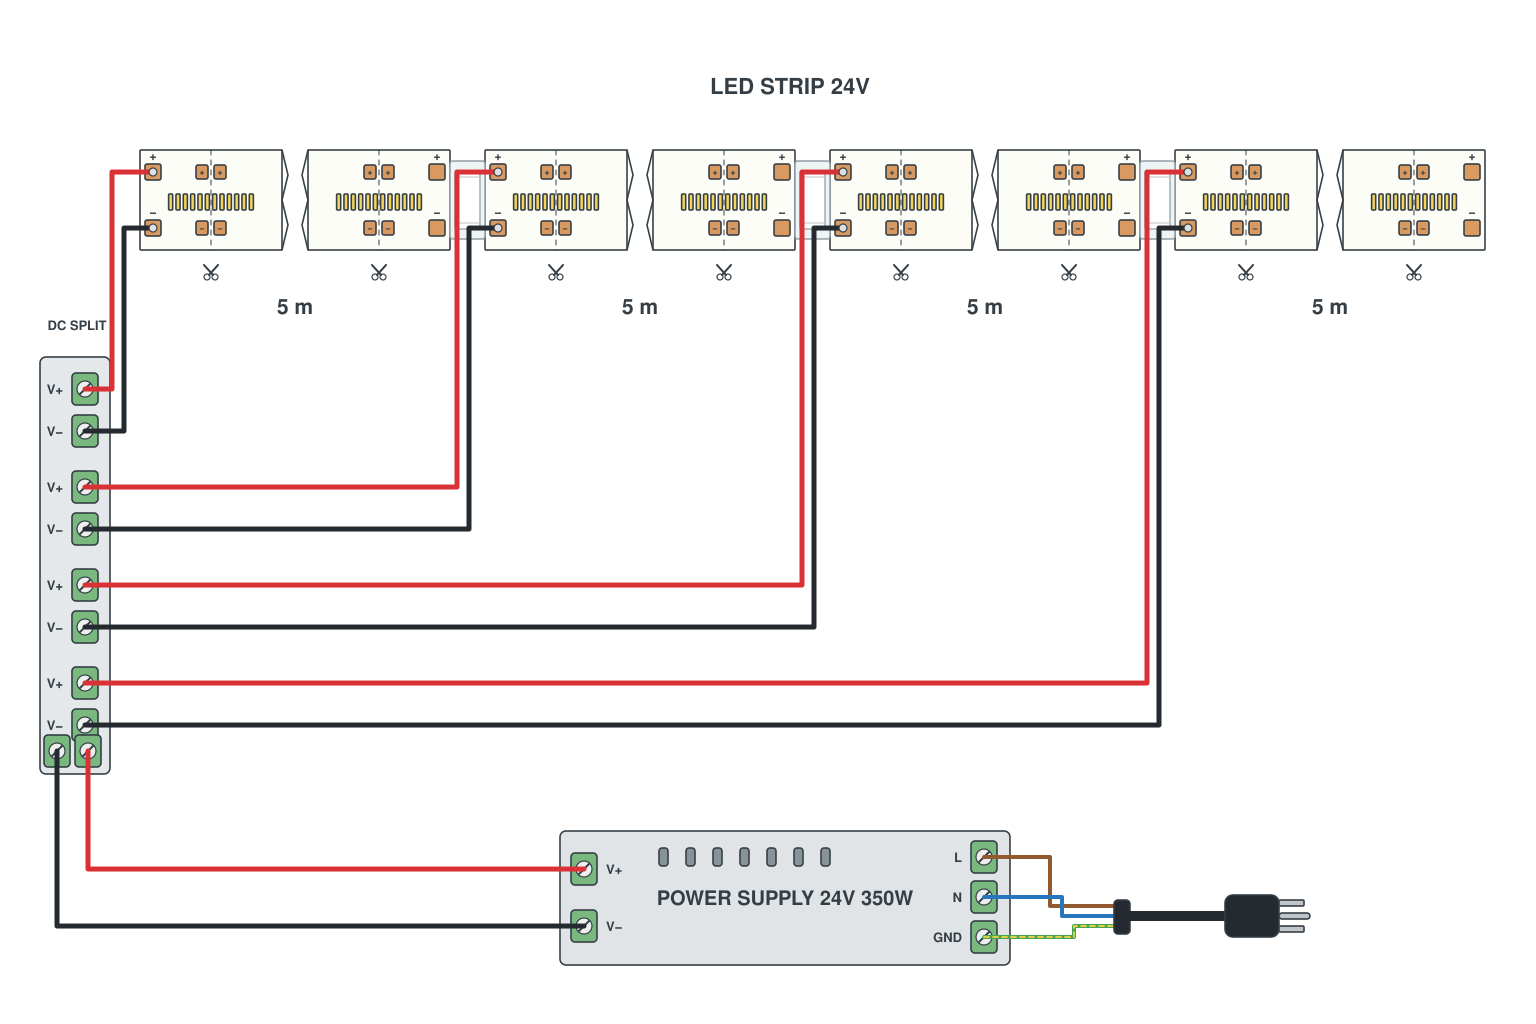
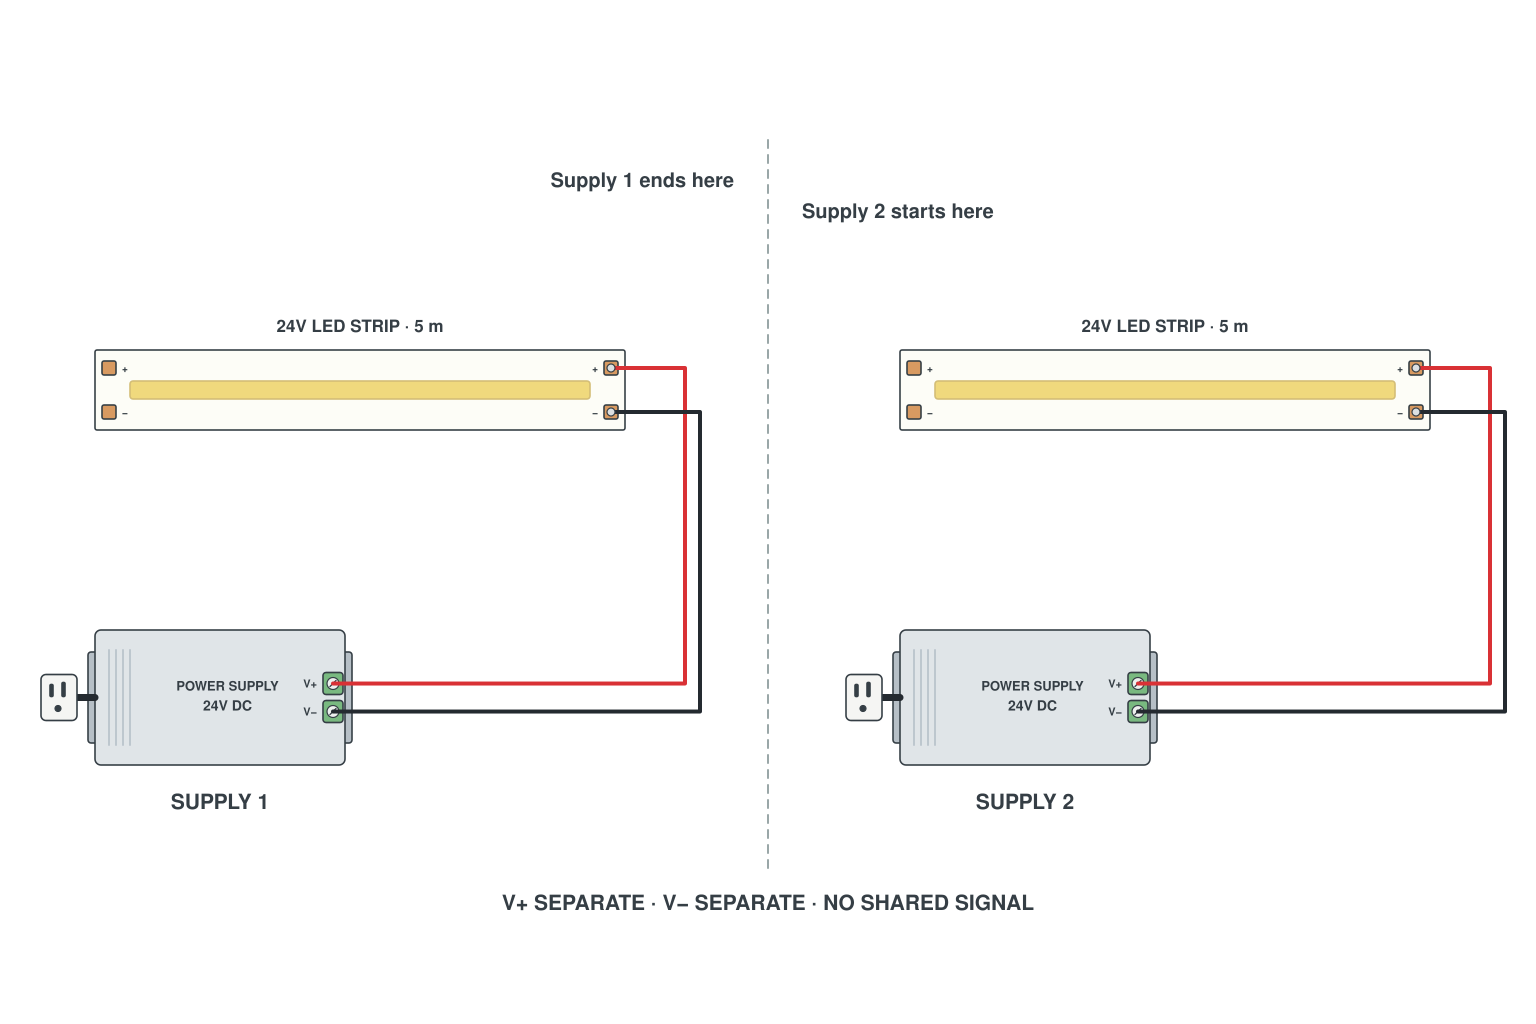
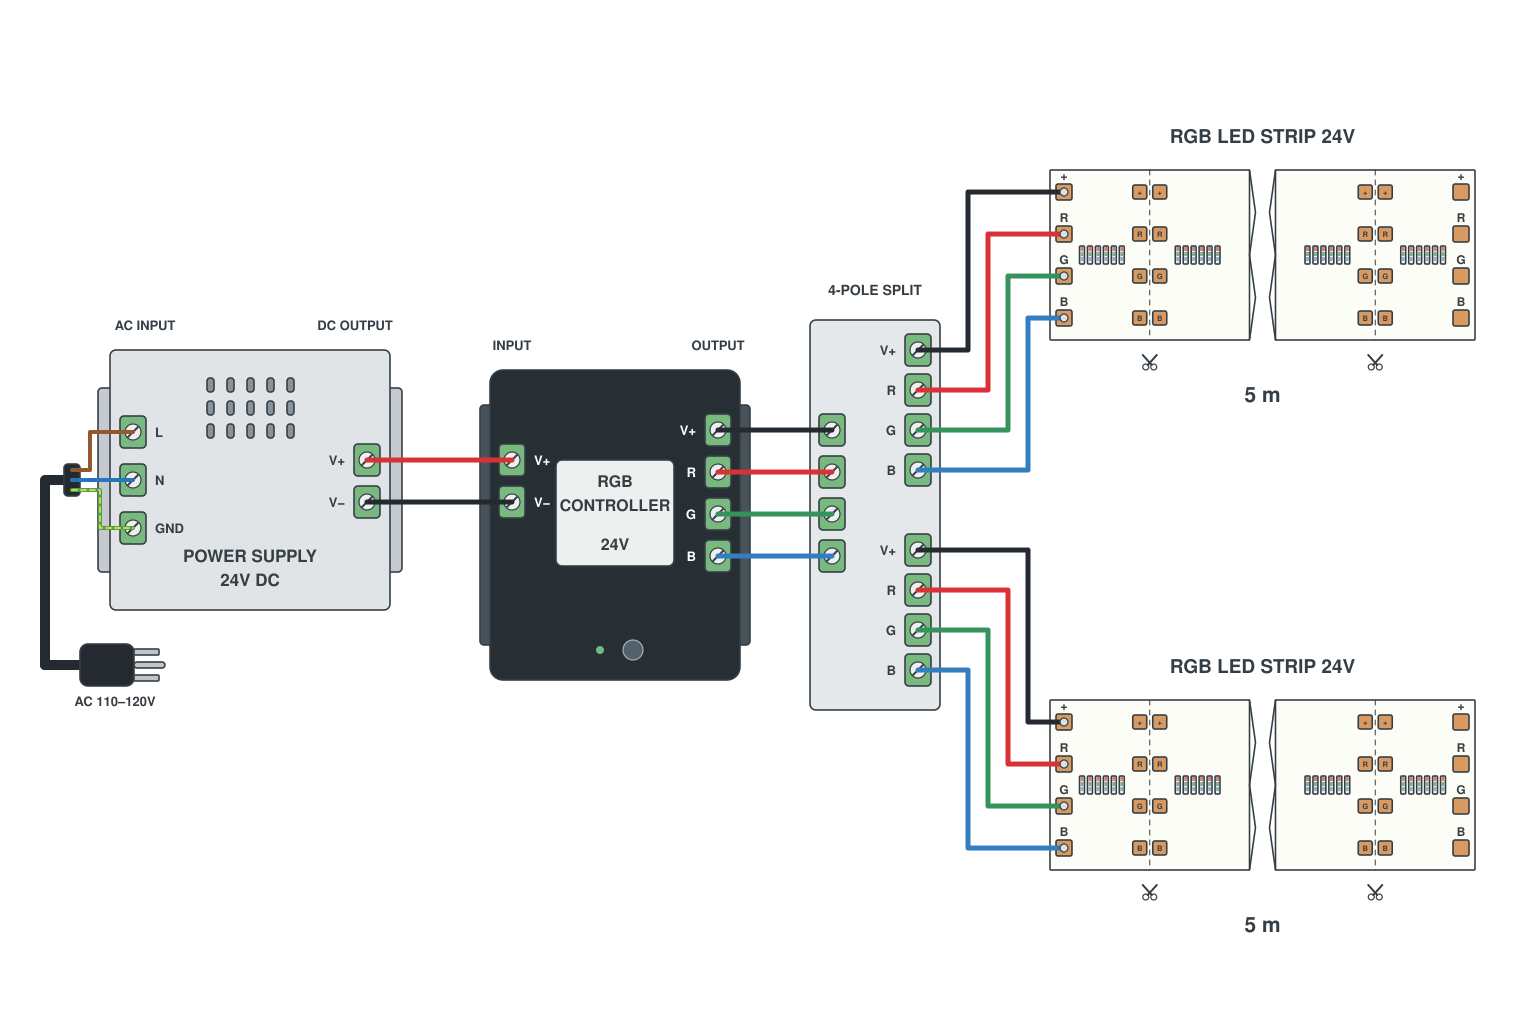
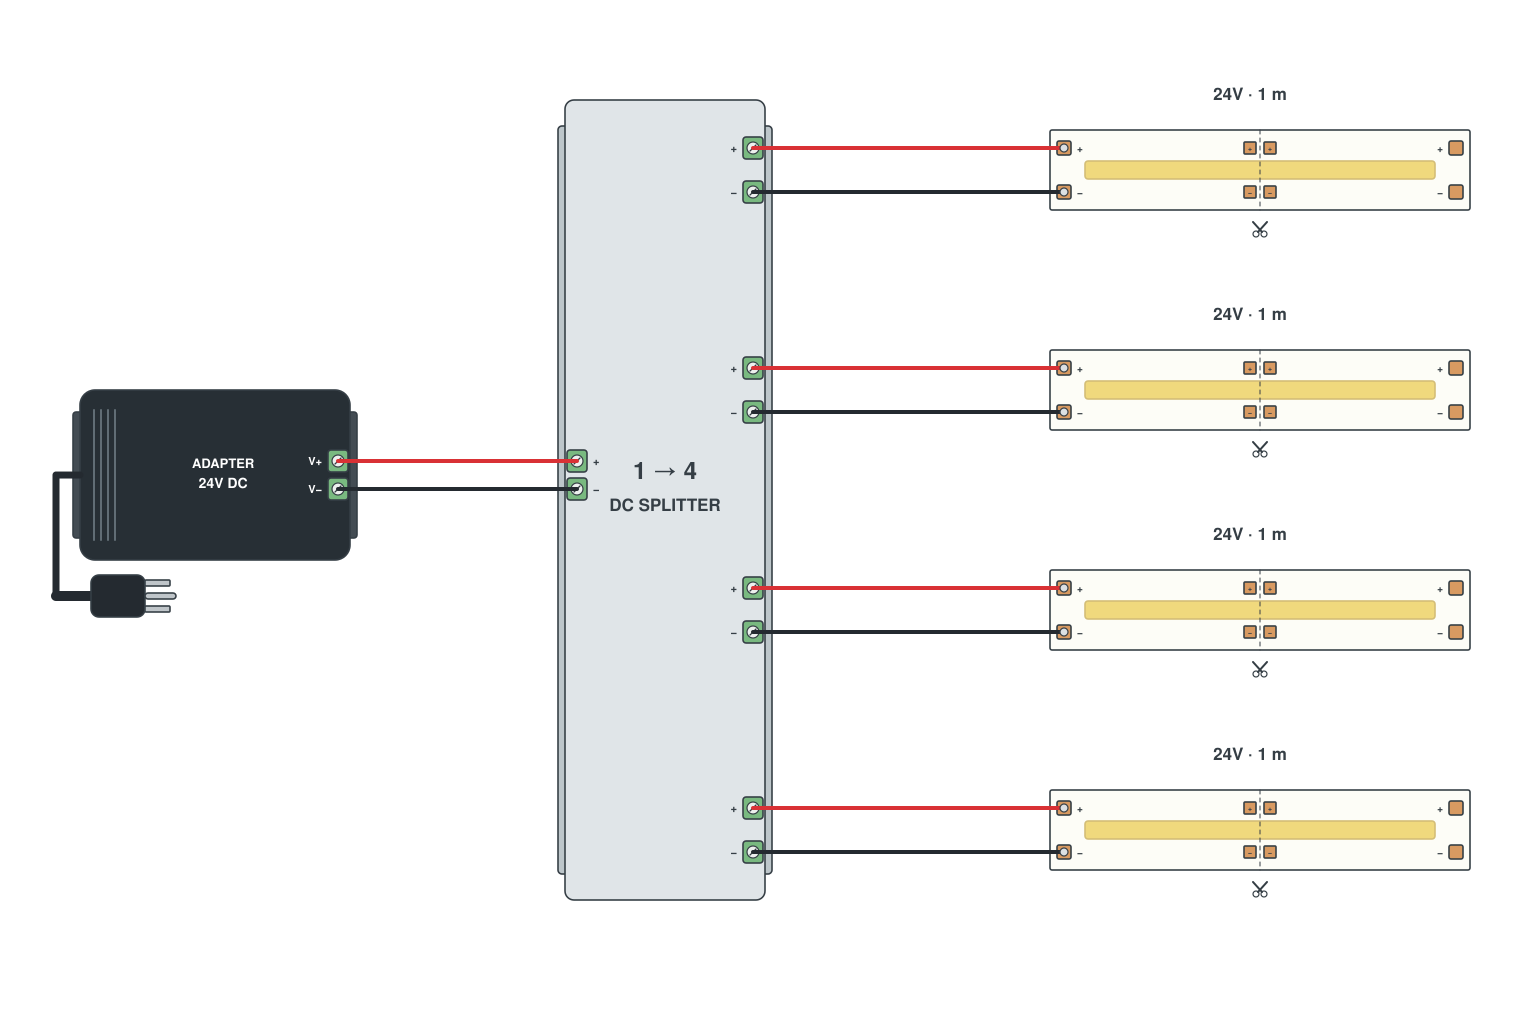
More layouts: 2 x 5 m in parallel, one continuous run fed at both ends, and an amplifier every 5–10 m for RGB runs over 10 m. To size the supply, see how to calculate power for LED strip lights.
How many led strip lights can you connect?
While connect multiple LED strip lights, the first thing we should pay attention to is the maximum number of connections of the strip lights. In general, the number is determined by led power supply. The total power cannot exceed the power of the power supply. And the power of the power supply is preferably 1.2 times of the total power. It is the rule 80%. It can improve the service life of the power supply and the LED strip light, and avoid burning to result in a short circuit.
*Calculating power for your LED strip lighting step by step: How to calculate power for led strip lights?
Connecting LED strip lights: FAQ
How do you connect two LED strips together?
Cut both strips at a cut mark, then join them with a solderless strip-to-strip connector made for the strip width and pad count, or solder wires to the pads. If the strips are apart, put a strip-to-wire connector on each end and run an extension cable between them. Only join strips of the same type and voltage.
Can you connect LED strips without soldering?
Yes. Slide the open end of the LED strip into the connector and close it to lock it in. Connectors are simple and easy to remove, but if the strip power is too high it can burn the connector, and a clip can make poor contact.
How many LED strips can you connect together?
The power supply decides. The total power of the strips cannot exceed the power supply, and the supply is best rated at 1.2 times the total (the 80% rule). For even brightness, feed each 5 m section at 12V, or each 10 m section at 24V, with its own pair of wires.
Should I connect LED strips in series or in parallel?
Join them end to end if you want continuous light, but feed the power in parallel. Strips connected in series from one feed get darker towards the end because of voltage drop; run a separate pair of wires from the supply to the start of each strip, or use a splitter cable when the strips start near the supply.
How do you connect waterproof LED strips?
Expose the pads first: peel the coating on IP65 strips, slide the sleeve back on IP67 strips. Use an IP67 clip or double clip and seal it with the silicone cap or heat-shrink. IP68 strips are re-sealed with an end cap and silicone. Every cut on a waterproof strip is a new joint that has to be sealed.
Connectors and cables to join LED strips
2-Pin Single Color LED Strips PartsConnectors for single color strips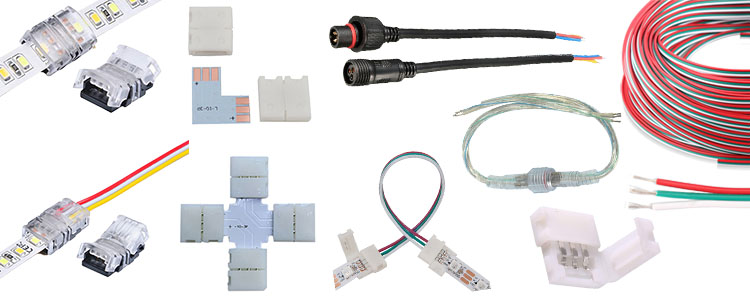 3-Pin CCT LED Strips PartsTunable white strips
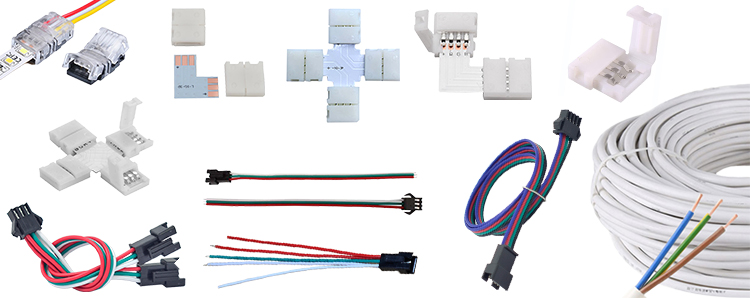 3-Pin Addressable LED Strip PartsSingle-signal pixel strips
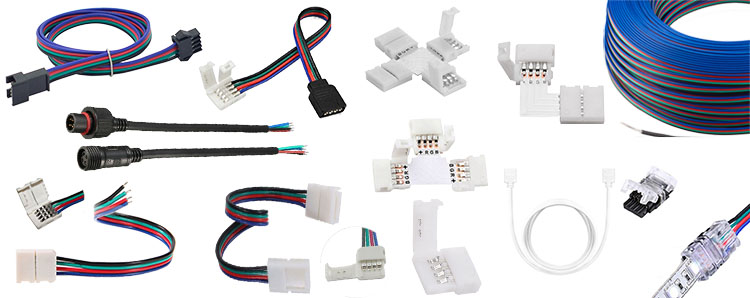 4-Pin RGB LED Strips PartsRGB connectors and cables
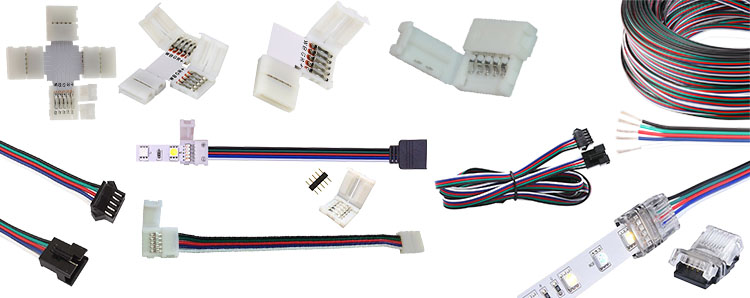 5-Pin RGBW LED Strips PartsRGBW connectors
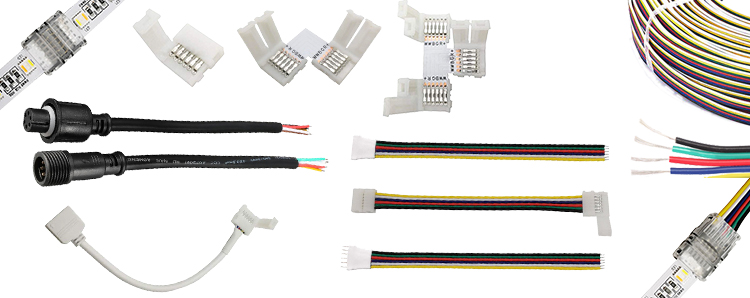 6-Pin RGB+CCT LED Strips PartsRGBCCT connectors
 COB LED Strip Light ConnectorsClips for COB strips
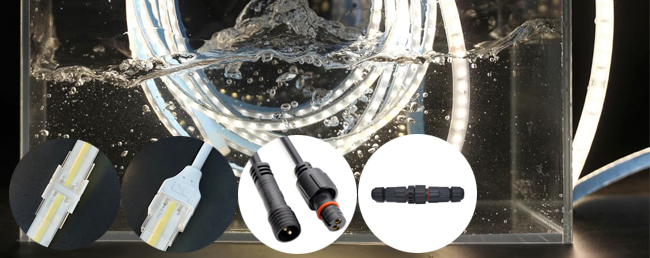 Waterproof IP68 Connector SeriesSealed outdoor joints
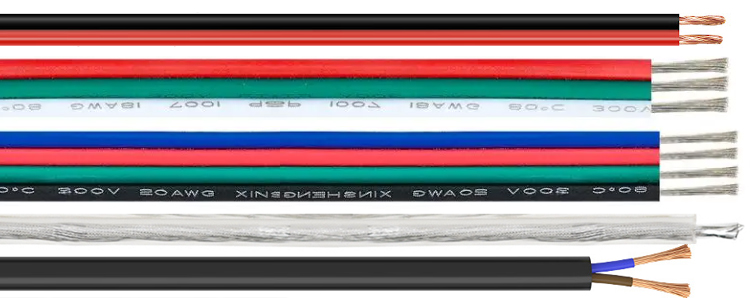 LED Light Cord Extension CableBridge the gap between two strips
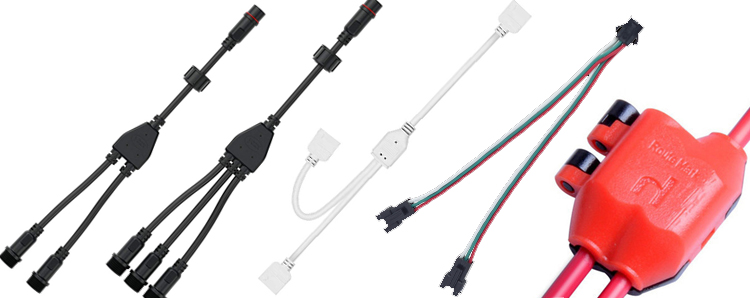 LED Light Wire Splitter CableOne supply, several strips
Send us a photo of the pads at the cut mark, or the strip model and the lengths you need, and the SuperLightingLED team will match the connectors, cables and power supply. Rather not wire anything? We can send a pre-wired plug-and-play kit. Standard orders such as accessories and controllers ship within 24–48 hours; LED strip orders follow the production lead time shown on the product page. Contact our team · Browse all LED strip accessories