
Plaster In Drywall Channels
63 products
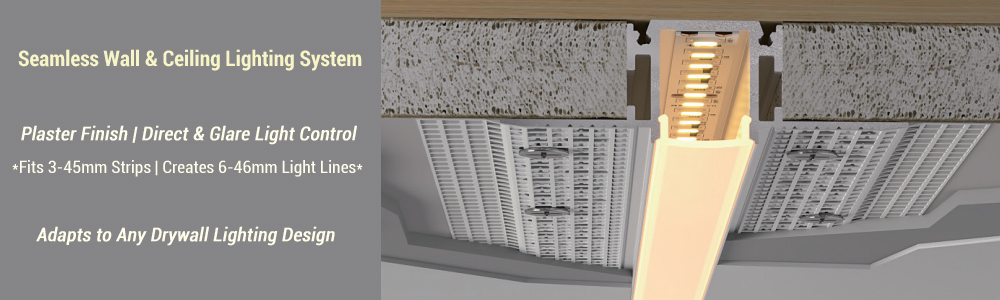
This section showcases all models within our wall and ceiling LED profile series specifically engineered for plaster installation. Also known as plaster-in, plaster-over, mud-in, drywall mud-over, taped and bedded (or taped & floated). Crafted from durable aluminum, these drywall LED strip channel profiles feature single- or double-wing perforated designs that screw directly into the wall / ceiling substrate. Following plaster or sheetrock application, they create a perfectly flush, smooth surface with the wall or ceiling.
Selection and Application Guide:
• Our hidden drywall LED channel products offer multiple slot dimensions ranging from 8mm wide × 6mm high / 26mm wide × 6mm high to 59mm wide × 25mm high, accommodating architectural lighting needs from ultra-slim to bold.
• Two standard optical solutions are available: - The flush-mounted diffuser delivers uniform, bright direct illumination with excellent versatility. - The deep-set anti-glare diffuser conceals the light source for precise light control, specifically designed for glare-prone areas like ceilings.
• The system fully supports both straight and curved drywall lighting designs, flexibly accommodating diverse geometric shapes and fluid lines in modern spaces.
For applications requiring heavy materials like gypsum board (plasterboard), tile, wood panel, stone over the profile surface, please refer to our dedicated tile series for matching structural load-bearing solutions.
If you already have preferred LED strips, focus on the “PCB Width Capacity (Inner Width)” parameter in each profile specification. When planning a new LED in drywall recessed lighting system, we recommend systematically matching profile dimensions, optical effects, and strip lights color temperature and density to achieve optimal optical performance and visual integrity.

Soft Grazing Indirect Wall Wash LED Strip Mud-in Lighting Extrusion

Drywall Recessed Cove Light Profile MS-HGD03 - Angled Wall Wash LED Trim

White Large 45 Degree LED Wall Wash Light Profile

Recessed LED Channel for 5mm Strip | Seamless Wall Lighting


MS-HGD9035 Dual-Flange Recessed LED Cove Channel - Glare-Free Lighting

Mud-In LED Channel for 8mm Strips | Seamless Recessed Lighting

Seamless Plaster-in LED Channel | Narrow Light Beam for 10mm Strips

53x12mm Bendable Mud-in LED Channel For 10mm Tape Lights

Plaster-In Flexible LED Lighting Channel - 10mm Slim Light

Plaster In LED Profiles for Seamless 10mm Strip Lighting


Architectural Series 6012 Trimless Curved LED Channel


15mm Light 3D Bend Aluminum LED Light Strip Rail Plaster LED Profile


Plaster In LED Channel for 15mm Double Row Rope Lights

Trimless Mud-In Flexible LED Profile - 16mm Light
Seamless Plaster Finish LED Channel Lighting
Plaster-in LED channels are designed to create a completely seamless lighting appearance by integrating the LED strip aluminum profile directly into plastered walls and ceilings. After the profile is installed and covered with plaster or joint compound, only the continuous light line remains visible while the aluminum structure disappears into the architectural surface.
The integrated flange design provides a stable connection between the LED strip channel and the surrounding building material. The perforated wings allow plaster, mud, or finishing materials to bond securely with the profile, preventing gaps and creating a smooth transition between the lighting channel and the wall or ceiling.
This makes plaster-in LED profiles an ideal solution for minimalist interiors where clean lines, hidden structures, and architectural lighting effects are required.
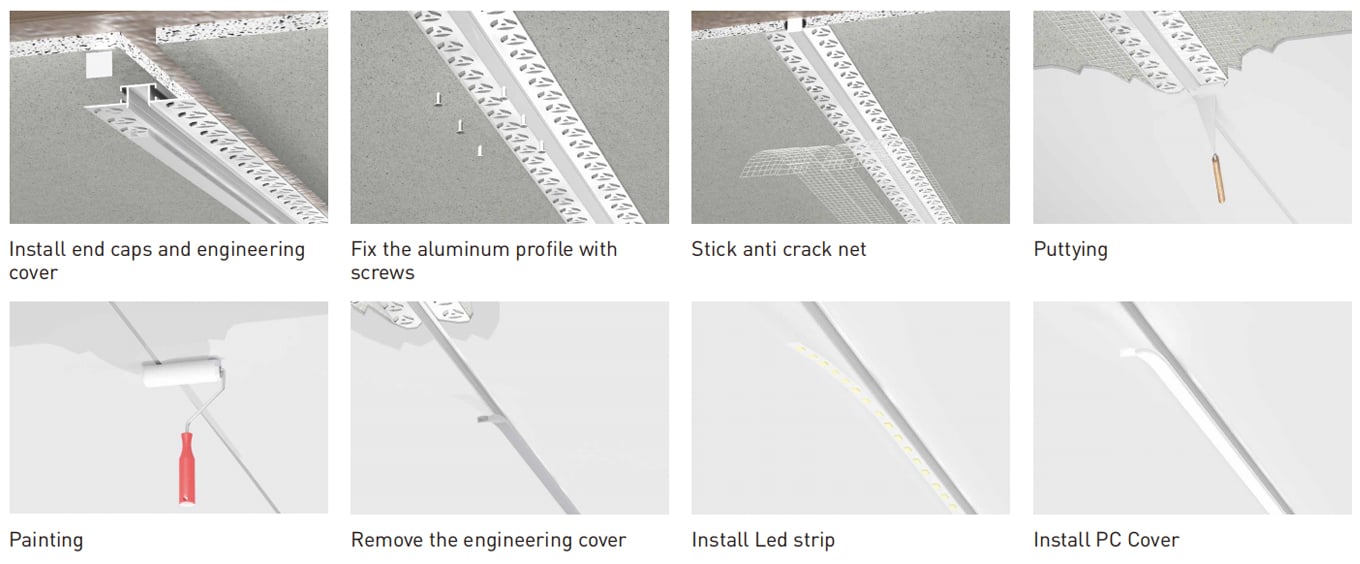
Drywall LED Channel Lighting for Flush Ceiling & Wall Designs
Drywall LED channel systems are widely used in modern ceiling and wall designs to achieve trimless linear lighting effects. These profiles are installed together with gypsum board or drywall structures, allowing LED strips to become part of the architecture rather than an exposed lighting fixture.
Available with single-wing or double-wing designs, drywall LED channels provide reliable mechanical support during installation. The wider flange structure improves stability and helps maintain a flat surface after drywall finishing.
Typical applications include:
- Recessed ceiling linear lighting
- Wall reveal lighting
- Cove lighting
- Perimeter ceiling lighting
- Architectural accent lighting
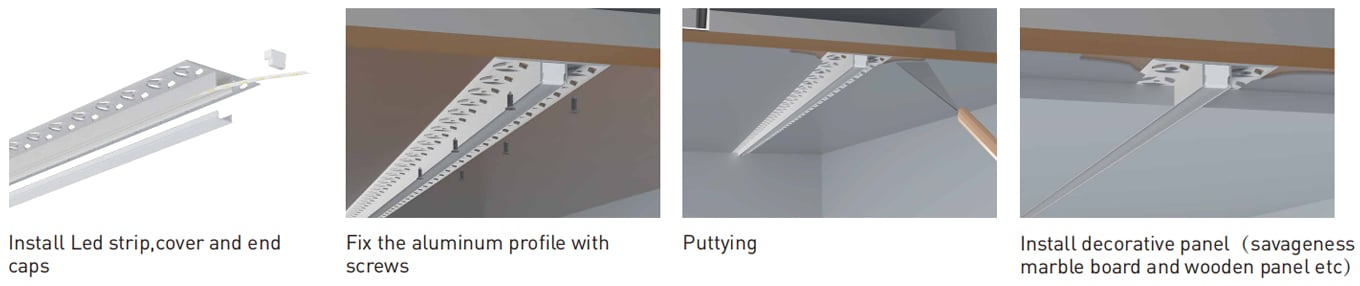
Tile LED Channel Lighting for Seamless Bathroom & Interior Applications
Tile-integrated LED channel lighting provides a refined solution for spaces where LED profiles need to blend with ceramic, stone, or other hard surface materials.
By embedding the aluminum channel into tiled walls or floors, designers can create continuous lighting lines without visible frames or exposed edges. The profile structure helps maintain accurate positioning during tile installation while protecting the LED strip from external impact.
Tile LED channels are suitable for:
- Bathroom wall lighting
- Shower niches
- Kitchen backsplash lighting
- Floor transition lighting
- Decorative tile feature walls
The flange structure creates a strong connection between the LED profile and tile surface, ensuring a durable and seamless finish for long-term interior applications.
Wood Panel LED Channel Lighting for Modern Interior Design
Wood panel lighting has become increasingly popular in residential and commercial interiors because it combines natural materials with modern linear illumination.
LED strip light channels installed into wood panels create a flush lighting effect where the light appears to emerge directly from the surface. The profile can be recessed into wooden walls, ceilings, cabinets, and decorative panels to create elegant lighting details.
Common applications include:
- Wooden feature walls
- Hotel wall panels
- Decorative ceiling panels
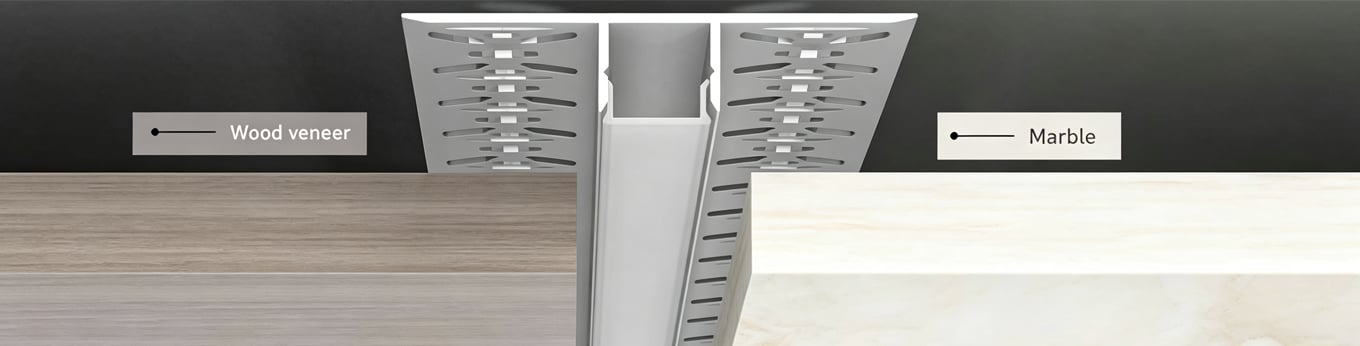
Stone & Decorative Surface Integrated LED Lighting
LED channels can also be integrated into stone, marble, and other decorative surface materials to create premium architectural lighting effects.
For luxury residential projects, hotels, retail spaces, and exhibition areas, recessed LED profiles provide precise light lines that enhance material textures while maintaining a clean and seamless appearance.
The aluminum profile acts as both a structural mounting system and a heat dissipation solution, ensuring stable LED performance in high-end architectural applications.
One LED Channel System for Multiple Architectural Surfaces
SuperLightingLED Plaster-In LED Channels provide a complete solution for integrating linear LED strip lighting into different architectural materials.
Whether installed in plaster walls, drywall ceilings, tiled surfaces, wood panels, or decorative stone finishes, these profiles help designers achieve seamless, flush-mounted lighting with reliable installation performance.
By combining aluminum heat dissipation, diffuser technology, and secure flange structures, plaster-in LED channels transform LED strips into a professional architectural lighting system.
Frequently Asked Questions About Plaster-In Drywall Channels
Your questions about getting that perfect, trimless line of light, answered by an engineer.
This is the most common point of failure, and it's almost always about proper support and using the right materials. First, make sure the channel is screwed securely to a stud or solid blocking, not just the drywall itself. Use fiberglass mesh tape over the perforated wings, embedding it in your first layer of mud, just like a normal drywall joint. This reinforces the area and prevents hairline cracks from forming as the building settles. Don't skip the taping step; it's critical.
Seeing the individual LED dots is called 'hotspotting.' There are three ways to fix it. First, use an LED strip with a higher density of LEDs. Second, choose a channel with a deeper profile, which moves the diffuser further from the LEDs and blends the light. Third, use a frosted or opal diffuser instead of a clear one. For a completely dot-free look, your best bet is a COB (Chip-on-Board) LED strip, which has no visible dots to begin with. Our guide on diffusing light covers this in more detail.
Aesthetics and installation. A standard recessed channel has a flange or lip that sits on top of the drywall, covering the edge of your cut. It's easier and more forgiving to install. A plaster-in channel has no lip. Its perforated flanges get completely covered by drywall mud, making the fixture totally trimless and seamless with the ceiling or wall. It's a more labor-intensive, higher-end architectural finish.
You miter them, just like crown molding. Use a power miter saw with a fine-toothed blade designed for non-ferrous metals. Cut each channel at a 45-degree angle. When you join them, you'll have a perfect 90-degree corner. For the light itself, you can either carefully bend the flexible LED strip around the corner or, for a sharper result, cut the strip and use solderless corner connectors or solder short jumper wires. This is how you create those sharp squares and rectangles of light you see in designs.
Absolutely. That's a great application for these. We have specific plaster-in profiles designed for this. One wing gets mudded into the drywall, and the other edge is designed to butt up cleanly against tile, wood paneling, or stone. It creates a very clean, integrated line of light right at the transition point. It's often used for wall-to-floor transitions or for washing a tile feature wall from the edge of the adjacent drywall.
Yes, we do this all the time. A huge part of our business is building custom LED channel lighting solutions. Just send us your requirements.