DMX501 DMX Touch LCD Screen Master Control, 36 Channel Intelligent Lighting Control System

DMX touch screen main control is a light controller based on an intelligent system. The touch screen adopts the current popular capacitive touch technology and uses the software to virtualize the metal texture control panel. The software is simple to operate and the user-defined settings are easy. Convenient and fast to achieve diverse lighting control effects.


Technical Parameters
Working Temperature: -20~70℃
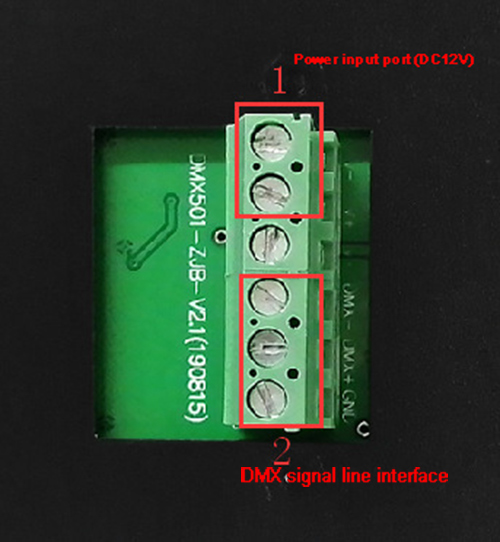
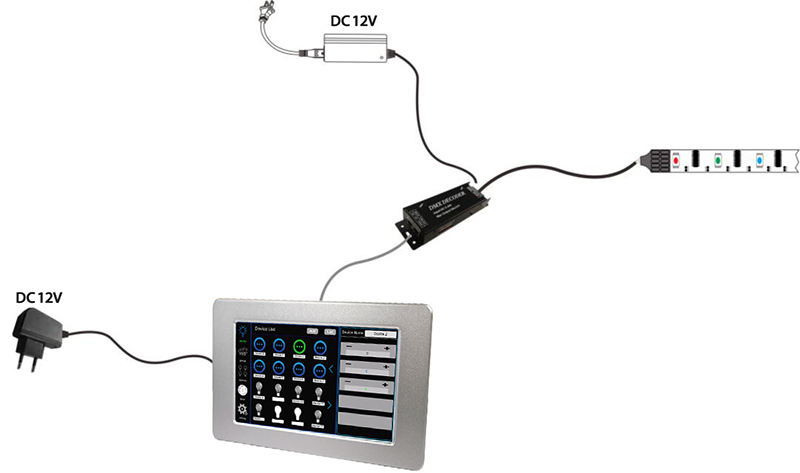
Power Supply Voltage: 12V (error ± 0.2V), 1A
Output: Primary DMX signal (add up to 64 DMX 1 to 5 loop lighting equipment)
Connection Method: DMX signal line
Packing Size: 245*165*60mm
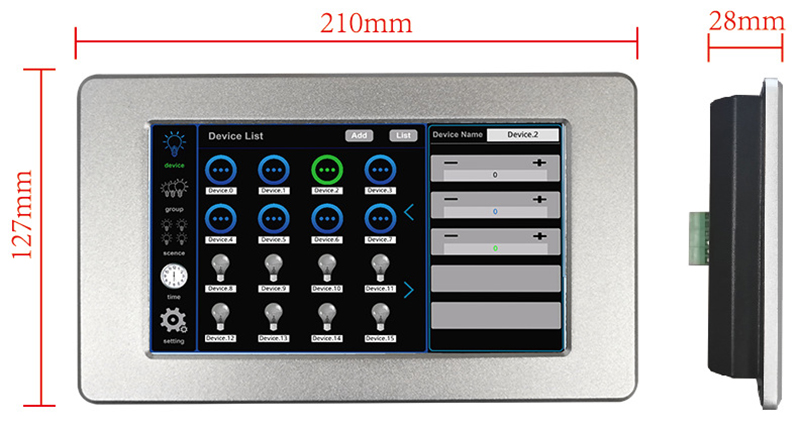
Dimensions: 210mm*127mm*45mm
Net Weight: 721g
Gross Weight: 1050g
Maximum Power Consumption: 12W
External dimension
Interface description
Function introduction
System function area introduction
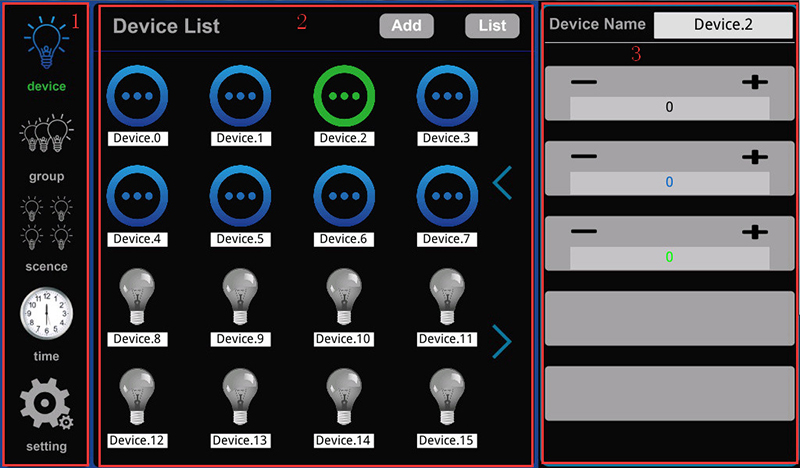
The system has three major areas, as follows:
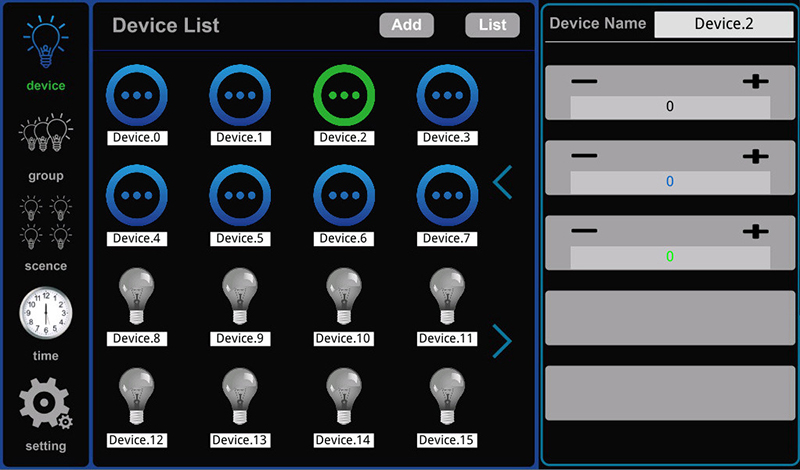
System menu (reference number 1 shown in Figure 1): contains five function buttons: device, group, scene, timer, and setting.
Content panel (label 2 shown in Figure 1): display device information (number of devices, device name), group information (group name, group picture), scene information (scene name, scene picture), timer information, settings Information (brightness adjustment, local restart, local data reset to factory state, lock screen password setting, screen time).
Attribute panel (reference number 3 shown in Fig. 1): display device attribute, group attribute, scene attribute information.
Software function introduction
device control: select a terminal device to control, such as controlling the brightness of the light.
Group control: select a group to add or remove devices, and control the brightness of the devices in the group as a whole. When performing group control, the brightness of the devices in the group will become the same.
Scene control: select a scene to add or remove the device, the brightness of the scene device can be different, more flexible than group control, the scene can be applied to the timer
time timer: select a timer to set (time, scene name), after the timer starts, the corresponding scene will be executed at the set time. All timers can be turned on or off at the same time, or a timer can be turned on or off individually.
Setting: brightness adjustment; restart the machine, click to restart immediately, no prompt; the machine data will be restored to the factory state (a password will be required, which can be the default password (686890) or a user-defined password); lock screen password; Breath time (in seconds).
Introduction to software operation
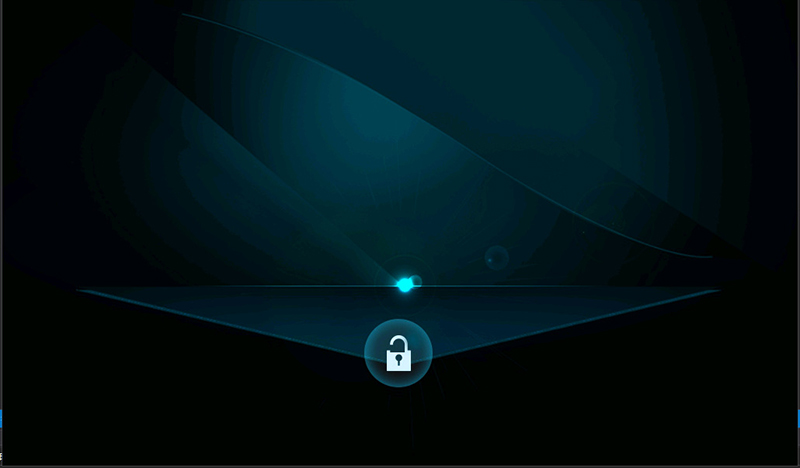
You need to click the lock button (as shown in Figure 2) in the interface to enter the unlock password to enter the user interface. The unlock password can be the initial password (686890) or a user-defined password. After entering, press back Confirm by pressing the key; if the password is empty, click the enter button.
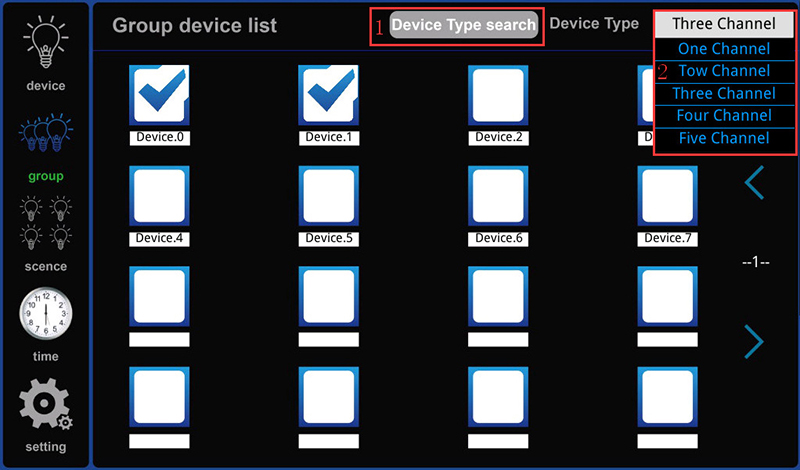
group is the group page, click the "group" button to enter the group page, as shown in Figure 6.
"Group name" shows the group name of the currently selected group (the group icon is displayed in green after the group is selected, and the currently selected group can be renamed here); the red box 1 is the brightness adjustment area, which can be passed through "+" And "-" buttons to fine-tune the brightness of the currently selected group, or you can adjust the brightness of the currently selected group through the slider; box 2 is the button to enter the group configuration page. When the group is selected, click this button to enter the group configuration page.
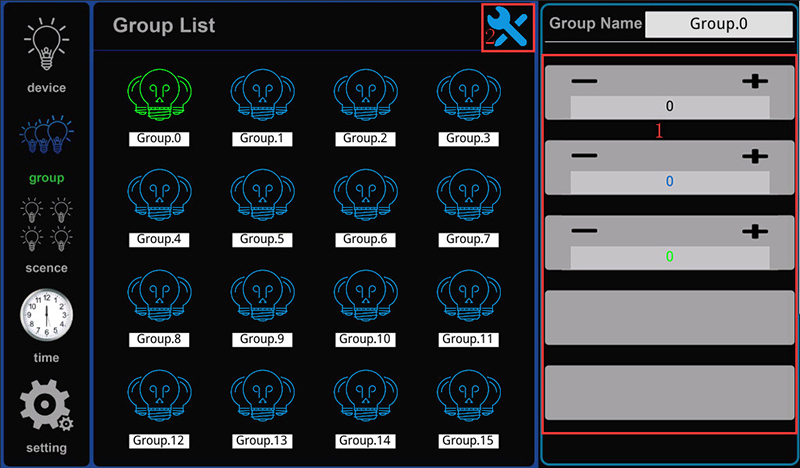
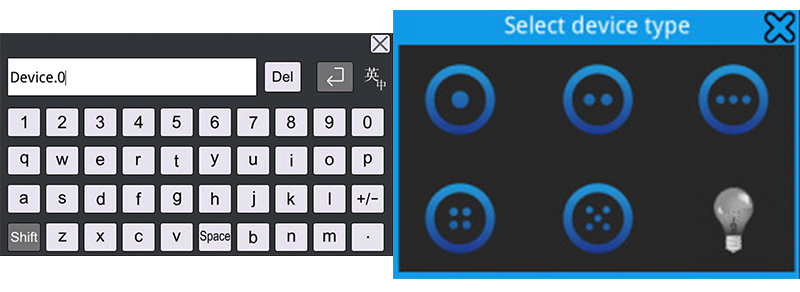
In the group configuration page, the device can be added to the currently selected group. undefined means that the device has been added to the currently selected group. undefined means that the device has not been added to the currently selected group. "Device Type" shows the device type of the currently selected group. The red box 1 on the page shows the device type selection. After clicking, the device selection list in box 2 will pop up. The small blue arrow on this page can also turn the page. After the operation is completed, click the "group" button to return to the group page.
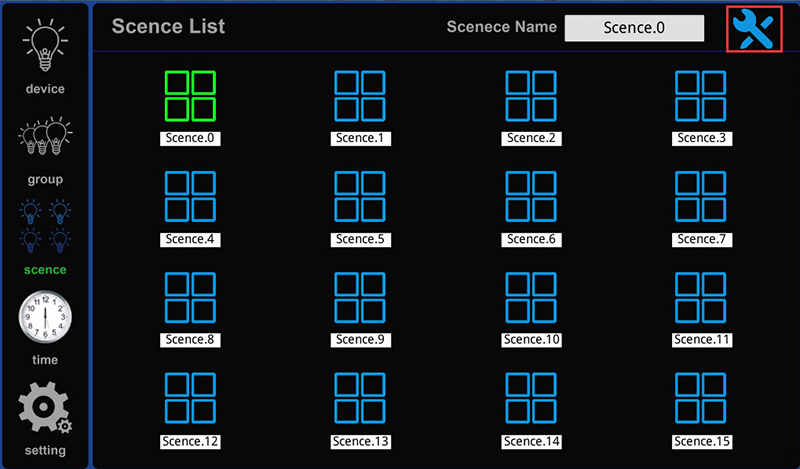
scene is the scene page, click the "scene" button to enter the scene page, as shown in Figure 8.
Click the button in the box in Figure 8 to enter the scene configuration page, "scene name" shows the name of the currently selected scene, and you can also rename the currently selected scene here (if the scene is selected, the scene icon will be Turns green; blue if unselected).
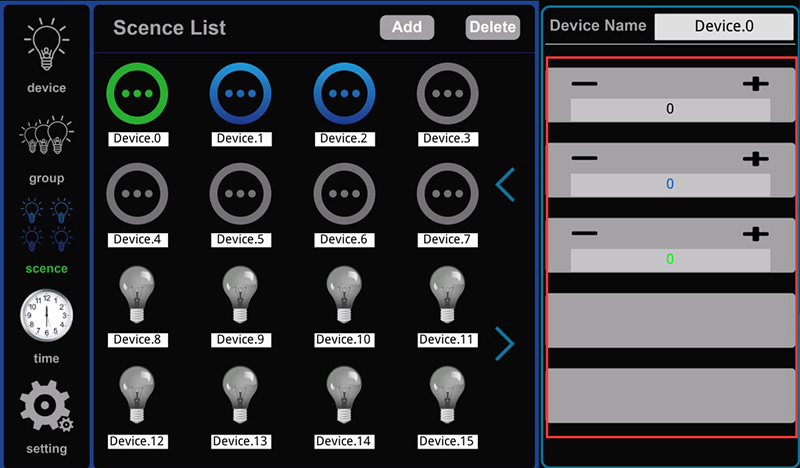
Click "ADD" and "Delete" in the scene configuration page to add or delete the device in the currently selected scene (as shown in Figure 9). If the device has been added to the current scene, the device icon will be displayed in blue; If it is not added to the current scene, the device icon will be gray. Click the gray device icon and then click Add to add the device to the current scene, and the color of the device icon will change from gray to blue. Similarly, click the blue device icon and then click Delete to delete the device from the current scene.
The "Device name" in the scene configuration page shows the name of the currently selected device in the current scene (the selected device icon is displayed in green). The red box in Figure 9 is the device brightness adjustment area of the currently selected scene. The two buttons "+" and "-" fine-tune the brightness of the device in the currently selected scene, or you can adjust the brightness of the currently selected group through the slider. The small blue arrow on this page can also turn the page. After the operation is completed, click the "group" button to return to the group page.
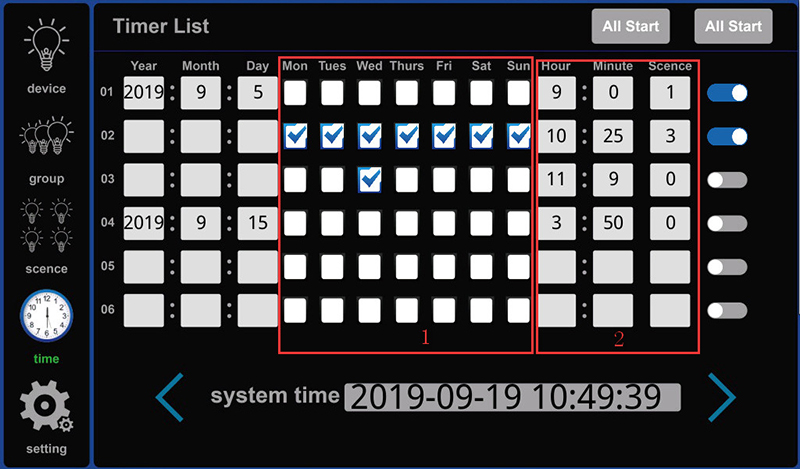
Time is the timer page. Click the "time" button to enter the timer page, as shown in Figure 10.
The "Year", "Month" and "Day" options on the timer page are filled in the year, month and day. If the year, month and day are filled in, the week option cannot be selected for the date in the same set of timers (box 1 is the week option ); Similarly, if the week option is checked, the date in the same group of timers cannot be selected to fill in the year, month and day. Box 2 is the time when the timer needs to be triggered and the scene selection that needs to be triggered.
The "undefined" button is a timer switch. When the button is blue, the timer is turned on (if the trigger date is the year, month, and day, the timer is triggered once, and if the week is satisfied, the adjustment can be triggered), and the gray is not turned on. The "system time" at the bottom of the page shows the system time. The blue arrows on the left and right sides of the system time are the page-turning buttons of the timer page. You can turn the timer page (24 timers in total). At the same time, long-press here to modify the system time. If you do not need a timer option, you can clear the option, select the option that needs to be cleared, click the box below the option to pop up the page in Figure 9, and choose Enter. “All On” and “All Off” are all on/off timer buttons.
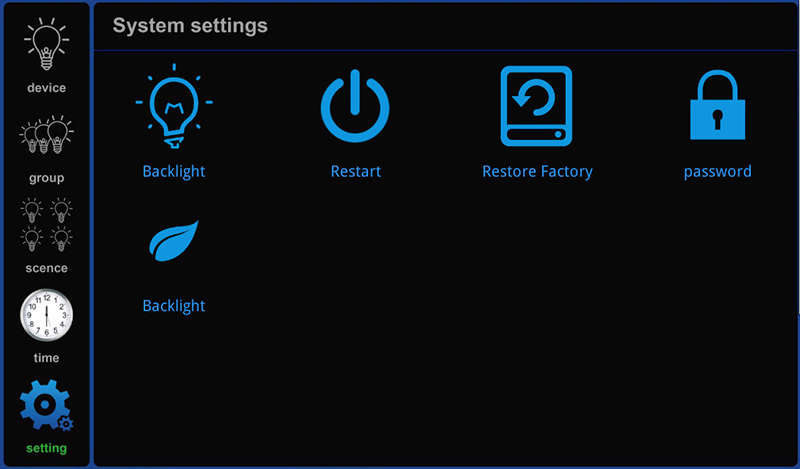
Setting is the system setting page. Click the "setting" button to enter the system setting page, as shown in Figure 10.
The "Backlight" icon is the brightness adjustment button of the local user interface.
The "Restart" icon in the local system restart button. It will automatically restart immediately after being clicked, and no prompt will appear.
The “Restore Factory” icon is a button to restore the factory settings (the machine data is restored to the factory state). After clicking it, a password will be required. The password can be the default password (686890) or a user-defined password. If the password is entered incorrectly, nothing will happen on the interface after clicking the confirm button. If the password is entered correctly, the setting interface will return after clicking the confirm button.
The "password" icon is a password setting button. If the user needs to change the password, he can click this button to modify it.
The “Screen time” icon is a breath-hold time button, which can be dimmed to set the breath-hold time of the unit (time unit in seconds).
Typical application
These images were taken with Canon EOS 5D Mark IV and the studio light source is provided by Ra 98's full spectrum LED strip to realistically reproduce the colors of the item itself. All copyrights are created by the superlightingled team, please feel free to browse and download if you are a registered user!


Here you can learn anything about led strip lights, find the part you are intrested in to learn more knowledge. There are knowledge parts of led strip lights, power supply, controller, accessories, and how to connect led strip lights, etc. You can also watch our thousands of demo video .
Led strip lights
►Everything you need to know before you buying led strip lights
| Top 6 Considerations Before Buying LED Strip Lights 1. Where do I want to place the LED strip lights? Indoor or outdoor? • What are waterproof led strip lights? • How to cut and connect waterproof led strip lights? 2. How much LED brightness do I need? 3. The working voltage is available? • 5V VS 12V VS 24V led strips • AC VS DC 4. How long is the LED strip light suitable for my project? 5. Do I need an LED light controller to adjust the LED color and brightness? 6. How to power the LED strip lights? 1. How do led strip lights work? 2. How long can you run an LED strip? 3. How long do LED strip lights last? Is it worth getting led strip lights? 1. Do LED strip lights use a lot of electricity? 2. Why are LED lights energy efficient? 3. Are LED Strip Lights sustainable? 4. What are the pron and cons of led strip lights? 5. Precautions for led strip lights 1. Do LED strip lights overheat? 2. How do you stop LED strips from overheating? 3. Can LED strips catch fire? 4. Is it safe to sleep with LED strip lights on? What are the types of led strip lights? Flexible led strip lights VS rigid led strip lights - 1. What are flexible led strip lights? 2. What are rigid led strip lights? 3. What happens if you bend LED strip lights? 4. What is the difference between flexible led strips and rigid led strips? 1. Can you cut led light strips? 2. What happens if you cut an led strip? 3. How to cut led strip lights? 4. How to connect RGB color changing led strip lights with a connector? 5. How to know what your led strip light is? How to choose the correct SMD led for your strip? Which is the brightest SMD LED? What does SMD 5050 mean? How many lumens is a 5050 SMD LED? How to know what type of LED strip? What is the difference between 2835 and 5050 LED? |
►COB led strip light
| 1. What is COB? 2. What is the COB production process? 3. Different types of COB strip lights 4. What is the difference between COB and SMD led strip lights? 5. What is the difference between COB and LED? 6. Are COB led strips better? 7. How to cut and connect COB led strips? 8. How to install COB led strip lights? 9. Can COB light strips use aluminum channels? 10. Why choose superlightingled? |
►Led neon lights
| 1. What is led neon light? 2. What are neon led lights used for? 3. Are led neon lights good? 4. How to choose led neon rope lights? 5. Are led neon ropes use DC or AC? 6. Can you change the light-emitting angle or the luminous way of neon led strip? 1. How to cut led neon lights 2. Can led neon lights be connected? 3. Easy 7 steps to make led neon lights 4. How to install led neon rope? |
►Addressable led strip
| Ultimate Guide to Choosing the Right Addressable LED Strip What is an addressable LED strip? Can you cut addressable LED strips? How to judge if an LED strip is individually addressable? How to choose the best DC12V addressable led strips? How to choose the best DC5V digital led strips? How to choose the right IC for your project? Which IC is most commonly used? How do I know my IC type? How do I know if my IC is good or bad? How many types of IC are there? |
►Color, color temperature, and CRI
| The Color Difference Between Warm White 2700K, 3000K, 4000K, 6000K Pure White and 7000K Cool White 1. What is color temperature? 2. What color temperature is right for me? • 2700K VS 3000K • How obvious is the difference between 2700K and 3000K? • Warm White 3000K VS Natural White 4000K VS Daylight White 6000K • Warm White VS Cool White 3. Enjoy 2700K, 4000K, 6000K 4. Further Reading: How to install Warm White LED light strip? How to choose the right color for your led strip lights? - 1. How many colors are in LED strip lights? 2. What do LED light colors mean? 3. Why do white LED light turns to yellow? 4. Why are your led strip lights not the same color? 5. What is the most relaxing color for LED lights? 6. What color led lights is best for sleeping? 7. Are led lights bad for your eyes? 8. Is cool white or warm white better for eyes? 1. What is the best color temperature? 2. Does color temperature keep the same as time goes by? 3. What color temperature is best for night? 4. Led strip lights about color temperature,CCT VS RGBW VS RGBCCT; What is color rendering index? 1. What is CRI in led lights? 2. How to choose the right CRI when buying led strip lights? 3. What is the relationship between CRI and brightness? 4. Is higher CRI better? High CRI VS Low CRI; 5. How to find CRI value? |
Led strip light connection
| How to connect led strip lights? 1. How to connect led strip lights together? 2. How to connect LED light strips without connectors? 3. How to solder wires to LED strips? 4. How to connect LED strips without soldering? 5. Which one is better between soldering and using a connector? 6. How to connect mutiple led strip lights? 7. How many LED strip lights can you connect? How to connect led strip to the power supply? 1. Ensuring the working voltage and power first 2. How to hardwire led strip lights? 3. Can I connect multiple LED strips to the same LED power supply? How to wire led strip lights? How to wire single color led strip lights? How to wire tunable white/CCT led strip lights? How to wire RGB color changing led strip lights? |
Controller for led strip lights
| How to choose led strip light controllers? 1. WIFI controller 2. RF controller 3. IR controller 4. Bluetooth controller 5. Remote control and panel control 6. Single color controller and multi-color controller 7. DMX512 controller 8. SPI controller 9. DALI controller 10. 0/1-10V dimmer 11. Triac series 12. Sonsor series |
Led power supply
| How to calculate power for led strip lights? 4 steps to calculate the power you need Performance And Reasons Of LED Voltage Drop How to choose led strip light power supply? 1. Alternating current power supply VS Direct current power supply 2. Constant current power supply VS Constant voltage power supply 3. How to choose the best led power supply for your led strip light? |
Led strip light installlation
| How to install led strip lights? What accessories will be needed? 1. Adhesive installation for IP20 and IP65 led strip lights 2. How to choose the right led tape? 3. Can IP20 and IP65 led strip lights use aluminum profiles? 4. How to use aluminum profiles? 5. Mounted clip installation for IP67 and IP68 light strips How to install LED sensor stair lights? Lighting Up Your Stairs With LED Strip Lights Ideas How to install led strip lights on TV? How to install led strip lights outdoor? |
Accessories
| How to choose led strip light connectors? 1. Are all LED light strip connectors the same? 2. How do LED strip lights connectors work? 3. What connectors do you need for LED strip lights? 4. What are the different kinds of LED connectors? 5. How to choose the right connector for your led strip lights? Ultimate Guide on Aluminum Profile for LED Strip Lighting 1. What are aluminium profiles used for? 2. Why choose aluminum profiles? 3. Different types of LED aluminum profiles 4. LED aluminum profile VS COB LED strips 5. How to install LED aluminum channels? 6. How To Get Ideal Light Diffuser For Your LED Strip? 7. Add Black Aluminum LED Light Diffusers For Your Home Lighting 8. How To Find The Right Aluminum LED Light Strip Diffuser Channel? |


 (0)
(0)


")


